Sources as Transformations
Centerprise provides an array of source options to read and extract data from. Different source objects can be found in Toolbox > Sources.
Look for the supported sources and data providers here.
For a detailed overview of different source objects in Centerprise, see Setting Up Sources.
Transformations in Centerprise are used to perform a variety of operations on data as it moves through the dataflow pipeline. Centerprise provides an extensive library of built-in transformations enabling you to cleanse, convert, and transform data as per your business needs. Transformations can be found through Toolbox > Transformations. For a detailed review on transformations, see Introducing Transformations.
In this article, we will discuss:
- How various sources in Centerprise can be used as a transformation
- Some common scenarios where you want to use a source as a transformation
While the basic function of source objects in Centerprise is to extract data and bring it to the designer for further integration, a source object can also be used as a transformation function.
Changing a Source object to a Transformation object
To use a source object as a transformation, you will need to:
1. Select the relevant source object from Toolbox > Sources and drag-and-drop it onto the designer.
2. Right-click on the source header and select Transformation from the context menu.
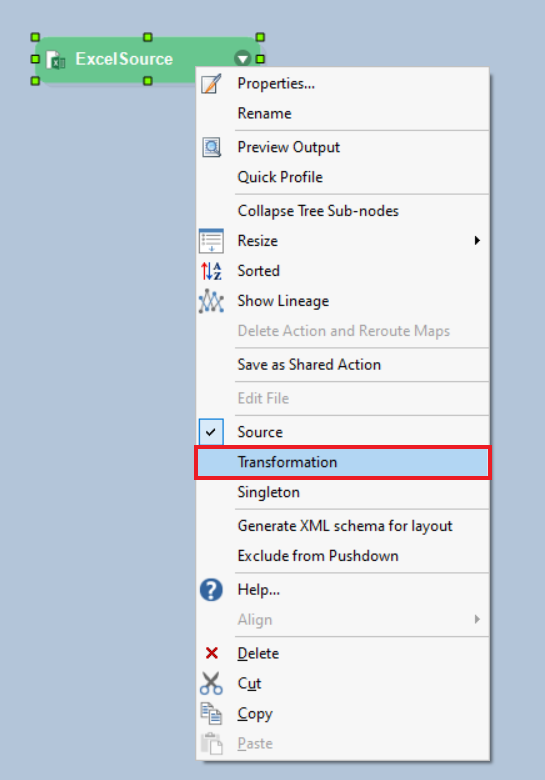
As soon as the Transformation option is selected from the context menu, header color of the source object will change from green to purple. This is because, by default, Source objects in Centerprise are indicated by a green header and Transformation objects are indicated by a purple header. Hence the change in color, when you’re using a source object as a transformation.

Listed below are the source objects that can be used as a transformation:
Note: Some sources in Centerprise cannot be used as transformations. These sources are: ADO.Net Metadata Collections, COBOL source, SQL Query source, Multi-table Query source, and FTP List Directory Contents.
Generally, the source objects are used as a transformation when the source file path is dynamic.
In the next section of the article, we will discuss how to use a Delimited File Source object as a transformation.
Using Delimited File Source as a Transformation
A delimited file source object can be used as a transformation when it is taking a dynamic file path; meaning that it will have multiple files of the same layout processing in a single dataflow or workflow.
1. Drag-and-drop the Delimited File Source object onto the designer.
2. Go to its properties and provide the path for the delimited source file.
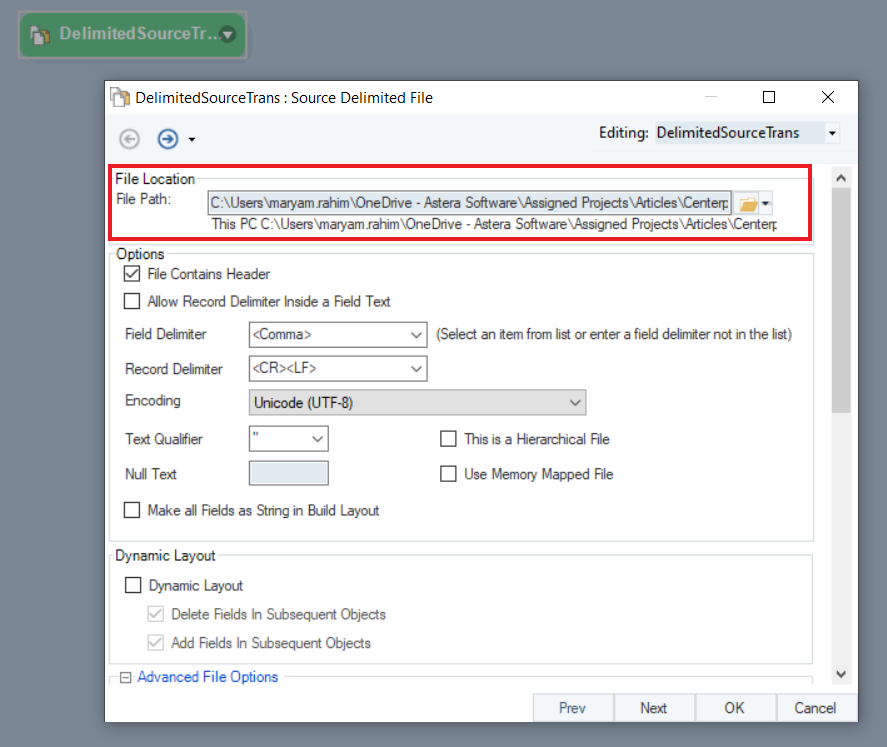
3. Once you’ve provided the file path and configured the properties of the source object, click OK. Now right-click on the header and select Transformation from the context menu, to change it into a transformation object.
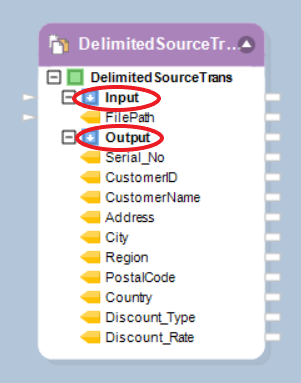
The header of the DelimitedSource object will change to purple indicating that the source object is now converted into a transformation object.
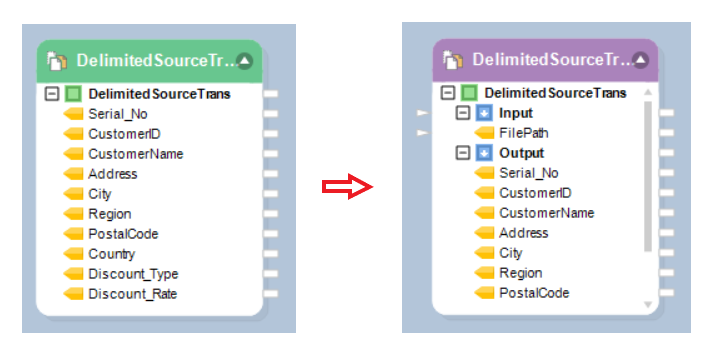
The transformed DelimitedSourceTrans object will now have two nodes:
Input node: To map the file path of the folder that contains delimited files that are to be processed.
Output node: On expanding the Output node, you will see the data fields in the delimited source file. Map these fields to other objects in a dataflow through the output mapping ports.
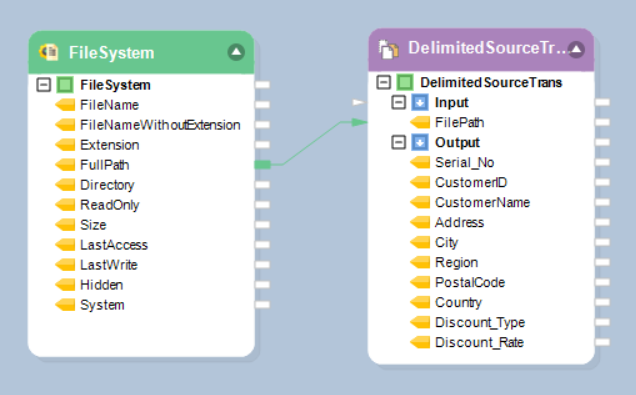
4. Use the File System Item Source to pass the file path information in the input node of the Delimited source-transformation object. Drag-and-drop it from the Toolbox > Sources section.

5. In the File System Source Properties, point the path to the directory and folder where the delimited files are located.

6. Map the FullPath field from FileSystem to DelimitedSource object’s input node (FilePath).
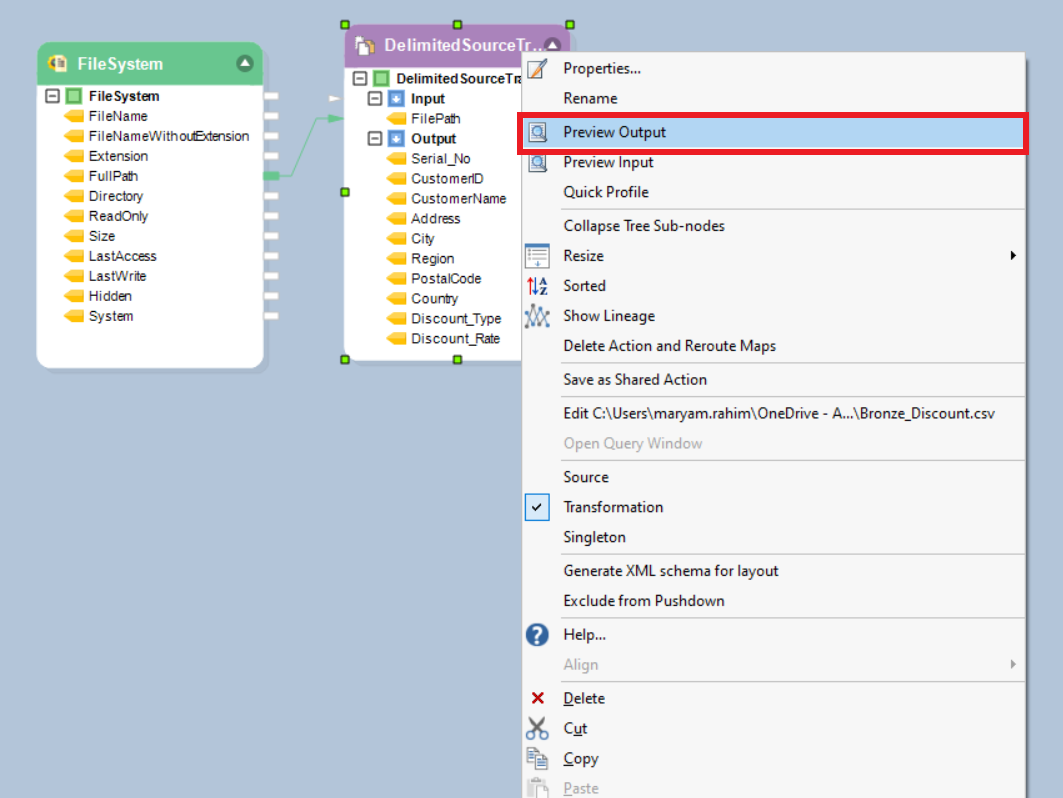
Now our Delimited source transformation object is ready. To preview the data, right-click on the DelimitedSourceTrans object and select Preview Output.
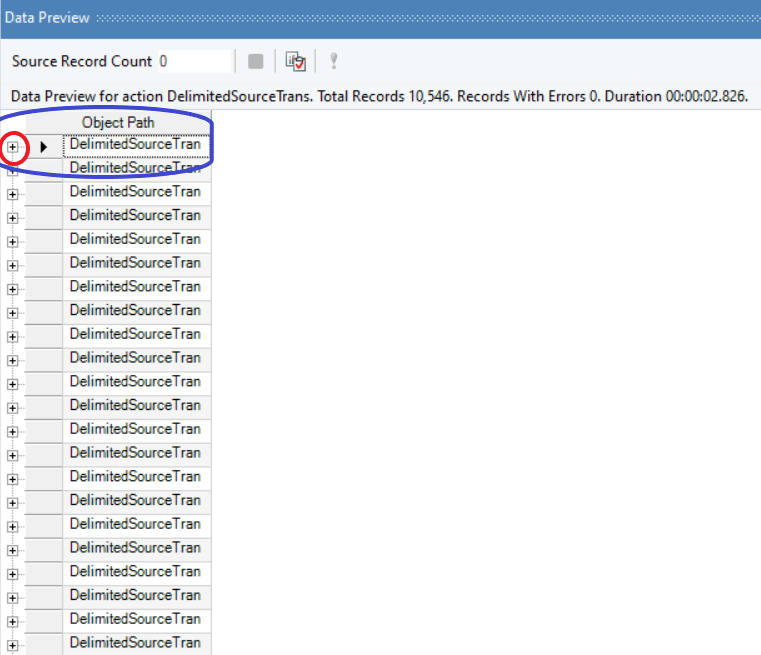
Once you choose Preview output, you will be able to view the data in the Data Preview pane. The data that you see in the above image is in condensed preview format. Click on the +icon right next to the root node DelimitedSourceTran object to expand the node and preview your data.
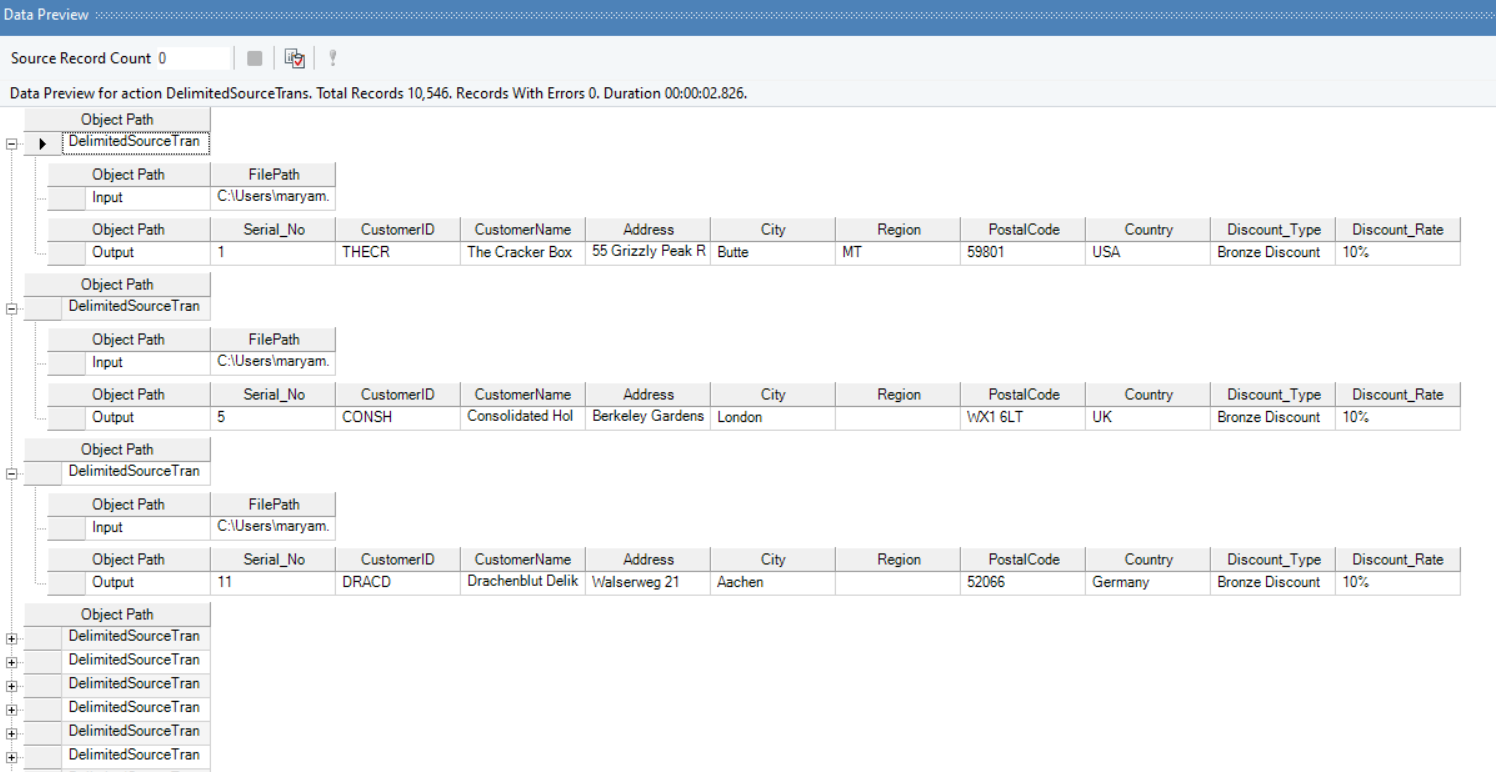
You now have an expanded version of your data:
- Root Node: Object Path – DelimitedSourceTran
- Sub Node:
- Input: Displays the path of the file that is being used as the input for this data.
- Output: Displays the fields in the source data.
This is how you use a Delimited File Source as a transformation.
Next, we will see how to use Excel Workbook source object as a transformation.
Using Excel File Source as a Transformation
The Excel File Source can be used as a transformation when you have multiple Excel files with the same layout, and want to process them together in a dataflow or workflow.
1. Drag-and-drop the Excel Workbook Source object onto the designer.
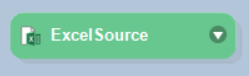
2. Go to its properties and provide the path for the excel source file.
3. Once you’ve provided the file path and configured the properties of the excel source object, click OK. Now right-click on the header and select Transformation from the context menu, to change it into a transformation object.
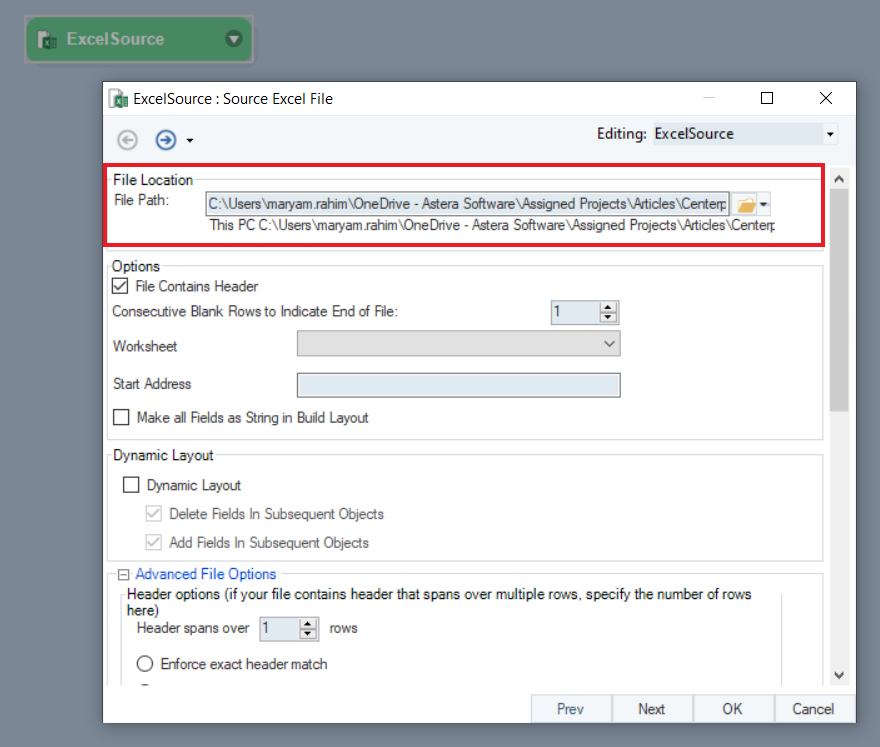
The header of the ExcelSource object will change to purple indicating that the Excel source object is now converted to a transformation object.
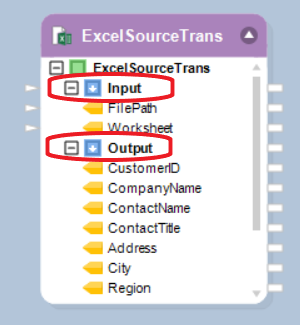
The transformed ExcelSource object will now have two nodes:
Input node:
- FilePath: To map the path of the folder that contains excel files that are to be processed.
- Worksheet: This option can be used when you have more than one worksheet in an excel source file and want to use any particular worksheet in the dataflow/workflow. This can be done by specifying the worksheet name using a Constant Transformation object which you’ll get through Toolbox > Transformation > Constant Value.
Output node: On expanding the output node, you will be able to see the data fields in the excel source file. Map these fields to other objects in the dataflow through the output mapping ports.
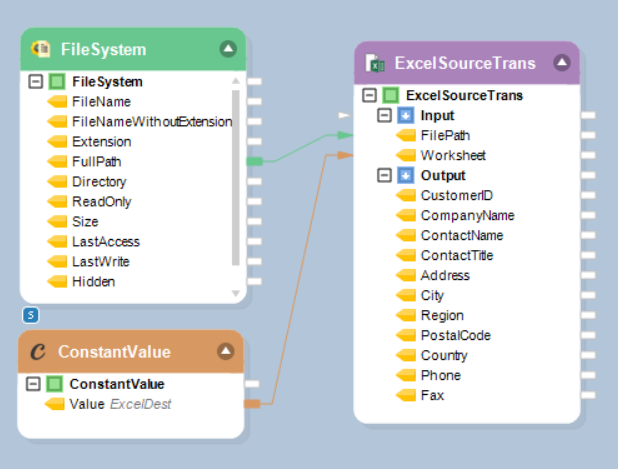
4. Use the File System Item Source to pass the file path information in the input node of the Excel source-transformation object. Drag-and-drop it from the Toolbox > Sources section.
5. In the File System Source Properties, provide the path of the directory and folder where the excel files are located.

6. Map the FullPath field from FileSystem to ExcelSource object’s Input node (FilePath).
- Map the Value field from ConstantValue to ExcelSource object’s Input node -Worksheet.
Now our Excel Source transformation object is ready. To preview the data, right-click on the ExcelSourceTrans object and select Preview Output.
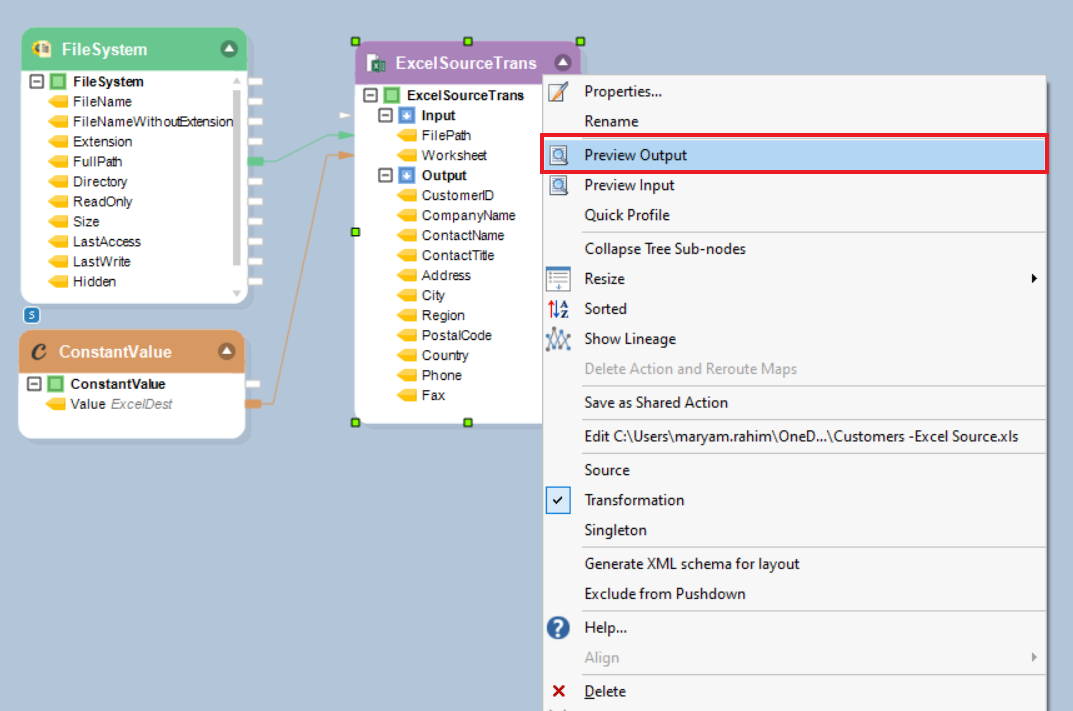
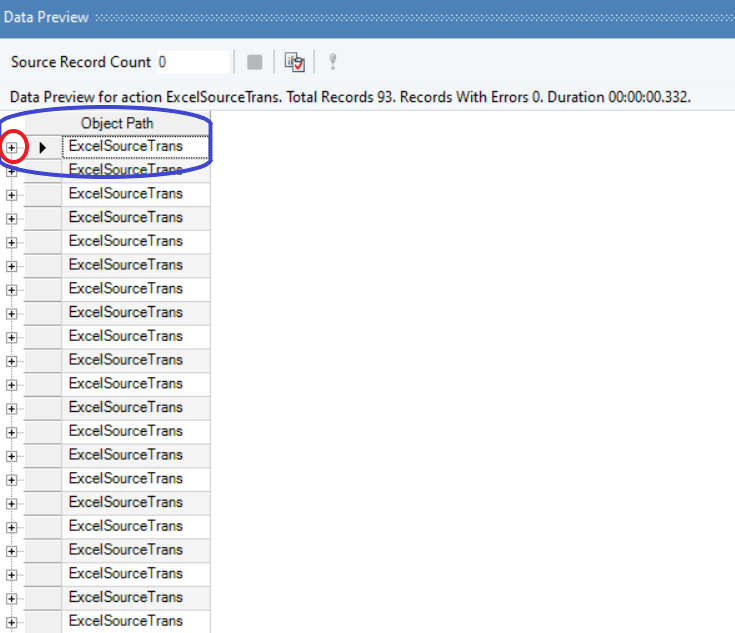
On selecting Preview output, you will be able to view the data in the Data Preview pane. The data that you see in the above image is in condensed preview format. Click on the +icon right next to the root node ExcelSourceTran to expand the node and preview your data.
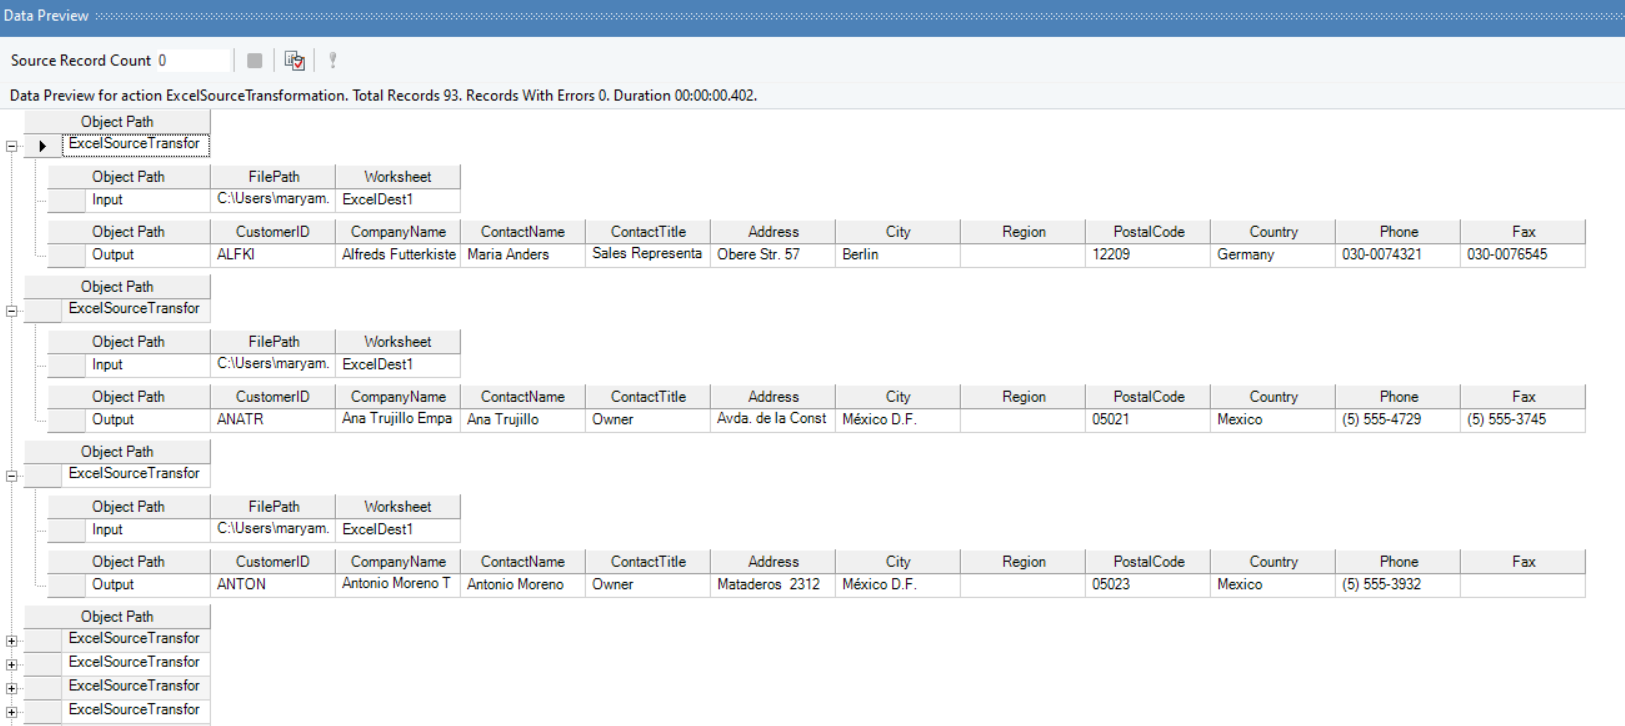
You will see the following nodes:
- Root Node: Object Path – ExcelSourceTran
- Sub Node:
- Input: Gives the file path of the file that is being used as the input for this data.
- Output: Displays the fields in the source data.
This is how you use an Excel File Source as a transformation.
Now we will discuss how to use an XML/JSON File Source as a transformation in Centerprise.
XML/JSON File Source as a Transformation
The XmlJson File Source object can be used as a transformation when you have multiple XML or JSON files with the same layout, and want to process them in a dataflow or a workflow.
1. Drag-and-drop the XML/JSON File Source object onto the designer.
2. Go to its properties and provide the path for the XML source file and its schema.
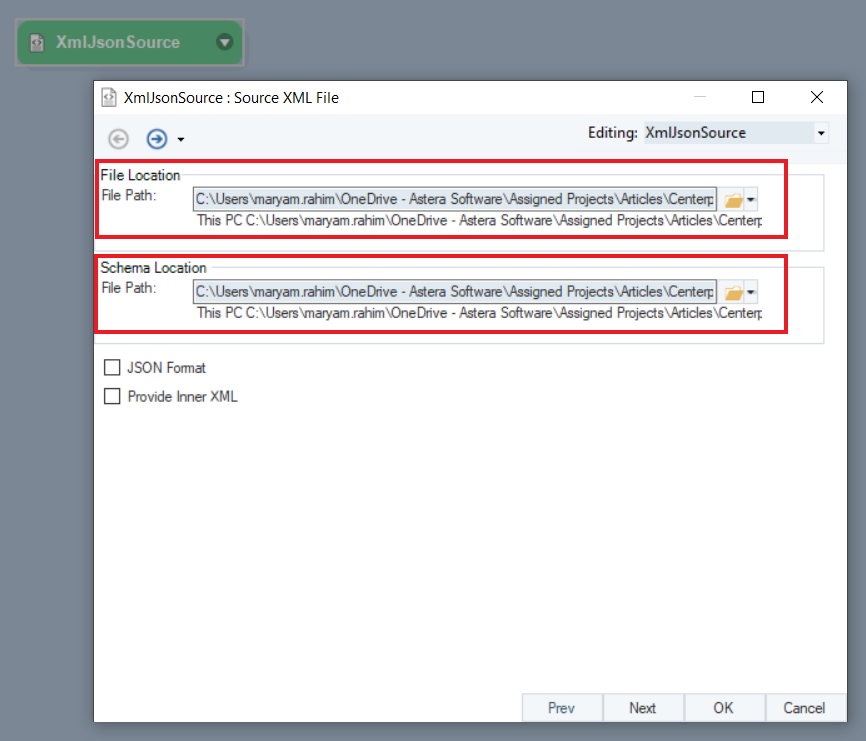
3. Once you’ve provided both the paths and configured the XML/JSON source object, click OK. Now right-click on the header and select Transformation from the context menu to change it into a transformation object.
The header of the XmlJsonSource object will change to purple indicating the conversion from a source object to a transformation object.
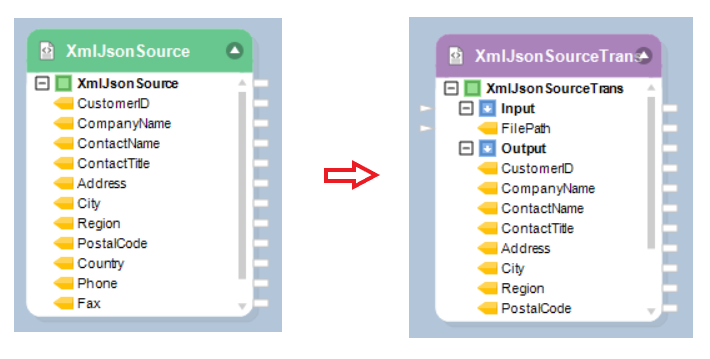
The transformed XmlJsonSource object will now have two nodes:
Input node: To map the file path of the folder that contains XmlJson files that are to be processed.
Output node: Expand the Output node, you will be able to see the data fields that are in the XmlJson source file. You can map these fields to other objects in a dataflow through the output mapping ports.
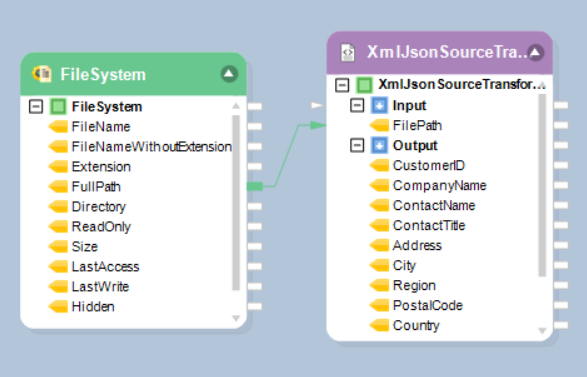
4. Use the File System Item Source to pass the file path information in the input node of the XmlJson source-transformation object. Drag-and-drop it from the Toolbox > Sources section.

5. In the File System Source Properties, provide the path of the directory and folder where the XML/JSON files are located.

6. Map the FullPath field from FileSystem to XmlJsonSource object’s Input node (FilePath).
Now our XmlJson source transformation object is ready. To preview the data, right-click on the XmlJsonSourceTrans object and select Preview Output.
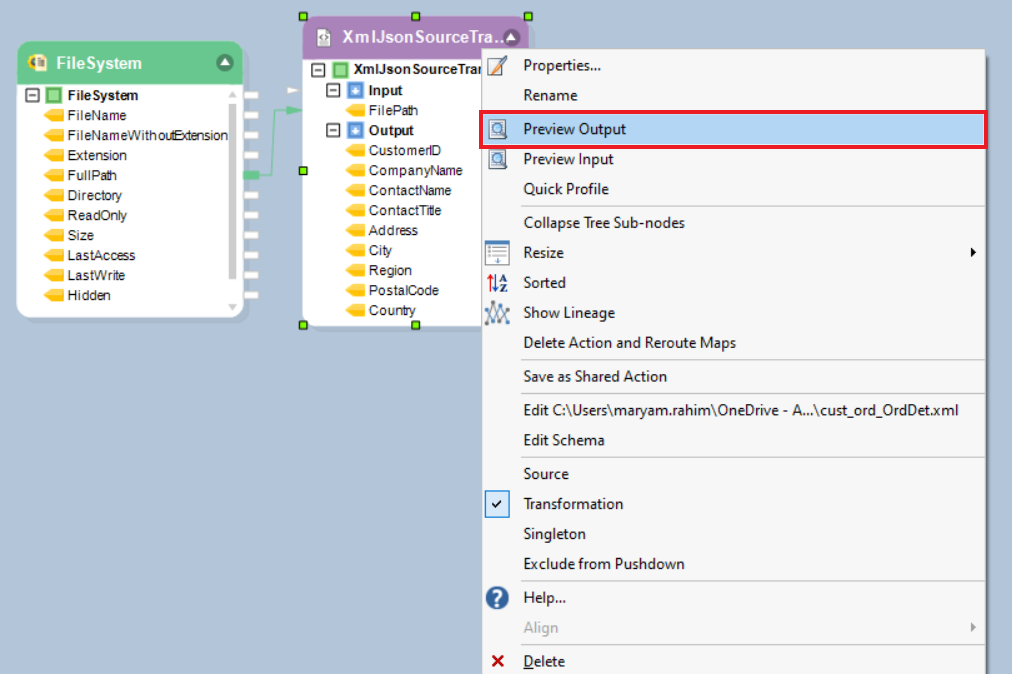
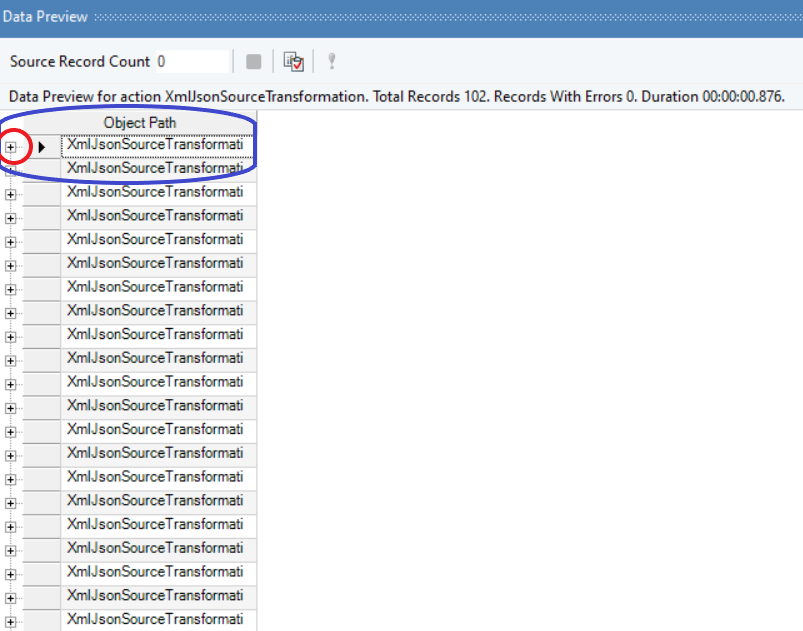
On selecting Preview output, you will be able to view the data in the Data Preview pane. The data that you see in the above image is in its condensed form. To expand the data and preview your output, you need to click on the +icon right next to the root node – XmlJsonSourceTran.
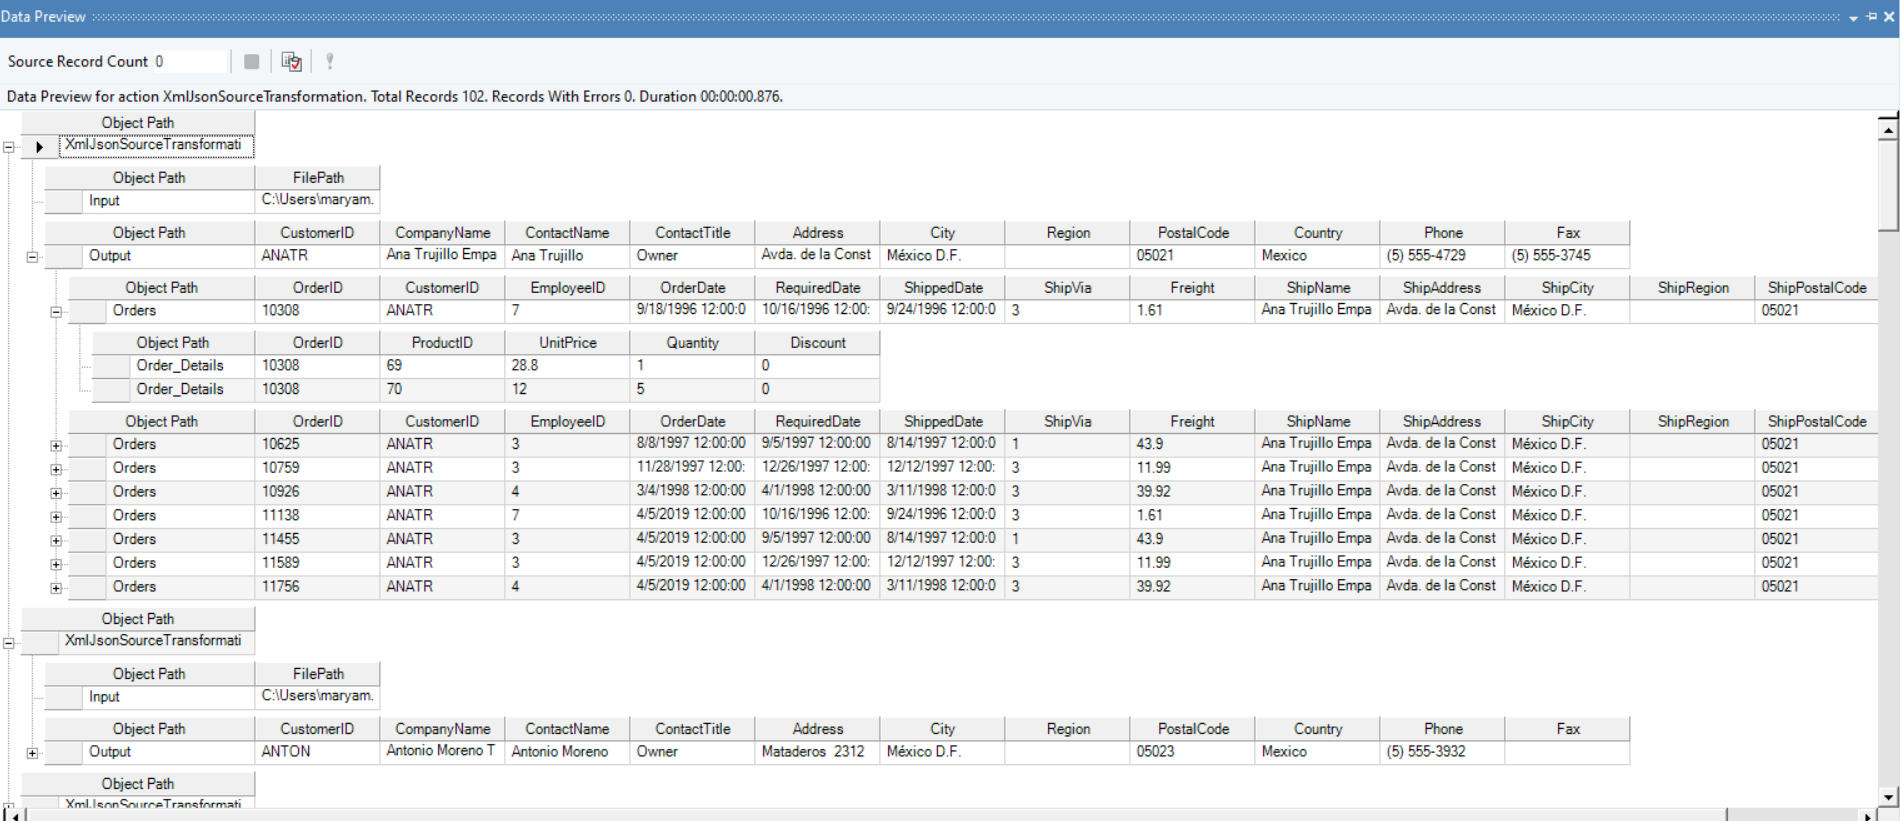
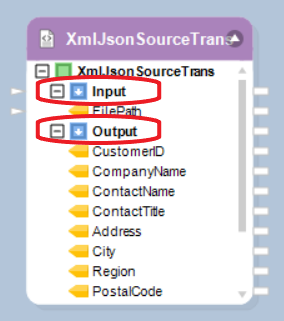
You now have an expanded version of your data:
- Root Node: Object Path – XmlJsonSourceTran
- Sub Node:
- Input: Gives the file path of the file that is used as the input for this data.
- Output: Displays the fields in the source data.
This is how you use an XmlJson File Source as a transformation.
In the next section of the article, we will discuss how to use Report Source as a transformation in Centerprise.
Report Source as a Transformation
The Report Source can be used as a transformation when you have multiple report models with the same layout, and process them in a dataflow or a workflow.
1. Drag-and-drop the Report Source object onto the designer.

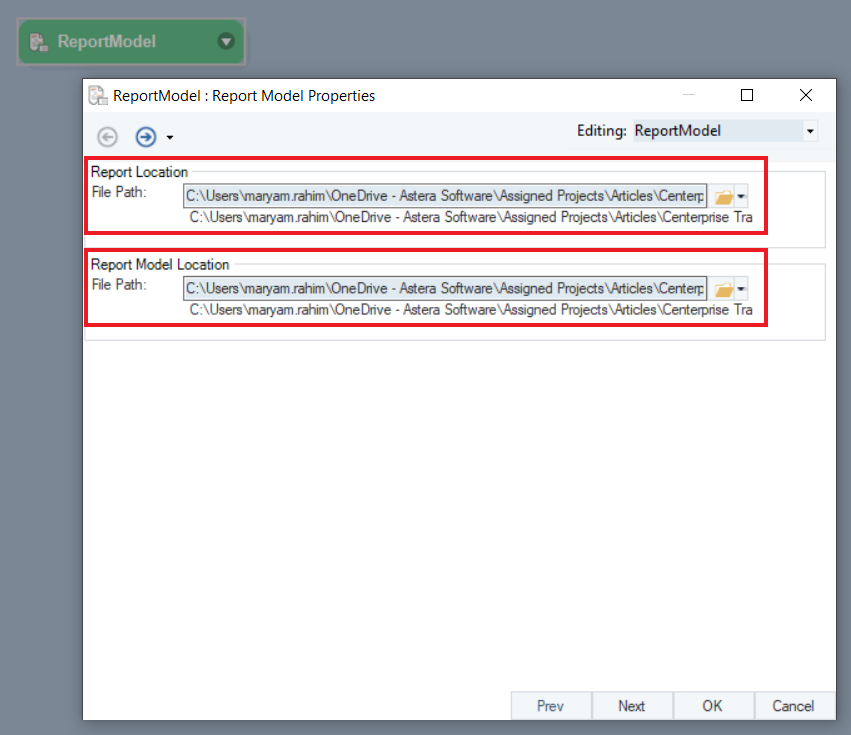
2. Go to the properties and provide the path for the report source and its report model.
3. Once you’ve provided both the paths and configured the properties of the report source object, click OK. Now right-click on the header and select Transformation from the context menu, to change it to a transformation object.
The header of the ReportSource object will change to purple indicating the conversion from a source object to a transformation object
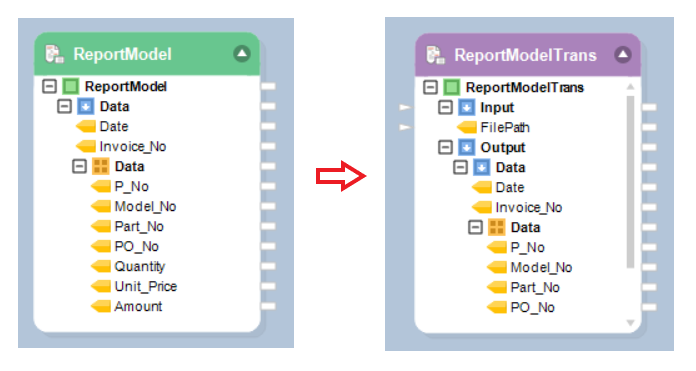
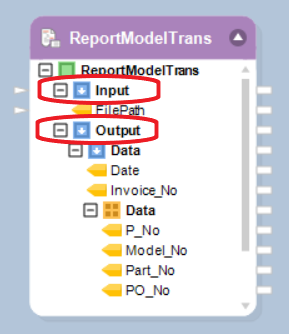
The transformed ReportSource object will now have two nodes:
Input node: Map the file path of the folder that contains report files that are to be processed.
Output node: Expand the Output node, you will be able to see the data fields that are in the report source file. You can map these fields to other objects in the dataflow through the output mapping ports.
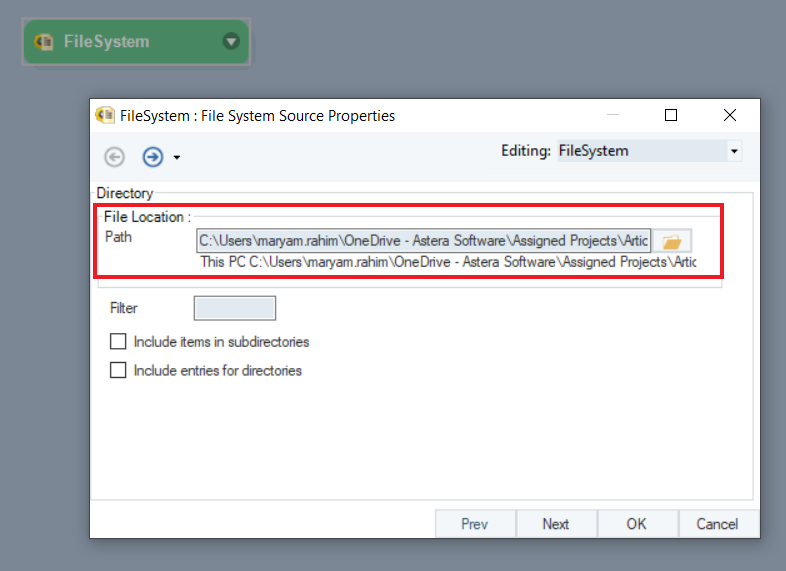
4. Use the File System Item Source to pass the file path information in the input node of the Report source-transformation object. Drag-and-drop it from the Toolbox > Sources section.

5. In the File System Source Properties, provide the path of the directory folder where report files are located.
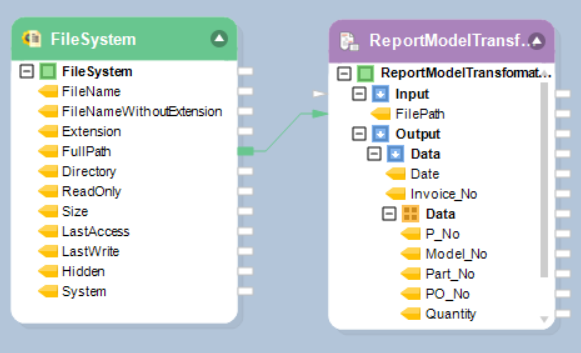
6. Map the FullPath field from FileSystem to ReportModel object’s Input node (FilePath).
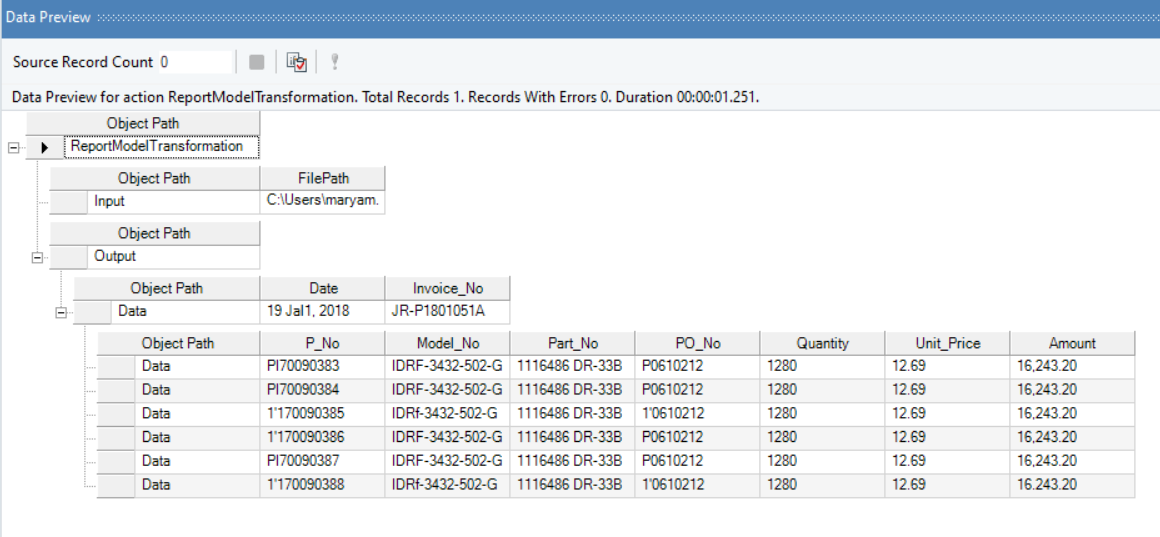
Now our Report source transformation object is ready. To preview the data, right-click on the report source object and select Preview Output.
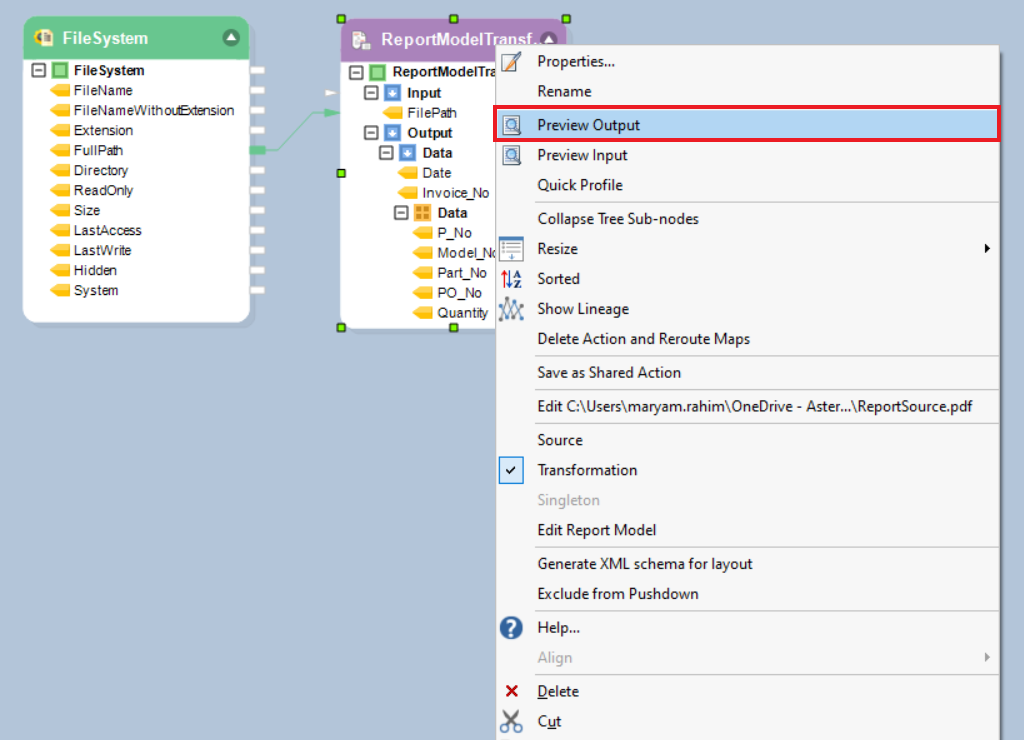
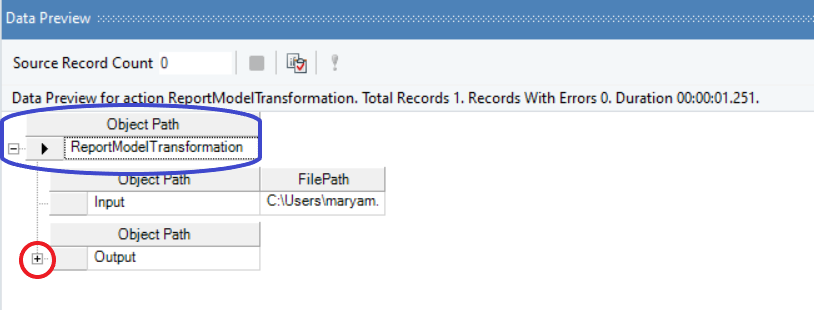
On selecting Preview output, you will be able to view the data in the Data Preview pane. The data that you see in the above image is in its condensed form. To expand the data and preview your output, you need to click on the +icon right next to the root node – ReportModelTran. And then to further expand the data, click on the +icon right next to the sub node – Output.
You now have an expanded version of your data:
- Root Node: Object Path – ReportModelTrans
- Sub Node:
- Input: Gives the file path of the file that is being used as the input for this data.
- Output: On further expansion it will show the fields/data that is there in the report model.
This is how you use Report Source as a transformation.