Making HTTP Requests Through REST API Browser
In this document, we will see how we can make HTTP requests through REST API Browser in Astera Centerprise.
Making a GET Request
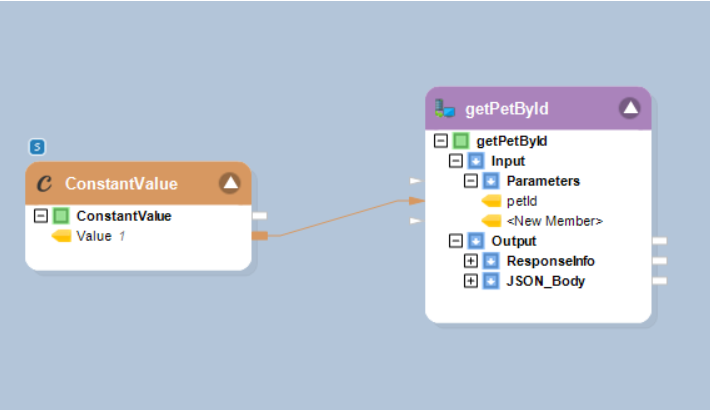
To make a GET request, drag and drop the relevant GET request object from the REST API Browser onto the designer window and pass your required PetId into it.
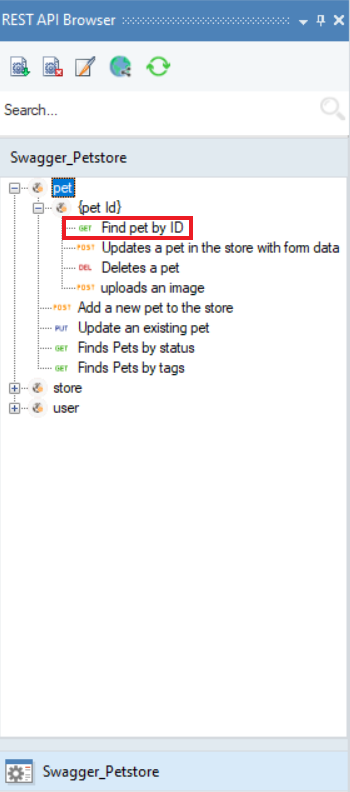
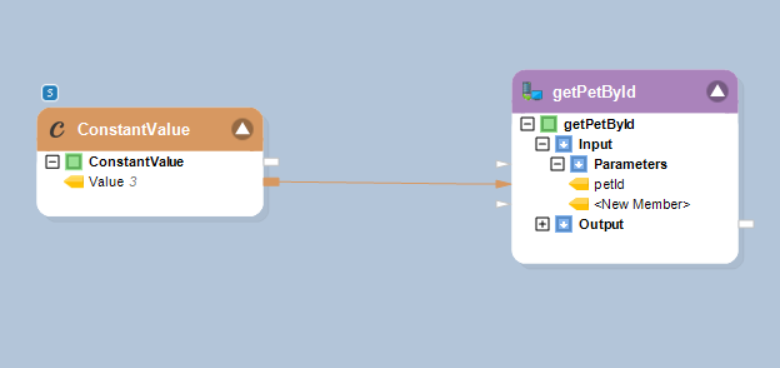
In this scenario, we want to get the info for pet with the PetId ‘3’. For this, we will select the GET request ‘Find pet by ID’ and pass the relevant PetId using a ConstantValue object.
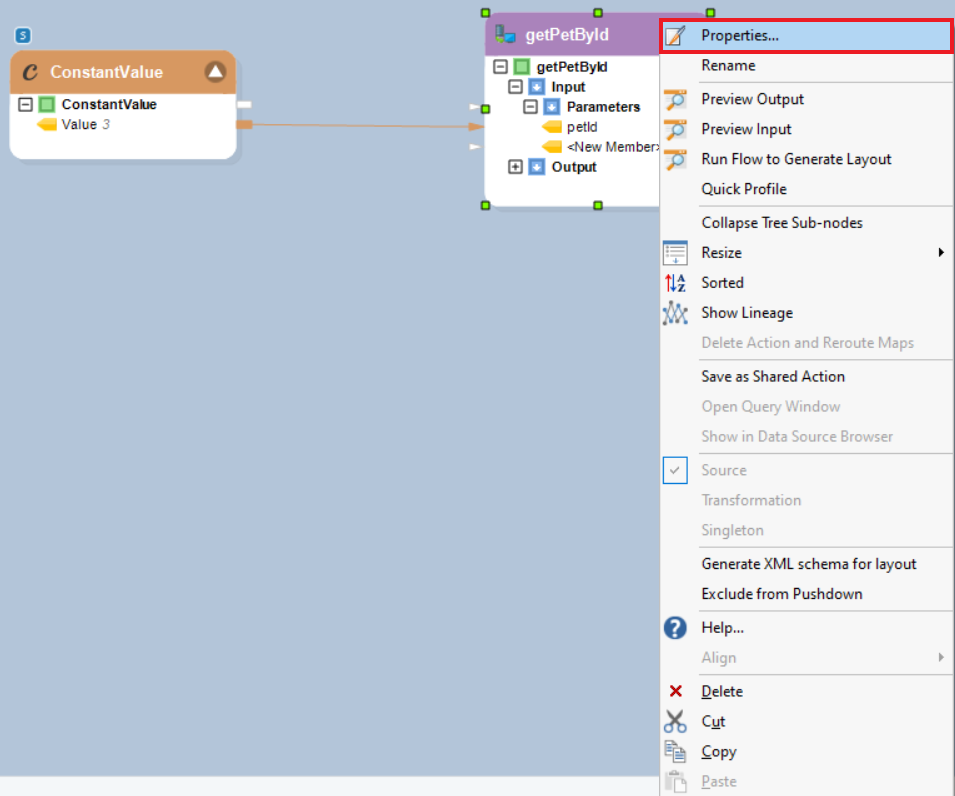
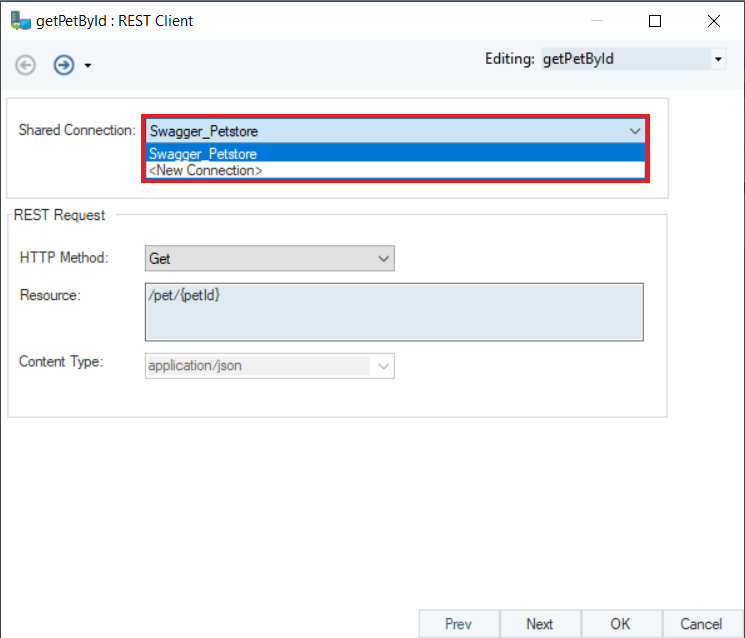
To explore the REST Client object for this method, right-click on its header and select Properties.
This will open the REST Client screen where the connection info of your API is defined.
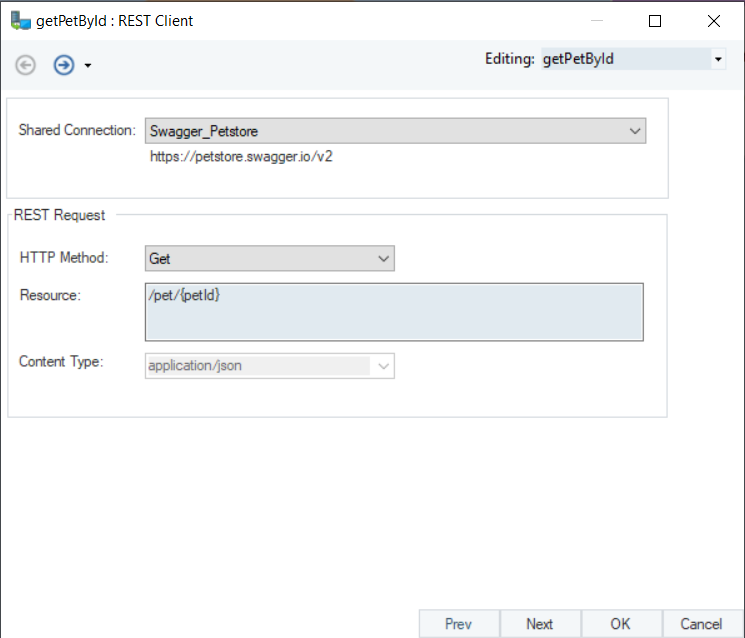
Shared Connection – shows the name of your REST Connection. You can select any shared REST API Connection you want to use from the drop-down list. The connections for all the APIs that have been imported in the project will be shown here.
REST Request
HTTP Method – shows the HTTP method of your request
Resource – shows what information you want to get from a specific API. It is a part of the UrI of request sent.
Content Type – shows the type of your content
All the above information is configured according to the request method that you have selected.
Click Next to proceed to the Parameters screen.

Here, you will see the following options:
Name - it contains the name of the parameter
Parameter Location - it tells which parameter is being used to make the call. The following three parameters are supported by Centerprise:
- URL: This is a required parameter.
- Query: This parameter may or may not be optional and can work as a filter while processing records.
- Header: This parameter is generally used for authentication purpose.
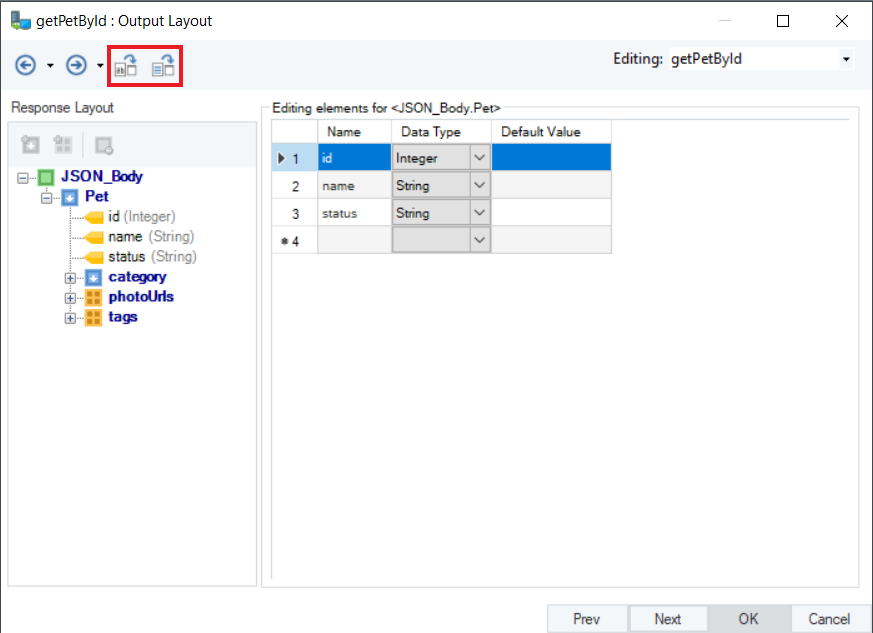
Click Next to proceed to the Output Layout screen where you can build the Response Layout of your API. There are two ways in which you can generate the output layout:
- The first one is by providing sample text by clicking on ‘Generate Layout by providing Sample Text’ option.
- The other way to do that is by running a request by clicking the ‘Generate Layout by running Request’ option.
Click Next to proceed to the Pagination Options screen.
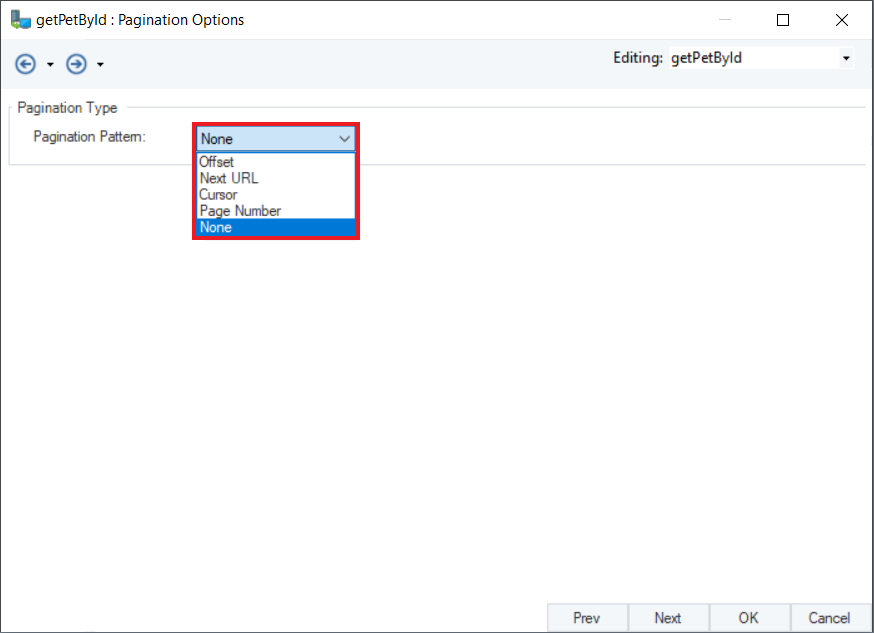
Pagination
Pagination refers to managing the traffic of records coming from a source. It divides the records into discrete number of pages so that they are comprehensible for a user. Pagination is not supportedby all APIs. For those that do, Astera Centerprise offers four types of pagination.
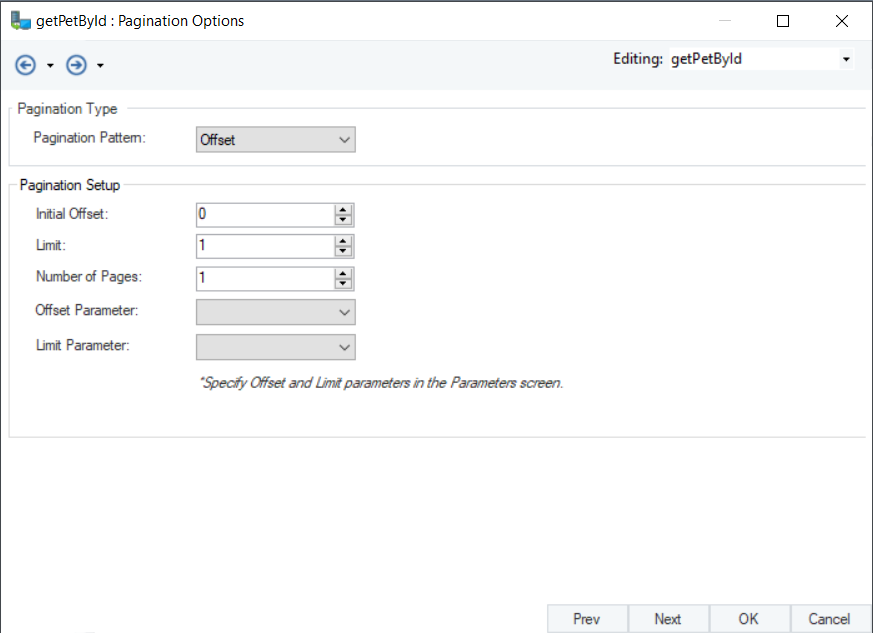
Offset:
It requires two parameters: a limit and an offset value to be specified by the user. A limit specifies the number of records that you want to specify in one page and an offset simply tells the number of records to be skipped before selecting records.
- Initial Offset – the record from which you want to start your pagination
- Number of Pages – the number of pages which you want to be processed
- Limit - number of records on one page
- Offset Parameter - here, you specify the offset parameter of the API that you are working with as specified on the Parameters screen
- Limit Parameter - here, you specify the limit parameter of the API that you are working with as specified on the Parameters screen
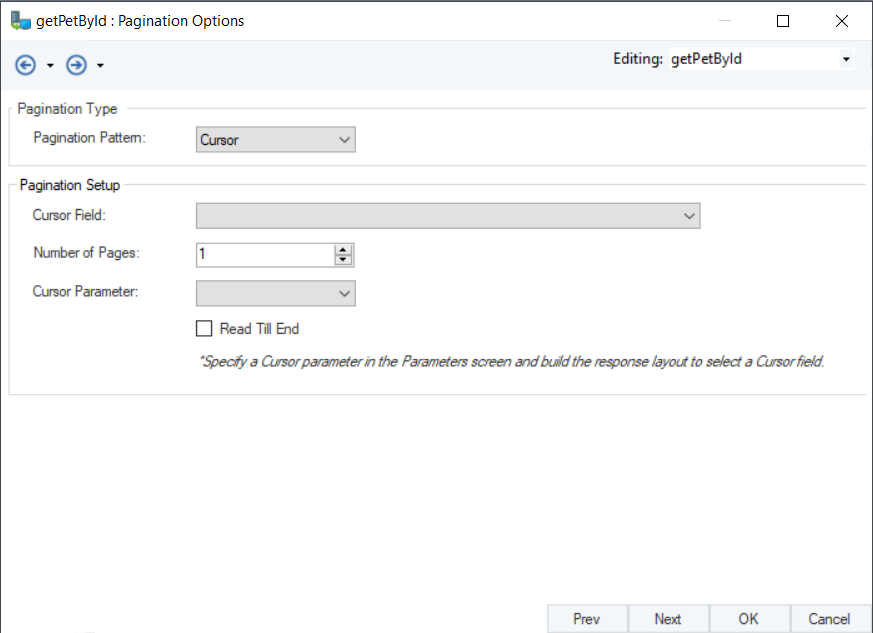
Cursor:
This type of pagination generates a token for the next page of records. You can set a limit to the number of pages you want to process.
- Cursor Field – here, the field you want to attach your cursor with is specified.
- Number of Pages – here, the number of pages you want to see in your output are specified or you can simply check the option of ‘Read Till End’ if you want to process all the records without any limit.
- Cursor Parameter - here, you specify the cursor parameter of the API that you are working with as specified on the Parameters screen.
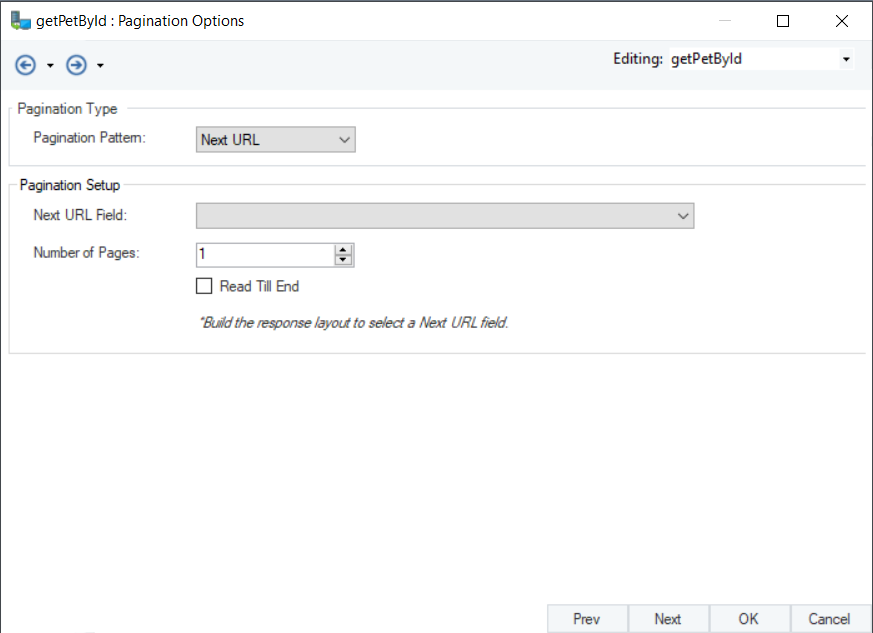
Next URL:
It is the same as Cursor pagination, except that it generates a URL for every next page instead of a token.
- Next URL Field - here, the field you want to attach your URL with is specified.
- Number of Pages - here, the number of pages you want to see in your output are specified or you can simply check the option of ‘Read Till End’ if you want to process all the records without any limit.
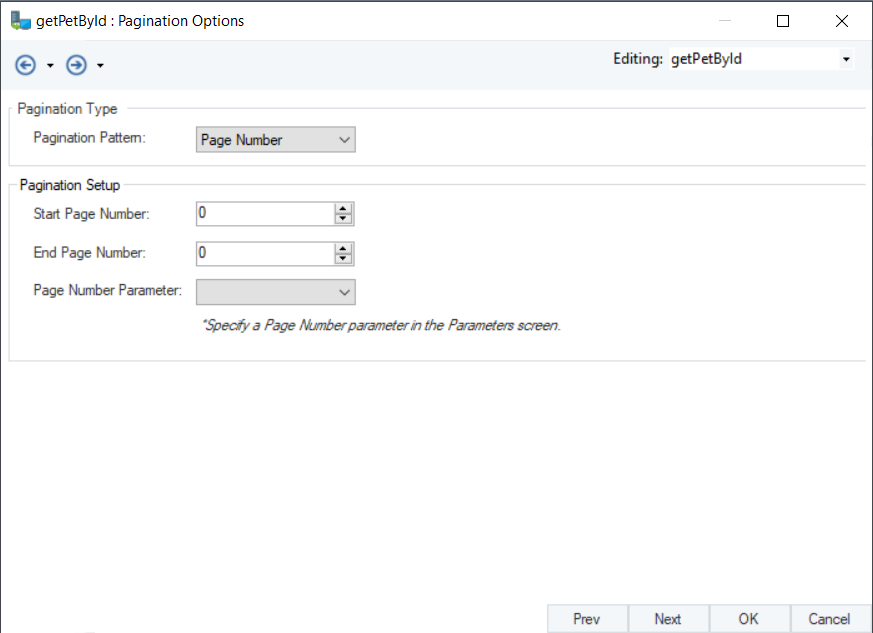
Page Number
In this type of pagination, you can specify the number of pages you would like to fetch in one go. It requires two parameters:
- Start Page Number - the page number from where you want to start fetching your output or the lower limit
- End Page Number - the page number where you want to end
- Page Number Parameter - here, you specify the page number parameter of the API that you are working with as specified on the Parameters screen
Click Next to proceed to the the Service Options screen.
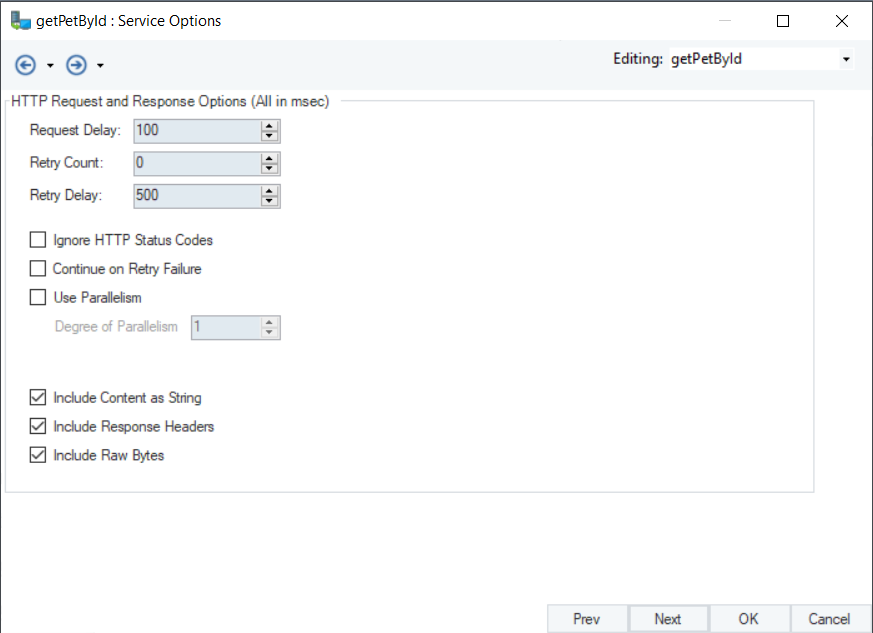
Here you can see the following service options:
Request Delay – the time (in milliseconds) to be delayed before sending a request
Retry Count – the number of retries to be made in case of a failed request
Retry Delay – the time (in milliseconds) to be delayed before making a request again
Ignore HTTP Status Codes checkbox is used to skip the error response for unsuccessful requests
Continue on Retry Failure - this option is used to retry building the connection if it fails
Use Parallelism - this option specifies if you want multiple requests to be run in parallel and the number of those requests can be specified in Degree of Parallelism option
Include Content as String - you can check this option if you want to include your content in the output preview
Include Response Headers - you can check this option if you want to include the response headers in you data preview
Include Raw Bytes - you can check this option if you want to include the raw data bytes in your data preview
Once you have specified these options, click OK.
Making a POST Request
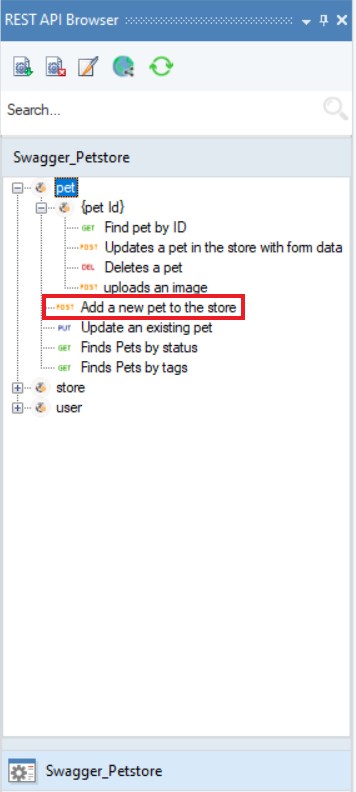
Now, let’s try posting a pet to Petstore. Drag the ‘Add a new pet to the store’ request from the REST API Browser panel and drop it on to the dataflow designer.
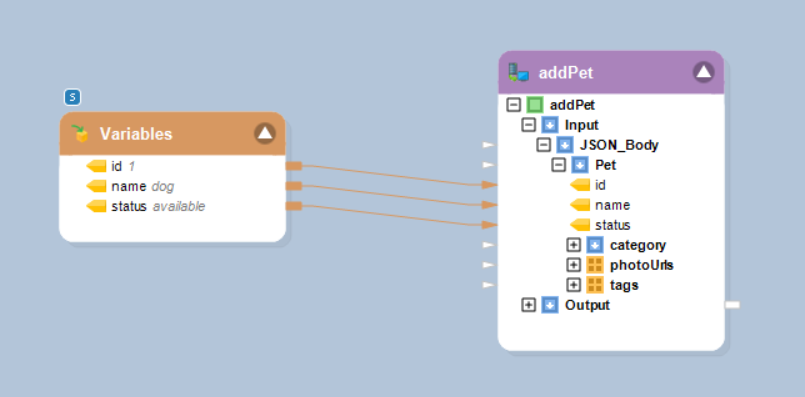
We will pass the required parameters to the POST request object using a Variables object.
Now, right-click on the REST API Client (addPet) object and select Preview Output.
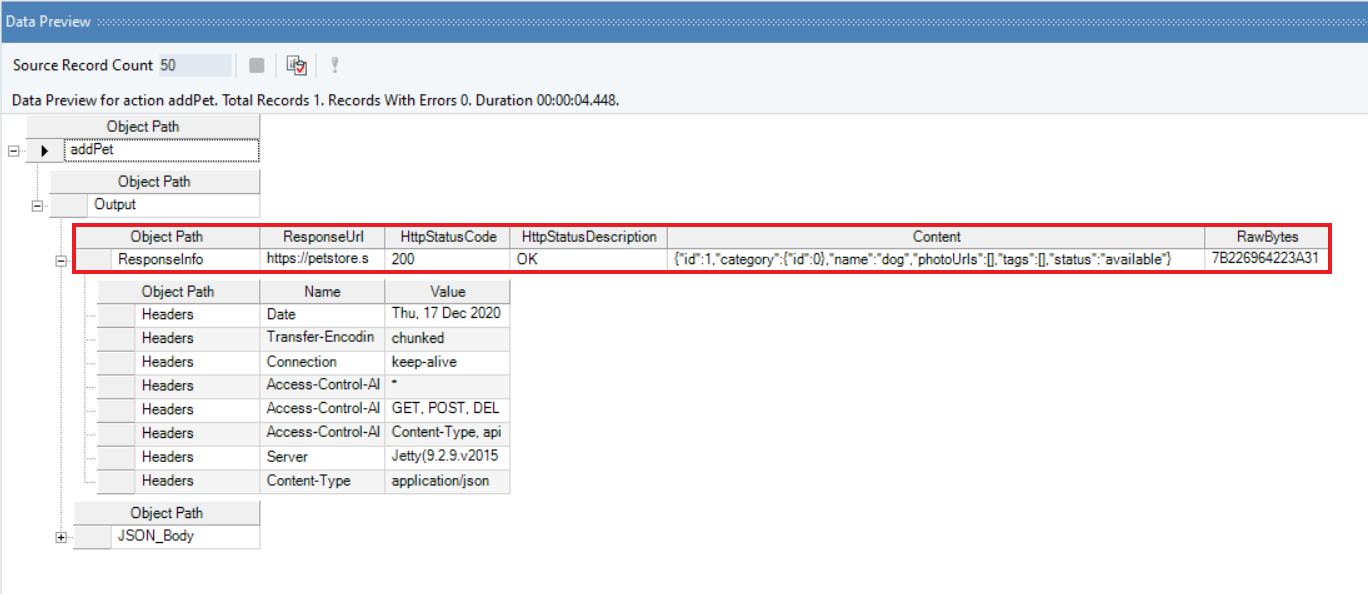
You can see that the ‘HTTPStatusCode’ is 200 which means that the REST API has successfully carried out the action requested by client. Let’s verify it by making a GET request for the same PetId which we had posted earlier.
You can see that a GET request for PetId 1 has returned us the same information which we had posted.
Making a DELETE Request
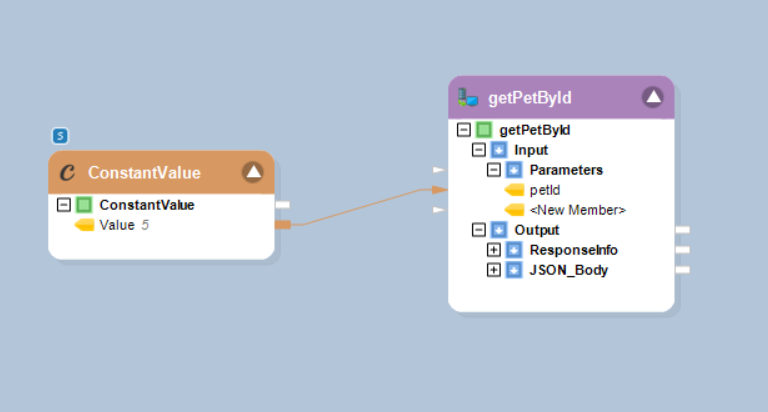
Now, let’s try making a DELETE request. For that, we will first make a GET request to see if that pet exists on the petstore or not and try to delete that. We will pass PetId 5 using a ConstantValue object.
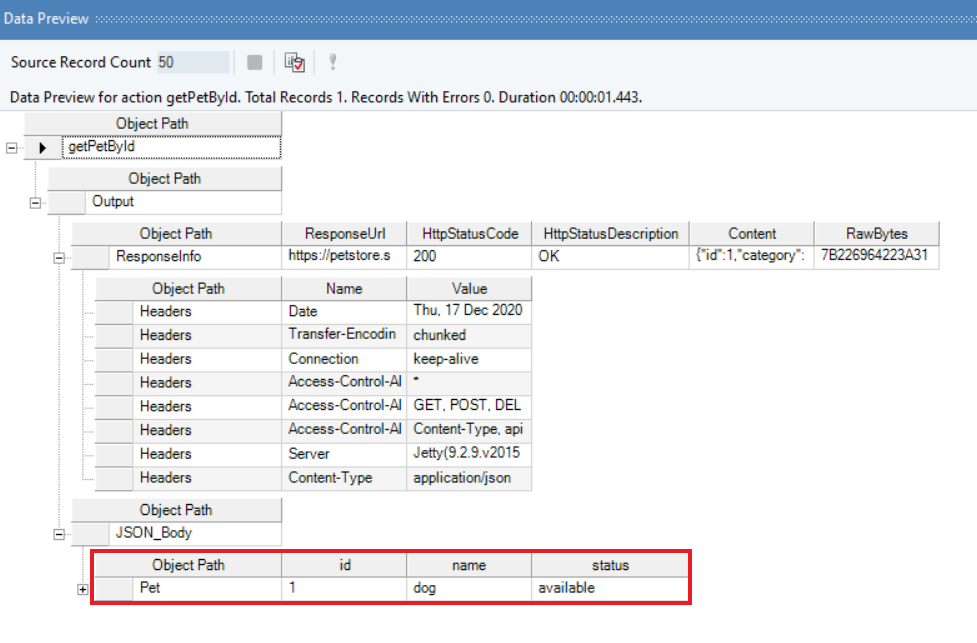
Right-click on the REST Client (getPetById) object and select Preview Output.
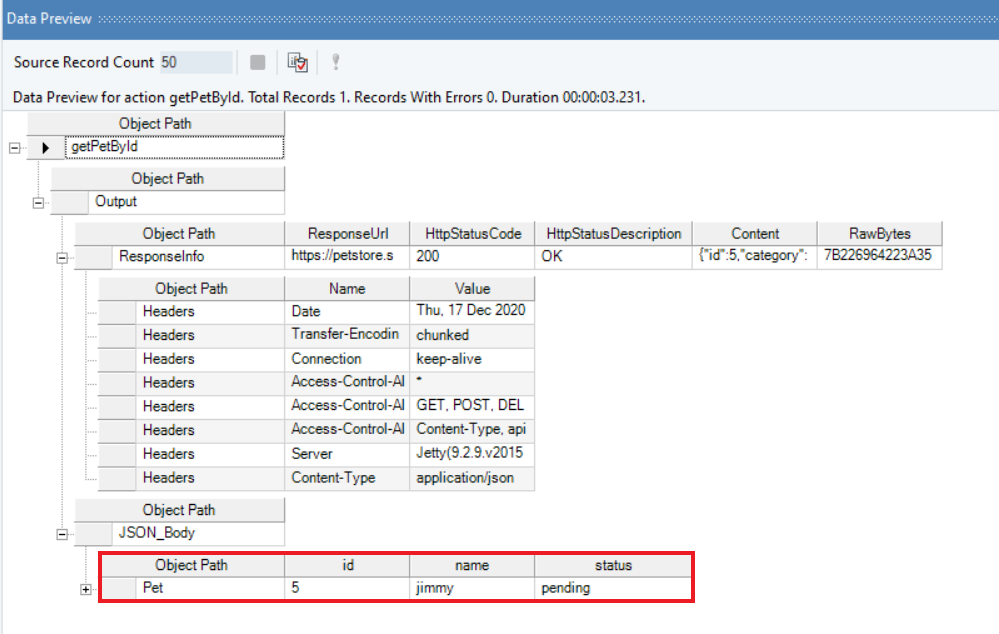
It has fetched the details of the pet with PetId 5, and the status shows that the pet is available on Petstore.
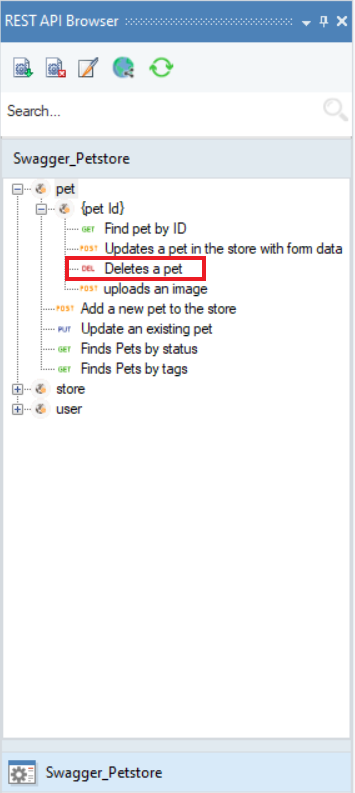
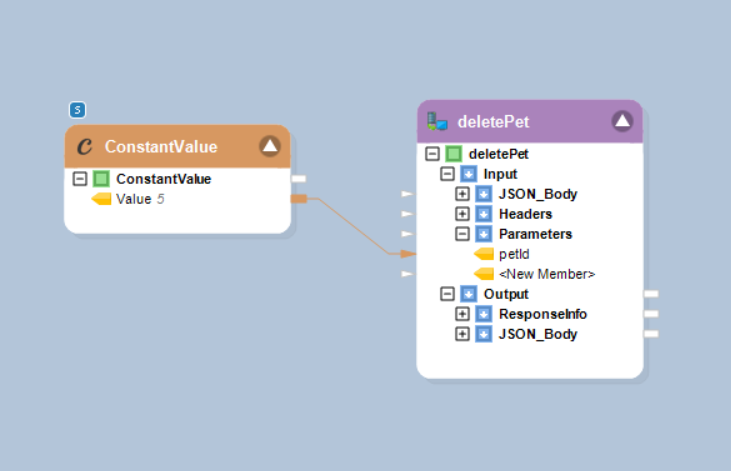
To delete this pet record, we will drag and drop the ‘Deletes a pet’ request from the REST API Browser panel on to dataflow designer.
Pass PetId 5 to the DELETE request object using a ConstantValue object.
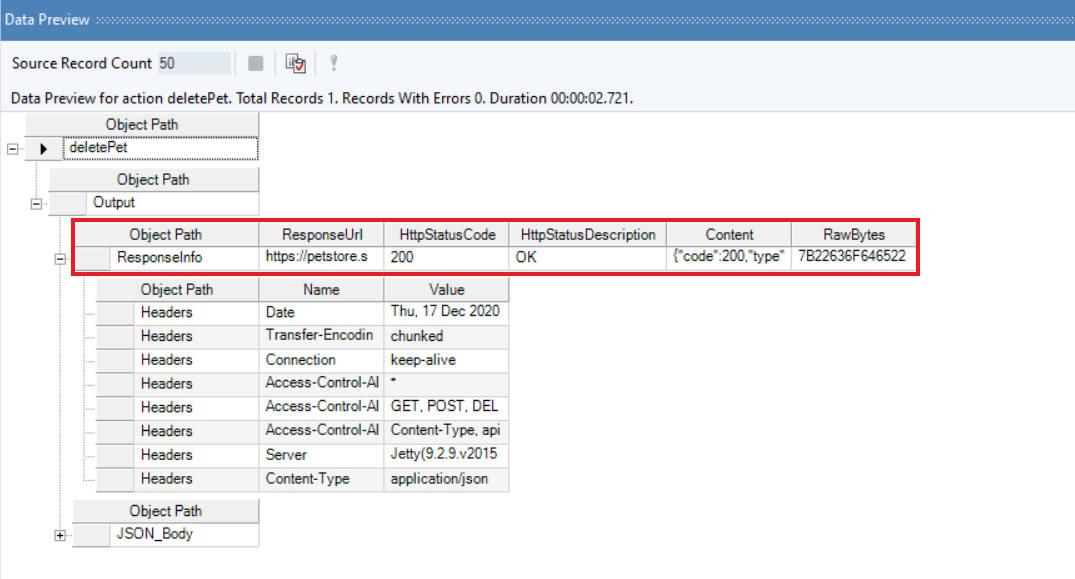
Right-click on the REST Client object and select Preview Output. You can see that it has returned ‘HTTPStatusCode’ 200 which indicates a successful execution.
Let’s verify it by making a GET request again and check if pet with PetId 5 has been deleted.

Right-click on the REST API Client (getPetById) object and select Preview Output.
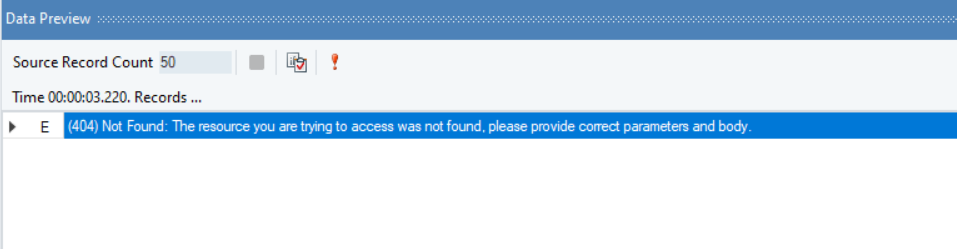
You can see that Centerprise has returned error 404 which means that there is no pet found with PetId 5 and the pet record has been successfully deleted from petstore API.
Making a PATCH Request
Let’s make a GET request to see what information is there in the user ID where we want to update something.
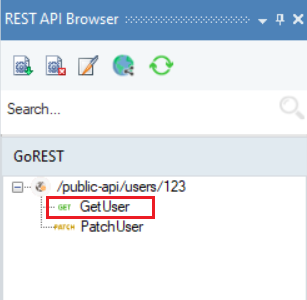
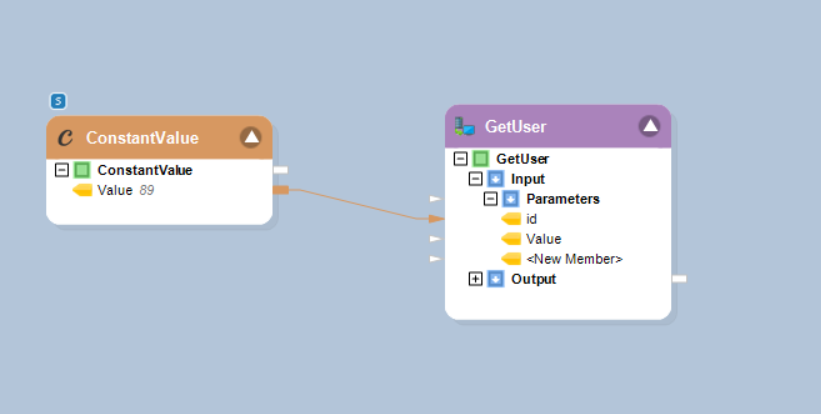
To make a GET request, drag and drop the ‘GetUser’ method from the REST API Browser onto the designer window.
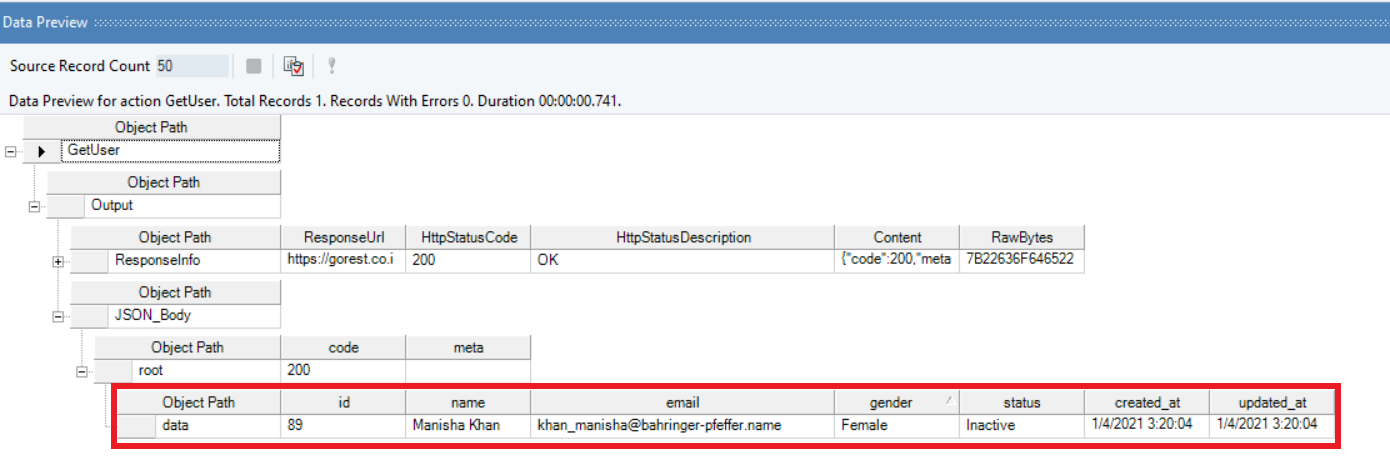
Pass userID ‘89’ to the userId under the Parameters node in the ‘GetUser’ object using ConstantValue transformation.

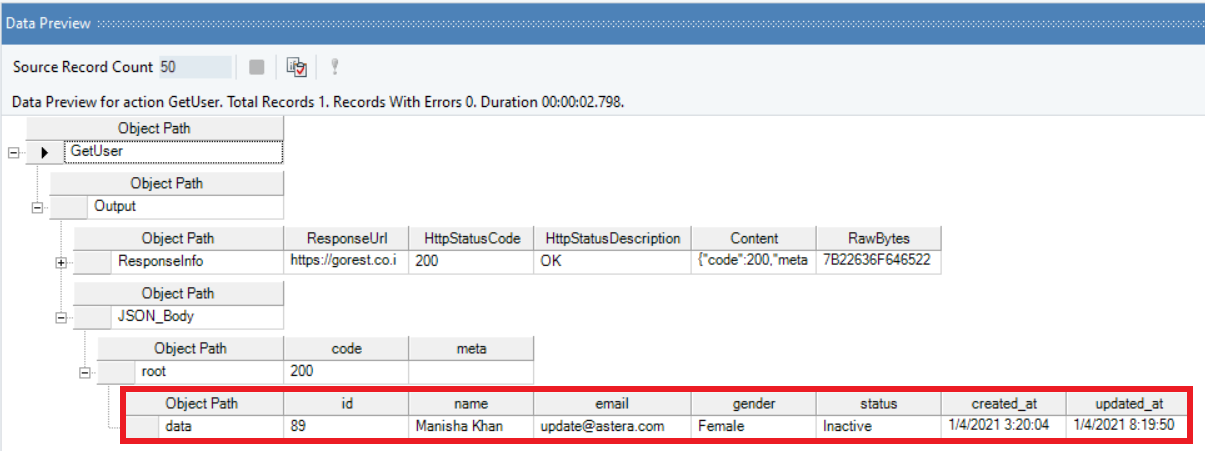
Right-click on the header of REST Client (GetUser) object and select Preview Output.

Here is what the output looks like:
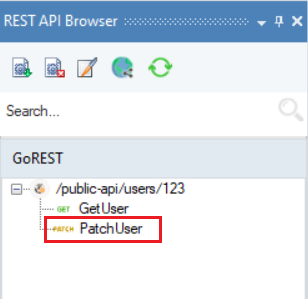
Now, drag and drop the ‘PatchUser’ method from the REST API Browser and drop it on to the designer window.
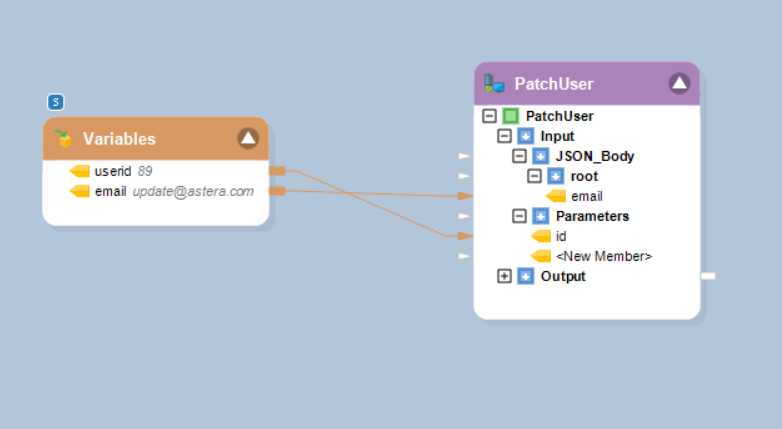
Pass userId ‘89’ and email ‘updatedemail@astera.com’ using a Variables resource object.
Right click on the ‘PatchUser’ and select Preview Output.
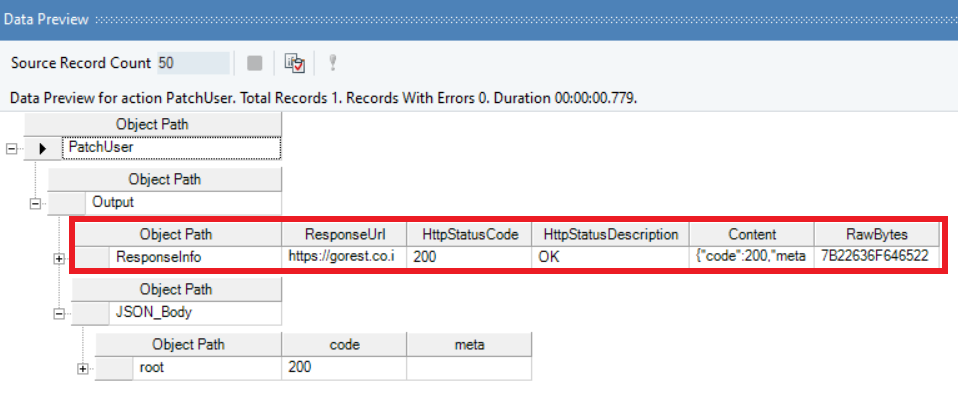
You can see that the ‘HTTPStatusCode’ is 200 which means that the REST API has successfully carried out the PATCH request. Let’s verify it by making a GET request for the same userId in which we made the changes.
Right-click on the header of the ‘GetUser’ object and select Preview Output.
As you can see, the request has been successfully carried out and the email address has been updated to updatedemail@astera.com.
Working with APIs That Require Authentication
Let’s try making an API request that needs authentication. We’ll be making a GET request object using an Adafruit API.
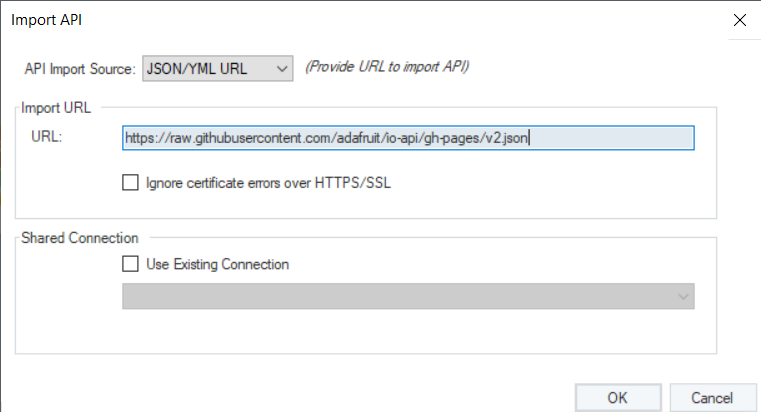
1. First, import the API by using the relevant import source. In this case, we will import using the JSON/YML URL import source.
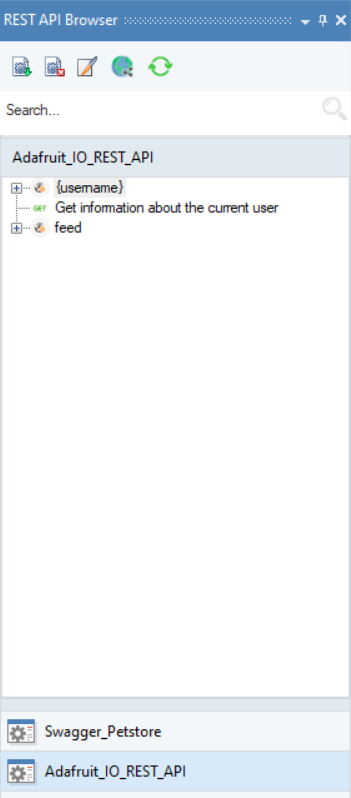
You will see that all the APIs present on Adafruit’s URL have been populated in the REST API Browser.
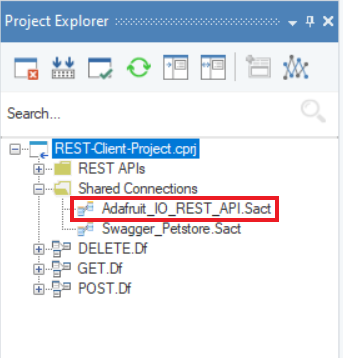
2. Now, you need to authenticate Adafruit’s APIs to use them in your dataflow. Without authentication, you will get an error. To authenticate an API, go to the Project Explorer and double click on the API’s .sact file under the Shared Connection node. In this case, we will double-click on Adafruit’s .sact file.
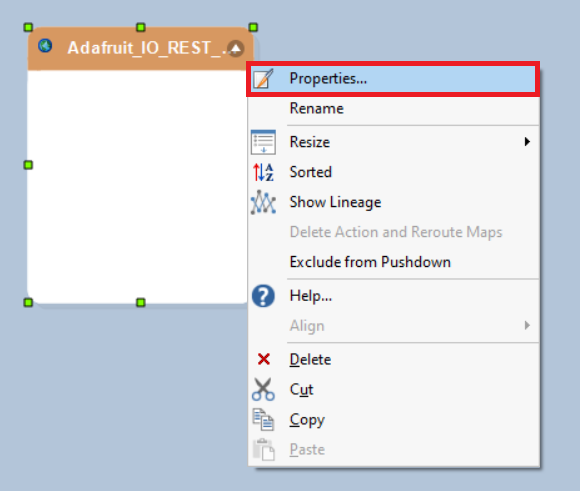
3. Adafruit’s .sact file will open on the designer. Now, right click on shared action file’s header and select Properties.
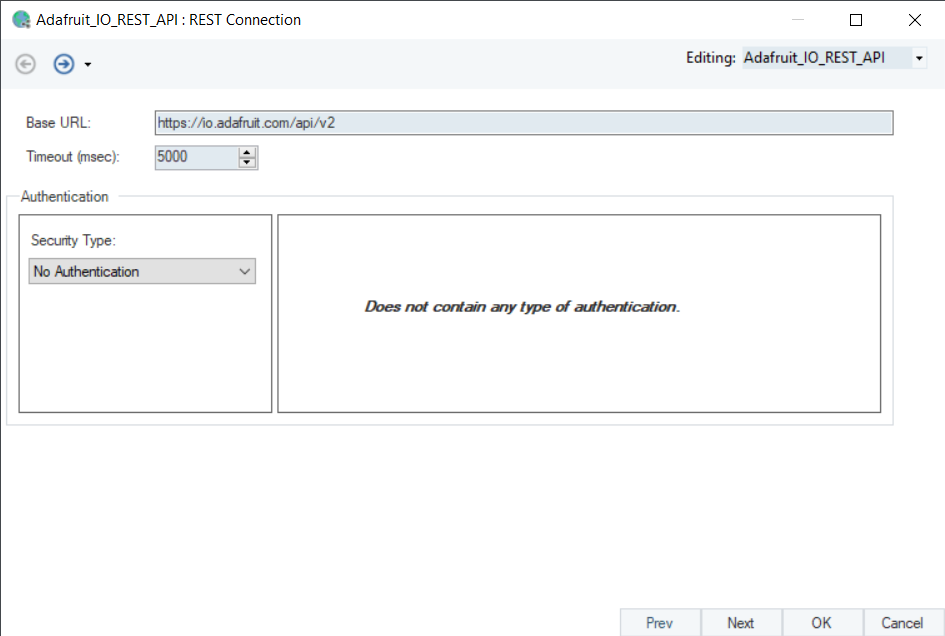
This will open the REST Connection window where you can configure the settings to authenticate Adafruit’s API.
Authentication
Following authentication types are supported in Astera Centerprise:
1. No Authentication
2. OAuth 2
3. API Key
4. Basic Authentication
5. Bearer Token
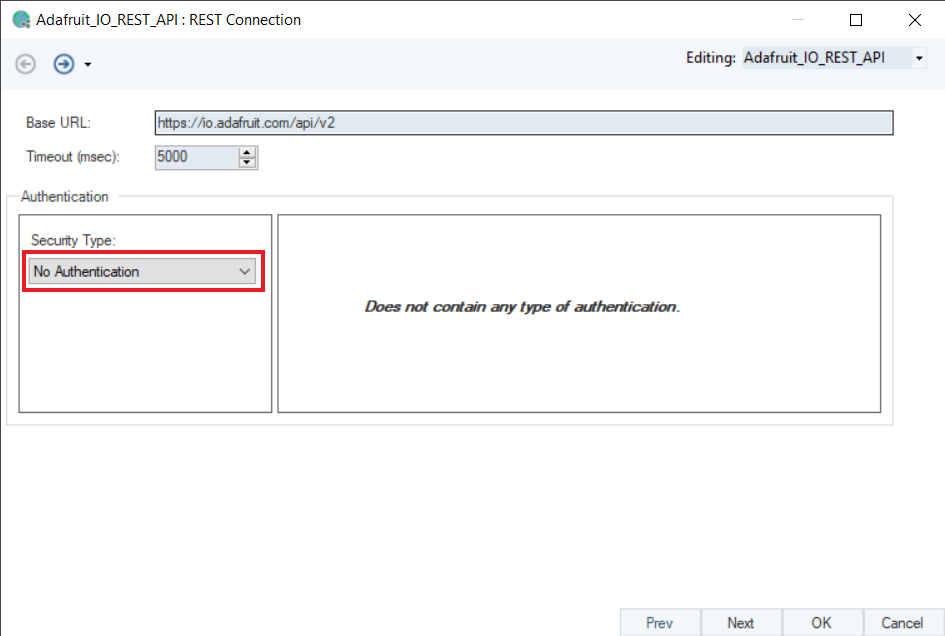
No Authentication
With this security type, the user can send requests and receive responses without any kind of authentication from APIs.
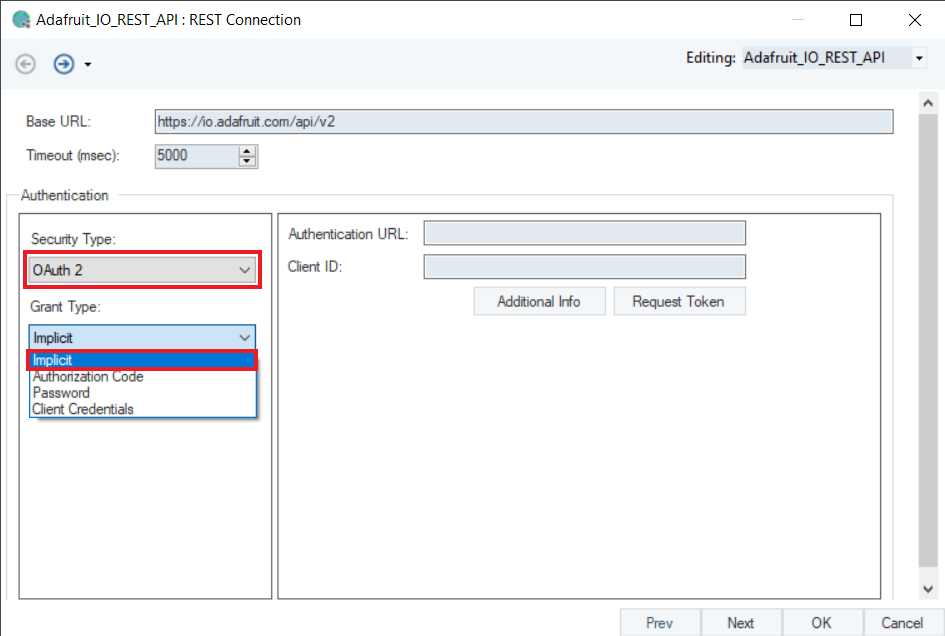
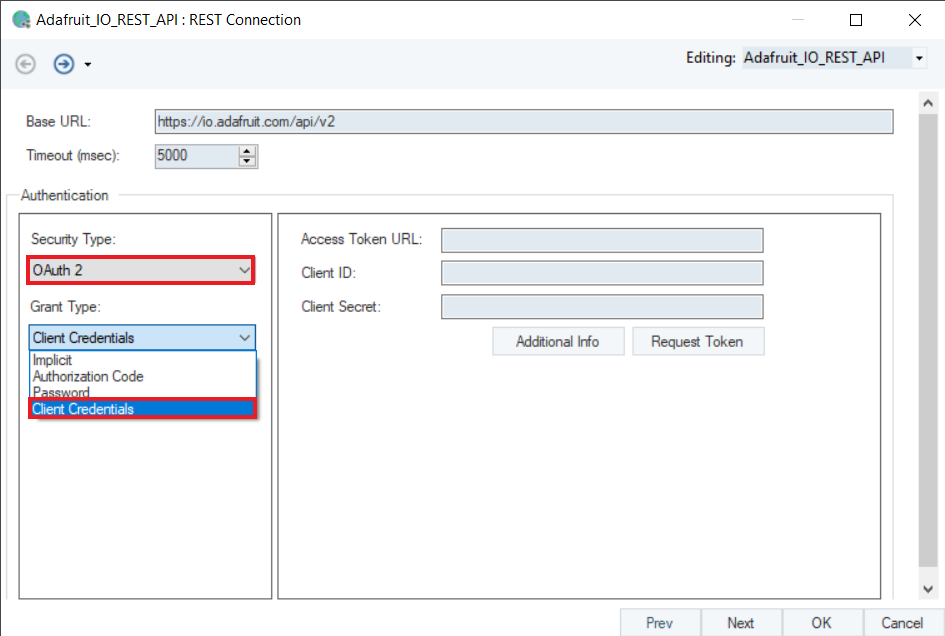
O Auth 2
In the OAuth 2 authentication, you can select any of the four grant types:
- Implicit
- Authorization Code
- Password
- Client Credentials
Implicit
In this grant type, you only need to provide Authentication URL and Client ID to request token and authorize.
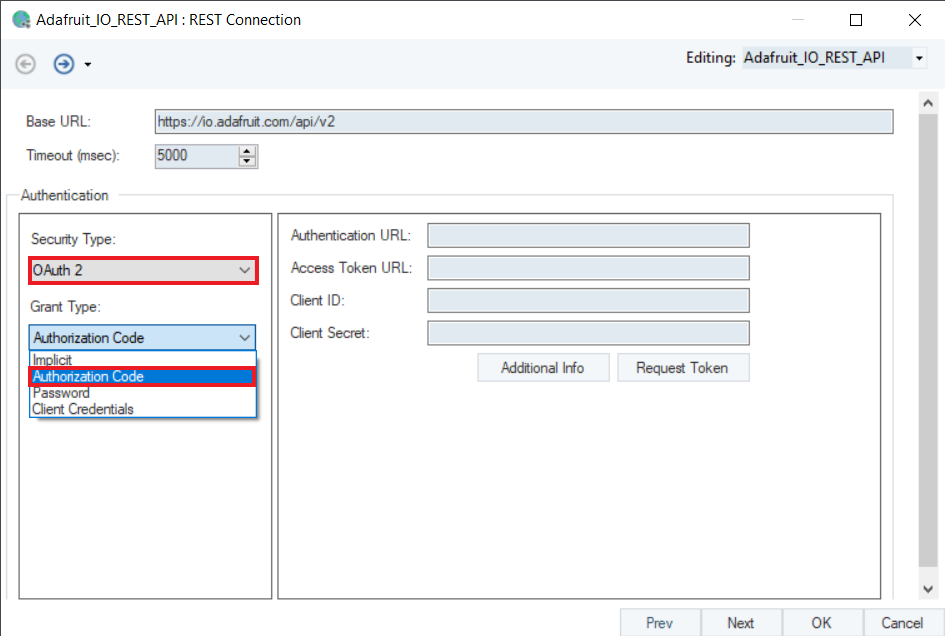
Authorization Code
In this grant type, you need to provide Authentication URL, Access Token URL, Client ID, and Client Secret to authorize.
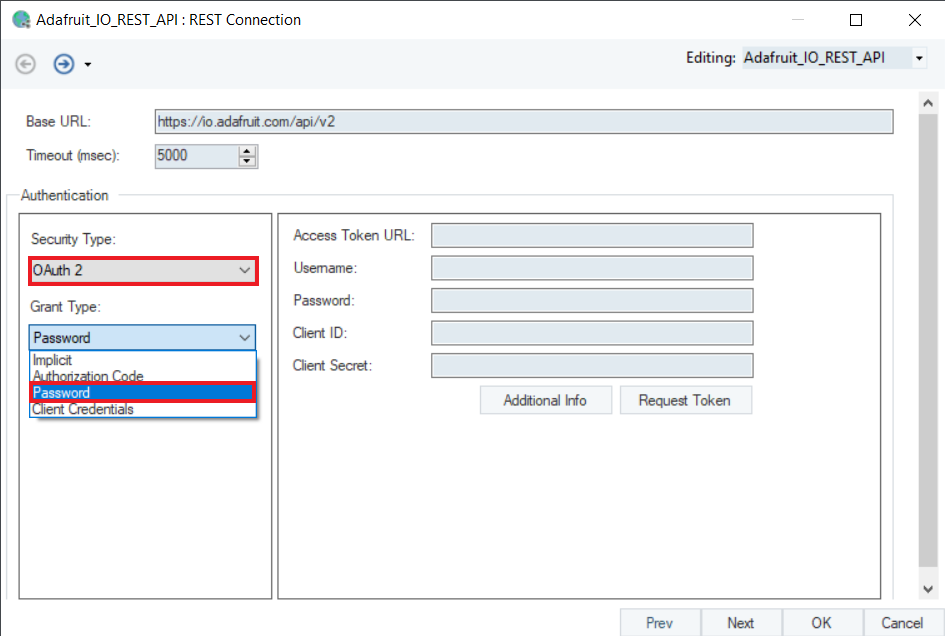
Password
In this grant type, you need Access Token URL, Username, Password, Client ID and Client Secret in order to authorize.
Client Credentials
In this grant type, you need Access Token URL, Client ID, and Client Secret to authorize.
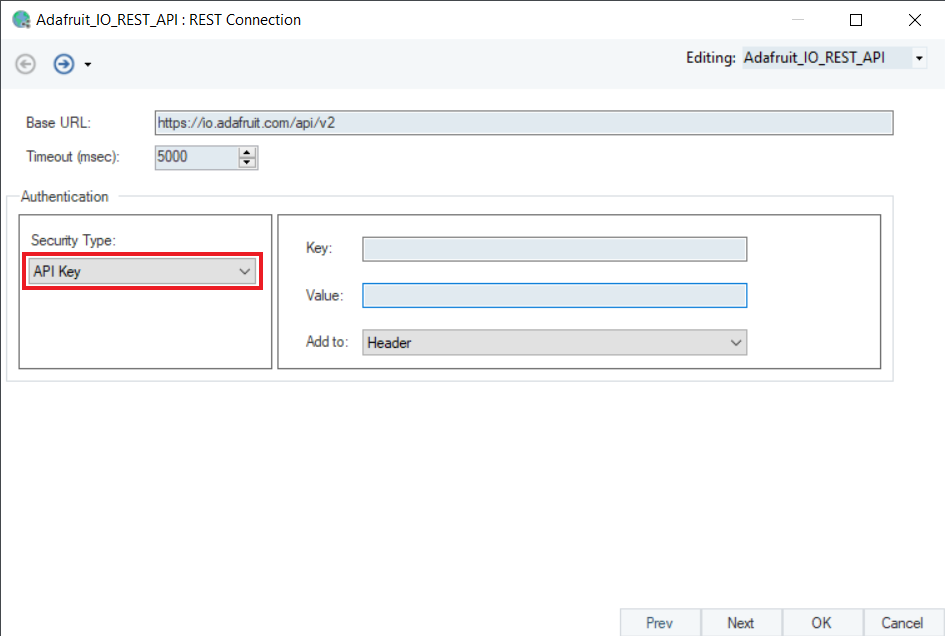
API Key
An API Key is a token that a client provides when it makes an API request. An API key is a secret that only the client and server know. They can be sent in the Query string or as a request Header.
It requires two parameters for authentication:
1. Key
2. Value
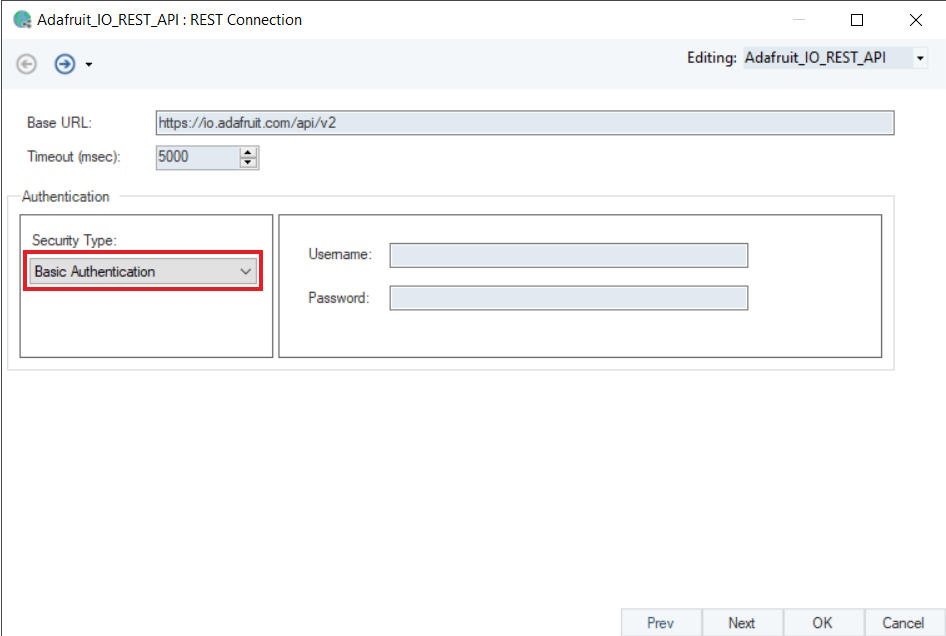
Basic Authentication
Basic Authentication is structured according to the HTTP protocol to provide a username and password when making a REST request. In basic HTTP authentication, a request contains a header field in the form of Authentication: Basic
It requires the following information:
1. Username
2. Password
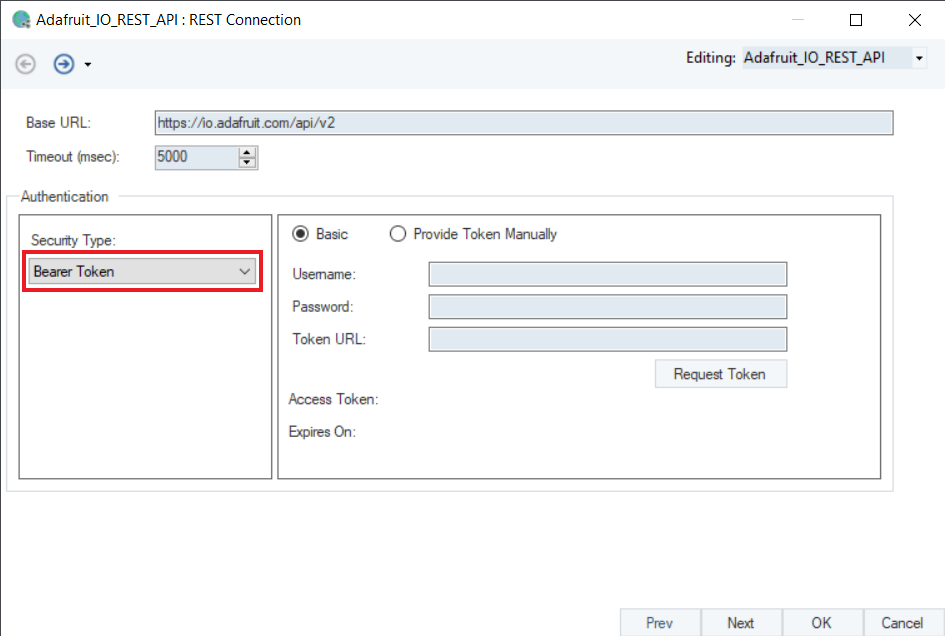
Bearer Token
Bearer token or token authentication is an HTTP-based authentication. The token is a text string included in the request header. It is generated by the server in response to a login request.
To authorize Bearer token, you need:
- User Name
- Password
- Token URL
4. Select the Security Type and specify the relevant details.
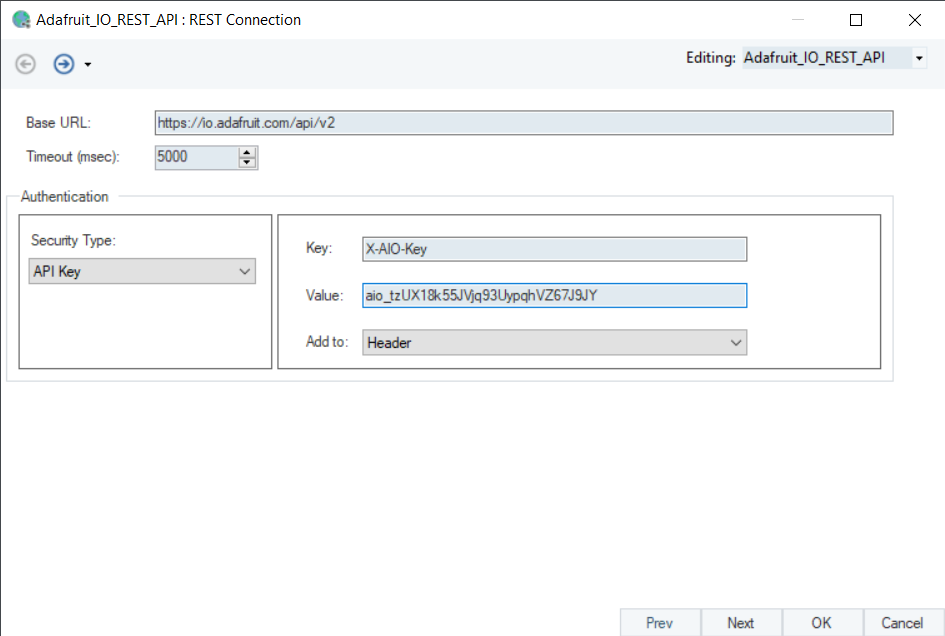
You can see that the Security Type has been specified as API Key which means that the Adafruit’s API uses ‘API Key’ as its authentication method.
5. Click OK. Now that the API has been authenticated, we can work with the API and make HTTP requests.
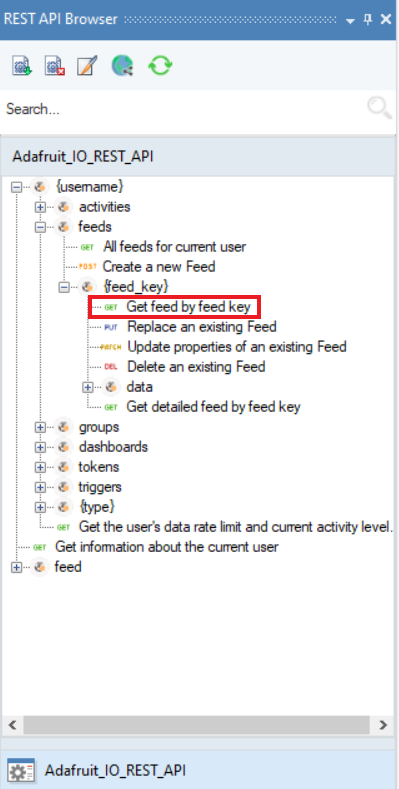
To make a GET request, drag and drop the ‘Get feed by feed key’ object from the REST API Browser on to the dataflow designer.
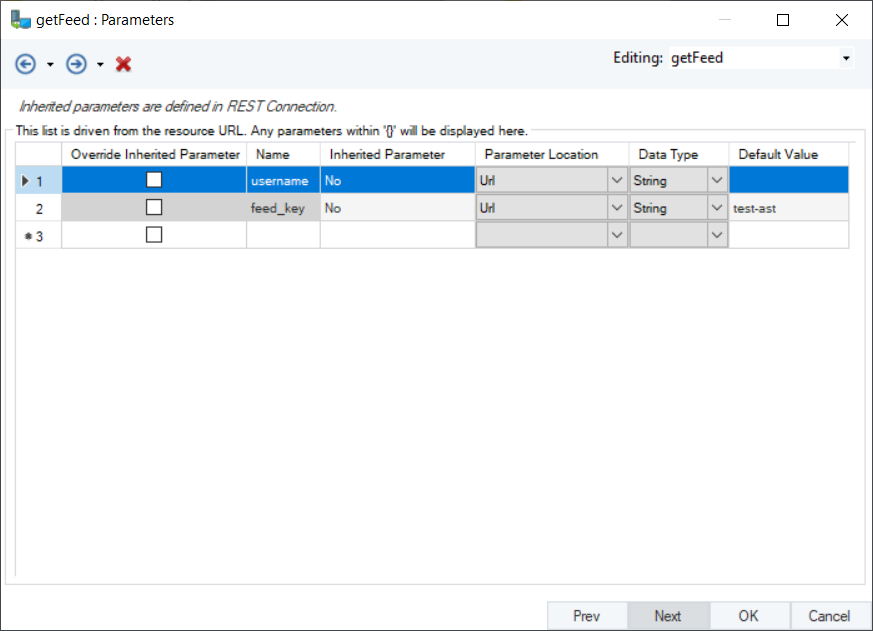
It requires two parameters: username and feed_key. We will pass the values to these parameters either by using a source object via mapping it or by specifying the parameter value in the default value column in the properties of ‘getFeed’ object.
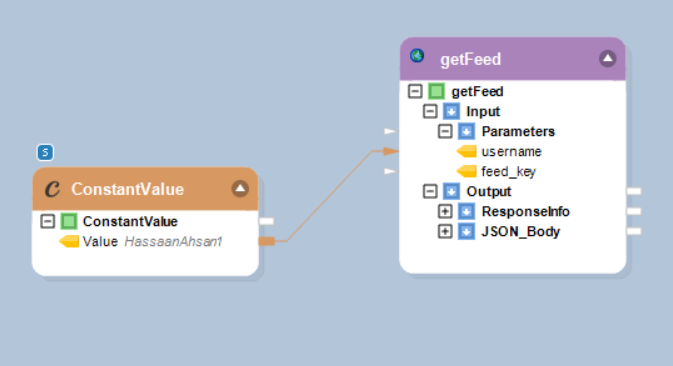
In this case, we have provided the username through a ConstantValue object. Now let’s specify the feed_key in the Default Value column in the properties of the getFeed object.
Right click on the REST Client object (getFeed) and select Properties. Go to the Parameters screen and specify the feed_key value in the Default Value column.
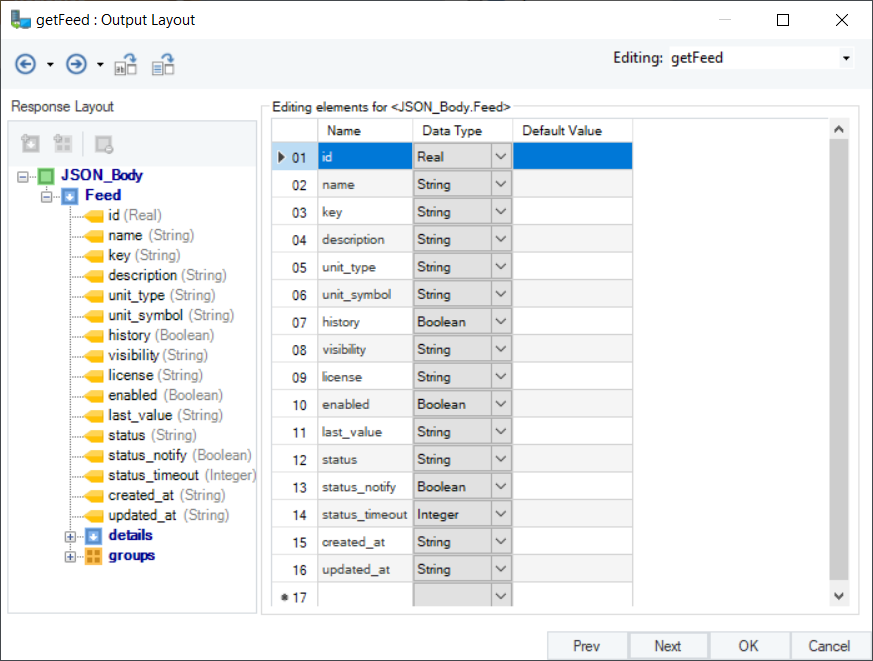
Click Next to proceed to the Output Layout screen. Here, you can see the Response Layout of your selected method.
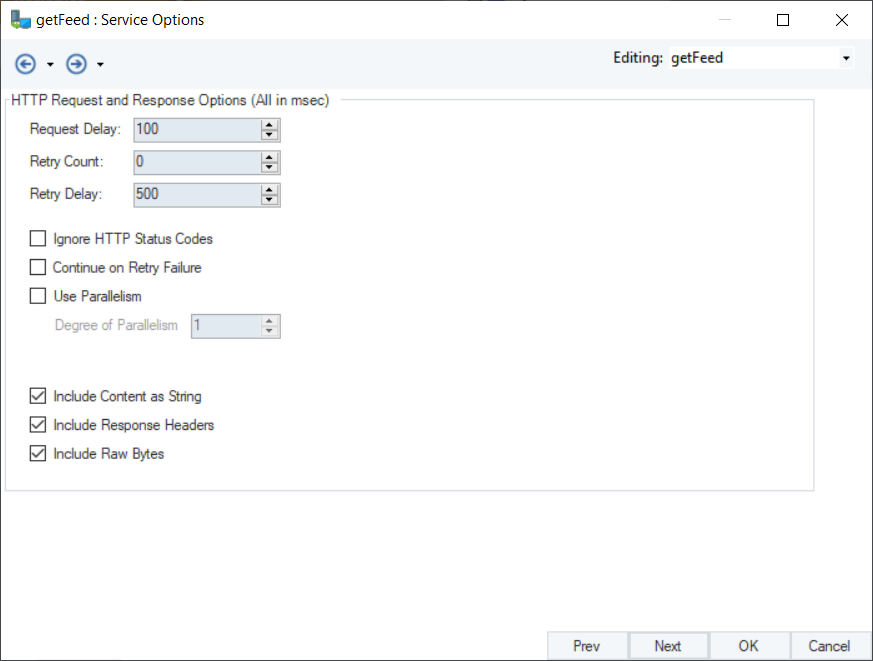
Click Next to proceed to the the Service Options screen.
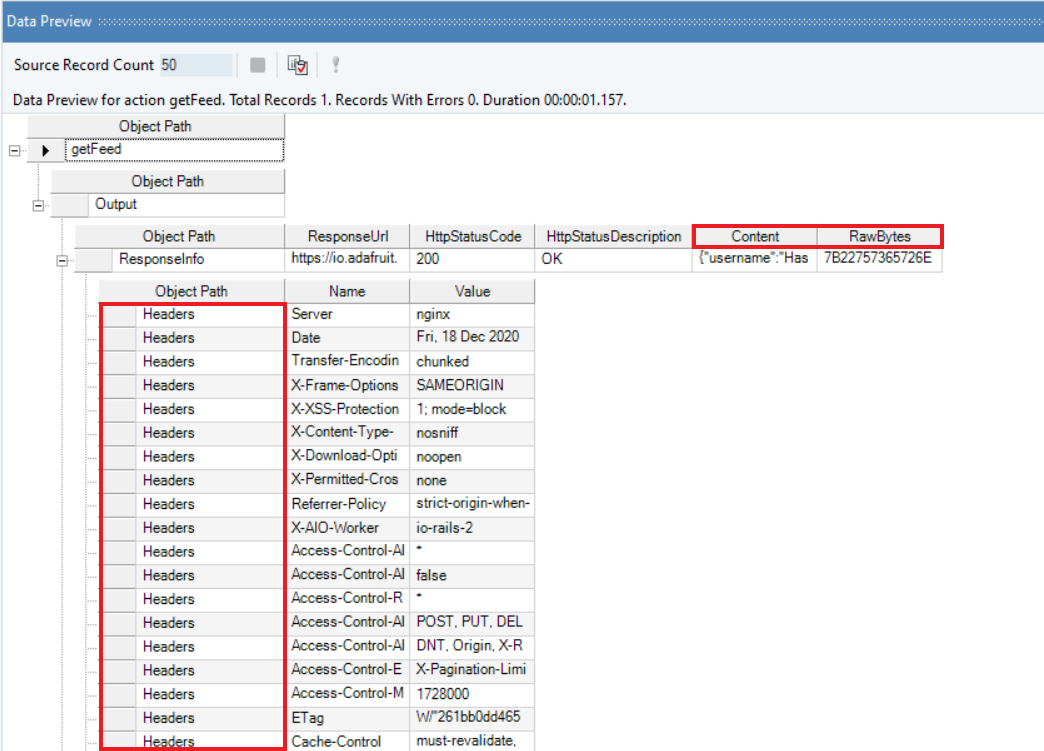
Now, right click on the REST Client (getFeed) object and select Preview Output.
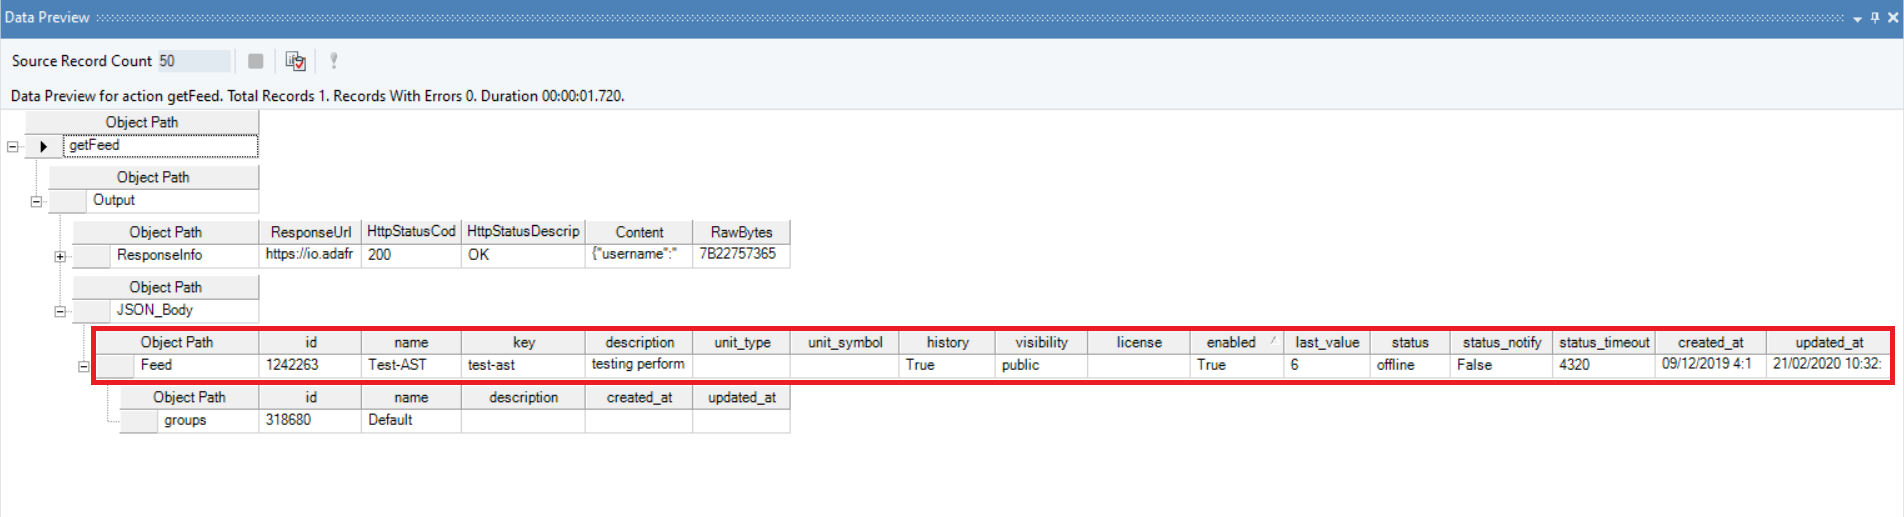
You can see that Centerprise has returned the feed information by providing the required parameters.
This concludes making HTTP requests through REST API Browser in Astera Centerprise.