UI Walkthrough - Astera Centerprise Data Integrator
What is Astera Centerprise?
Astera Centerprise is designed to support integration of complex and high-volume data. It is a powerful ETL (Extract, Transform, Load) tool that provides connectivity to all leading databases, flat and hierarchical file sources, and even supports legacy systems such as COBOL. Moreover, PDF form source, Email source and Report source enables users to extract data from a PDF file, Email and Report Models in Centerprise.
It combines data profiling, data transformation and data reporting in a single seamless user-interface. For further information, watch Centerprise Demo or read Centerprise Data Integrator product brochure.
Centerprise Home Screen
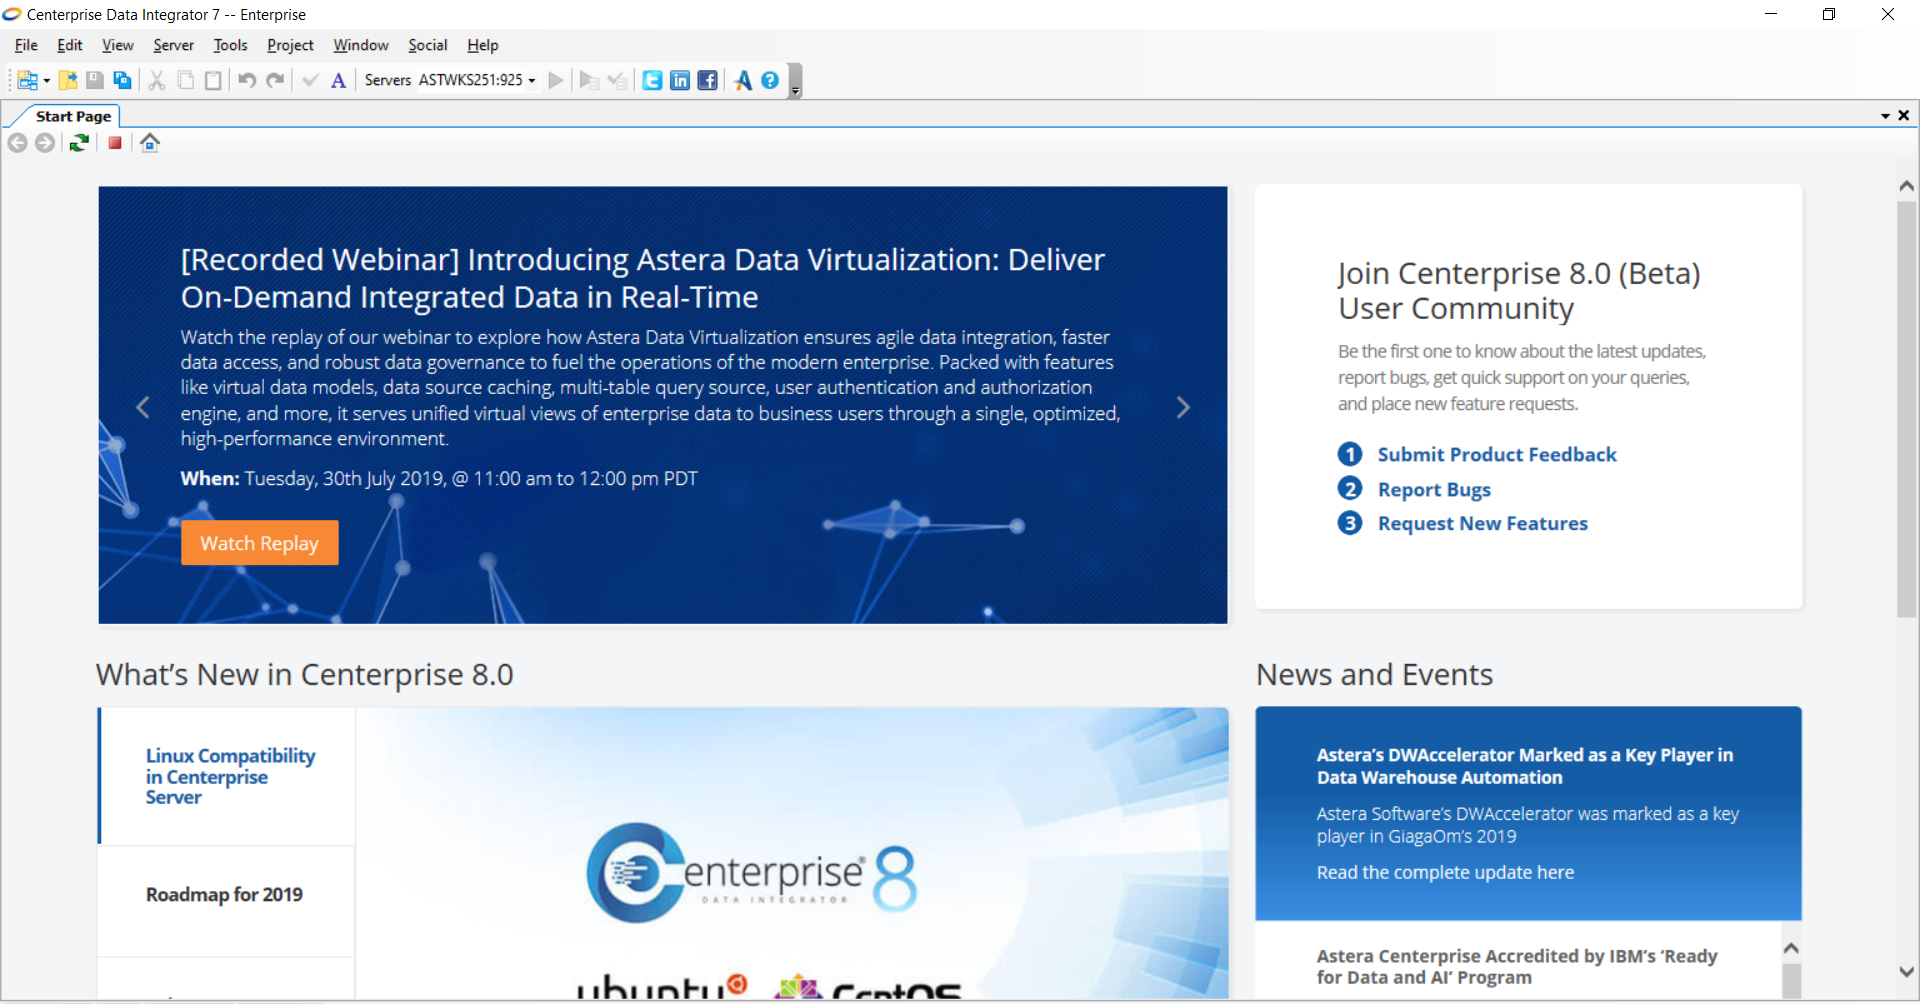
Above screenshot shows the start page layout of Astera Centerprise 7.5. The items on the start page keeps varying, however, the menu bar and icon bar abides the arrangement shown.
On the top-left side of this page, there are some tabs and icons. These are described in the coming sections.
![]()
Menu Bar

Menu Bar contains nine general menu items for the home screen, more items appear in the bar when working with Dataflows and Workflows. Each item expands in a list of options. The names of these items are mostly self-explanatory. A full description of each is as follows.
File
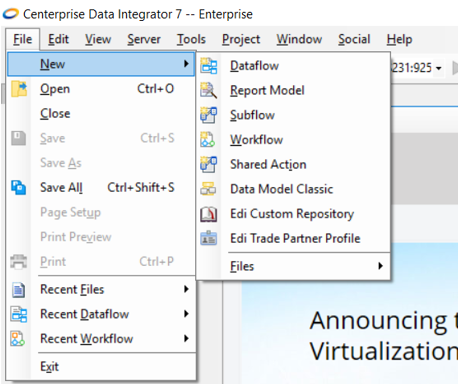
File menu item has a standard layout and provides the option for
- Creating, opening and saving a Dataflow, Subflow, Workflow and a Report Model
- Accessing the recently opened files, Dataflows and Workflows from here
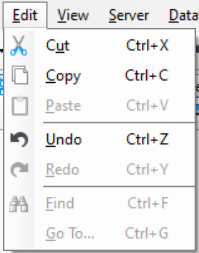
Edit
 *
*
Edit provides options to
Cut, copy and paste any file or item on main screen of Dataflows, Subflows, Workflows and Report models
Undo and redo any action/task performed
Locate any item on Dataflow, Subflow and Workflow designer through Find
*options become available when you select an item on the designer
View
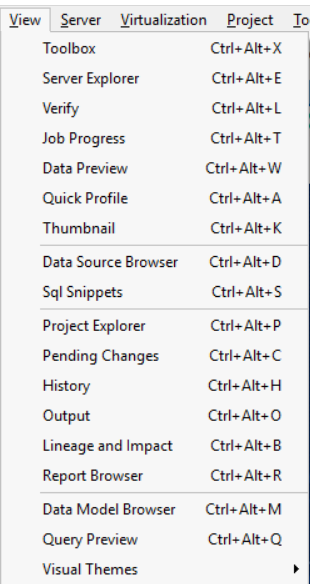
View allows access to various task bars, description and links for each is given below.
| Items | Shortcut-key | Description |
|---|---|---|
| Toolbox | Ctrl + Alt + X | It contains objects essential for performing tasks on Dataflow, Subflow and Workflow designer. |
| Server Explorer | Ctrl + Alt + E | It displays the server connected with Centerprise. |
| Verify | Ctrl + Alt + L | It verifies dataflow to list any errors and warnings present in the dataflow designer. |
| Job Progress | Ctrl + Alt + T | It displays status of the dataflow as it is being executed. This window also provides links to any error log files and the data profiler files. |
| Data Preview | Ctrl + Alt + W | It displays a sample of records for the selected object. |
| Quick Profile | Ctrl + Alt + A | It displays statistical information for a sample of records from the selected object. |
| Thumbnail | Ctrl + Alt + K | It allows the user to select a particular part of the dataflow and focus the designer on that. |
| Data Source Browser | Ctrl + Alt + D | It helps connect to query data on a database server. |
| Project Explorer | Ctrl + Alt + P | It displays a tree of items incorporated in a project. |
| Lineage and Impact analysis | Ctrl + Alt + B | It shows trail of all transformations and changes the data has been through. It only works if tasks are performed inside a project. |
| Report Browser | Ctrl + Alt + R | It displays the Model layout when working with Report Model in Centerprise. |
| Query Preview | Ctrl + Alt + Q | It displays the query of the execution of a Dataflow and Workflow task. |
Server
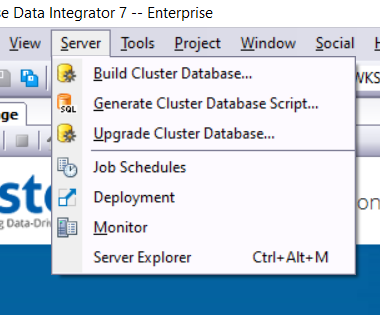
Server menu item has options for setting up server connection from Centerprise client. You have the options for:
- Connecting to an existing server
- Generating a new cluster database
- Upgrading cluster databases in a repository
However, this repository needs to be set up on a server instance first where schedules, logs and queues are kept.
| Items | Description |
|---|---|
| Job Scheduler | It allows you to run your jobs, silently in the background; once, or repetitively according to a selected schedule. |
| Deployment | It is a way for setting up Centerprise Projects to run on the Scheduler. |
| Job Monitor | It shows the execution status and time of tasks. |
For more information, read here.
Tools
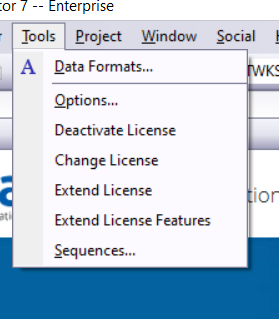
Tools menu tab provide options with which you can:
- Change the format of date
- Deactivate, change or extend license
- Manage Database sequences
Project
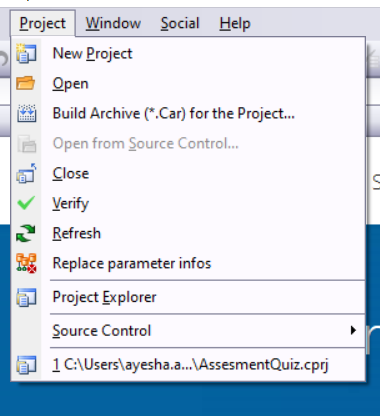
As the name suggests, Project menu tab deals with organizing various projects in Centerprise. You can
- Create a new project
- Open an existing one
- Connect to Source Control systems such as TFS and VSTS for team collaboration on any integration project
Windows
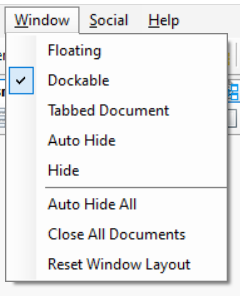
It provides option to
- Customize windows into a floating and dockable layout
- Hide windows
- View in tabular layout
Help
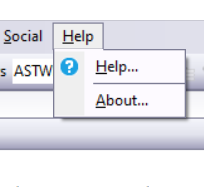
The Help menu lets users’ access guidelines, videos and help articles regarding various objects and options available in Centerprise.
Icon Bar
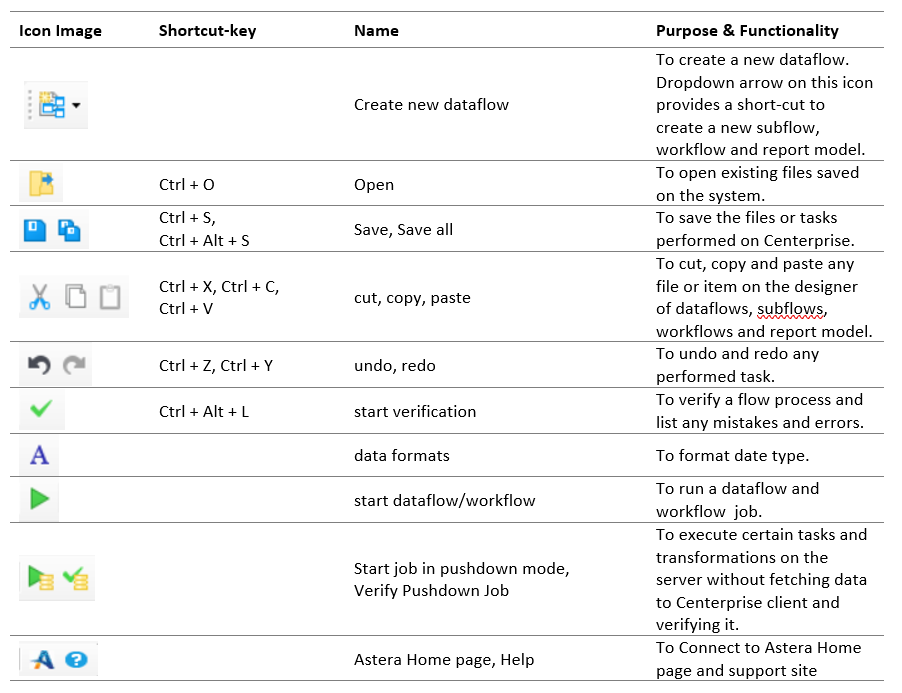
Dataflows
 Above screenshot shows the main screen of a Dataflow. To open a Dataflow, go to File > New > Dataflow. Here, you can see an additional menu item on the Menu Bar – Dataflow. There is also a secondary Icon bar and a Toolbox panel on left-side of the screen.
If the Toolbox is hidden, you can access it by going to View > Toolbox or using the shortcut Ctrl + Alt + X. Toolbox has different categories and we will discuss these categories in detail in the following sections.
You can hide and close the Toolbox panel from these icons  respectively.
Read more on Dataflows here.
Dataflow Menu Item
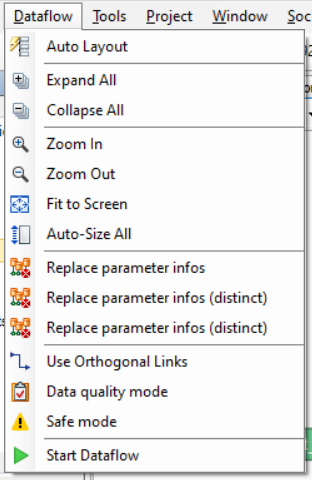
Dataflow menu item provides options that allow users to
- Change the layout of various objects in the dataflow
- Expand and collapse the objects’ view in the dataflow
- Zoom in and zoom out of the designer
- Change Links to orthogonal links
- Replace parameter information
- Run a task in Data quality mode
You can quickly access these options from the secondary icon bar.
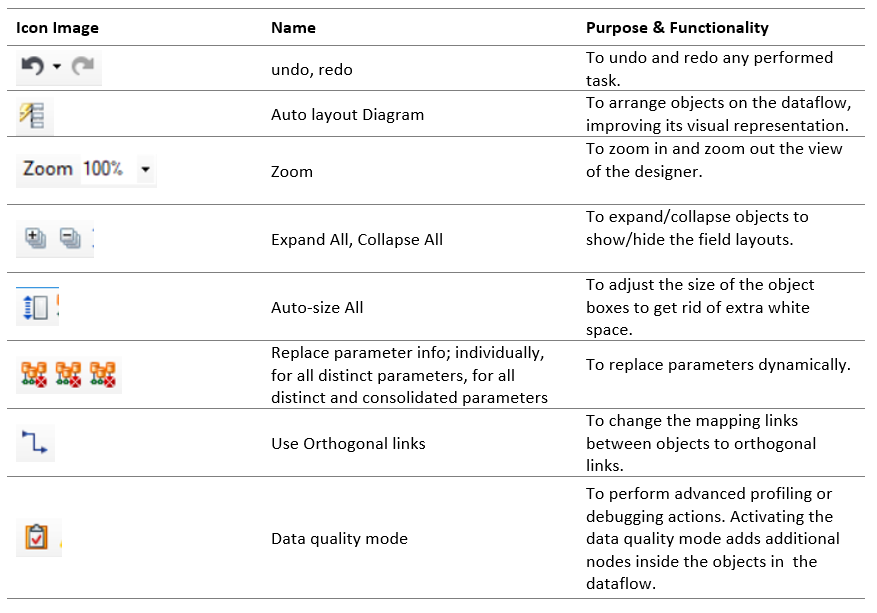
Secondary Icon Bar
Toolbox - Dataflow
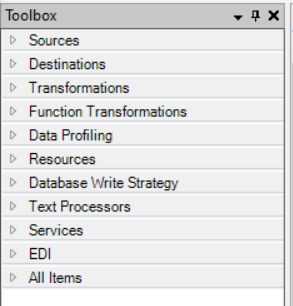
The items on the Toolbox are arranged into expandable sections. From each section, objects can be dragged-and-dropped on to the dataflow designer. In this section, we will discuss about these items in detail.
Sources
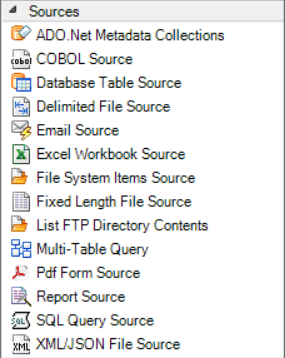
Data is extracted from a source and brought to Centerprise client for further transformation and integration. Source objects from the Toolbox can be added to the dataflow designer through a simple drag-and-drop action. Read more on setting up sources here.
The following types of sources are supported by Centerprise:
| Items | Extension | Description of Sources |
|---|---|---|
| COBOL Source | .cbl | COBOL (COmmon Business-Oriented Language) are fixed-width files containing text and/or binary data. |
| Database Table Source | .dbo | Database files store data information in a series of tables, table fields, and field data values and organized according to a data model. |
| Delimited File Source | .csv | Delimited file is a text file that stores data in fields separated by a delimiter. |
| Excel Workbook Source | .xls , .xlsx | Excel file is a spreadsheet file. |
| File System Items Source | File System item source provides metadata information about files found in a particular folder. | |
| Fixed Length File Source | .txt | Fixed length file is a text file in which every field has fixed length. |
| Report Source | .rmd | Report Source is a file with structured data extracted from an unstructured file using a Report Model. |
| Email Source | Email Source in Astera Centerprise enable users to retrieve data from emails and process the incoming email attachments. | |
| SQL Query Source | .sql | SQL (Structured Query Language) Query Source enables the user to retrieve data from a database using SQL query or a stored procedure. |
| XML/JSON File Source | .xml | XML (eXtensible Markup Language) stores data in a hierarchical structure. |
Destinations
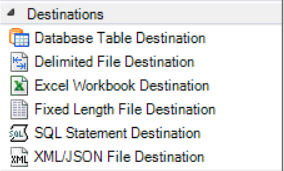
All these destinations can be added to the dataflow designer through drag-and-drop interface. Read more on setting up destinations here.
Following destinations are supported by Centerprise:
| Items | Extension | Destinations |
|---|---|---|
| Database Table Destination | .dbo | Database destination provides the functionality to write data to a database table. Users can control how data is written to a database table. |
| Delimited File Destination | .csv | Delimited file destination provides the functionality to write data to a delimited file with the ability to control the structure and content of the file. |
| Excel Workbook Destination | .xls , .xlsx | Excel File Destination provides the functionality to write data to Microsoft Excel workbook and does not need Microsoft Excel to be installed on the machine. |
| Fixed Length File Destination | .txt | Fixed-length file destination object allows user to write data to a fixed-length file. |
| SQL Statement Destination | .sql | SQL Statement Destination object offers extra flexibility over database destination objects in applying a custom INSERT, UPDATE, or DELETE SQL code that controls what will be written into the destination table. |
| XML/JSON File Destination | .xml | XML/JSON file destination object allows you to write data to an XML or a JSON file. |
Transformations
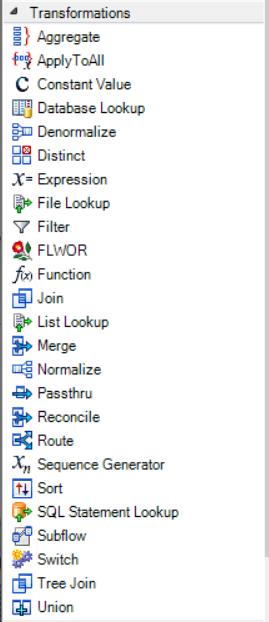
Transformations are used to perform a variety of operations on the data as it flows through a dataflow. Centerprise provides an extensive library of built-in transformations. These transformations are divided into two types:
- Single Record level - creates derived values by applying a lookup, function, or expression to fields from a single record
- Set level - operates on a group of records and may result in joining, reordering, elimination, or aggregation of records
Above screenshot shows the transformations toolbox as it appears in Astera Centerprise. A brief description of each is given in the following table:
| Items | Transformation type | Description |
|---|---|---|
| Aggregate | Set level | Creates aggregations of a dataset, using functions such as Sum, Count, Min, Max, Average, Variance or Standard Deviation. |
| Apply To All | Single Record level | Applies an Expression transformation to all mapped elements. This transformation is useful when applying a common Expression transformation to the entire dataset without the need of using multiple Expression transformation objects. |
| Constant Value | Set level | Returns a single, prespecified value for all records. |
| Database Lookup | Single Record level | Returns a single output field from the database lookup table, or a combination of fields in which lookup values matches the incoming values. |
| Denormalize | Set level | Combines several records into a single record. In other words, it transposes rows into columns. |
| Distinct | Set level | Removes duplicate records from the dataset. |
| Expression | Single Record level | Defines an expression that can be used to process the incoming value (or values) according to the expression’s logic. |
| File Lookup | Single Record level | Looks for certain specified values in the source data, replaces them with the desired information and stores the replaced values in a file. |
| Filter | Set level | Filters out data according to a predefined rule. |
| Function | Single Record level | Contains a series of built-in mathematical, logical, financial, conversion and encoding functions. |
| Join | Set level | Joins records from two record sets with the help of a join key. It combines fields in the data. |
| List Lookup | Single Record level | Stores information in the metadata and is used to look for certain values in the source data and replace them with the desired value. |
| Merge | Set level | Combines records from two inputs into a single output stream with the same layout as the input streams. |
| Normalize | Set level | Creates several records from a single record. In other words, it transposes columns into rows. |
| Passthru | Set level | Creates a new dataset based on the elements that were passed to the transformation. |
| Reconcile | Set level | Identifies and reconciles new, updated, or deleted entries within an existing data source. |
| Route | Set level | Invokes one or more paths in the dataflow, according to some decision logic expressed as a set of rules. |
| Sequence Generator | Single Record level | Makes it easy to add sequences of integer values to your dataset. |
| Sort | Set level | Sorts values in the dataset – either in ascending or descending order of some key field(s). |
| Subflow | Set level | Calls a subflow to run as part of your dataflow. |
| Switch | Single Record level | Matches source data for the criteria specified by the user, and wherever the criteria is met, it replaces the information in the particular field with the desired output. |
| Tree Join | Set level | Enables you to join datasets in a hierarchy and create tree structures. |
| Union | Set level | Combines incoming data from two or more inputs into a single output. It combines rows in the dataset. |
Function Transformations
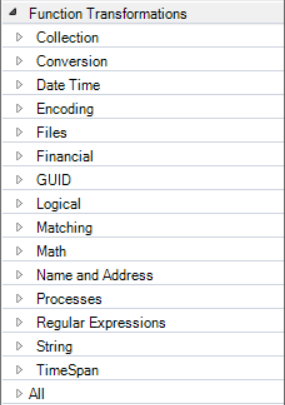
This item contains the built-in functions provided by Astera Centerprise. These functions are further classified into various categories (Math, Financial, Date Time, String etc.). Read more about using functions in the Functions Glossary.
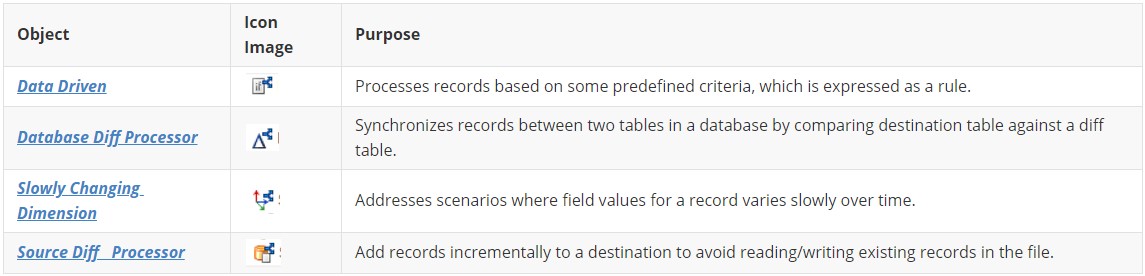
Data Profiling
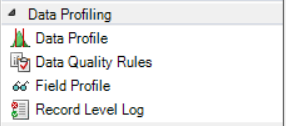
Data profiling is essentially related to collecting statistic on fields of data, performing data quality checks on the incoming data and creating log files for records with errors and warnings.

 _
_
Database Write Strategy
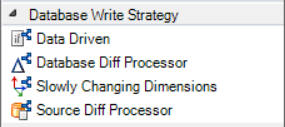
Database Write Strategy is used to perform database write actions such as INSERT, UPDATE, UPSERT, or DELETE. These actions are directly performed in the database table destination. Four different Database Write Strategy options are available in Astera Centerprise.
Text Processors
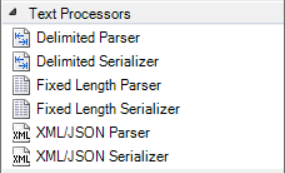
Text Processors enable the users to:
- Resolve data into components and write each component to a different field
- Serialize different field components
Learn more about the Delimited Parser here.
Services
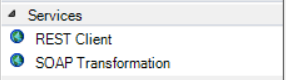
Using the SOAP and Rest web services connector, you can easily connect to any data source that uses SOAP protocol or can be exposed via Rest API.

EDI
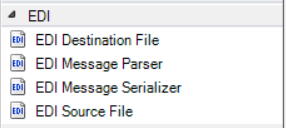
In this screenshot, you can see the options for EDI (Electronic Data Interchange) supported by Centerprise. EDI is a special file format just like XML and JSON. Here, Source, Destination, Parser and Serializer have the same purpose as defined in the earlier sections.
Subflow
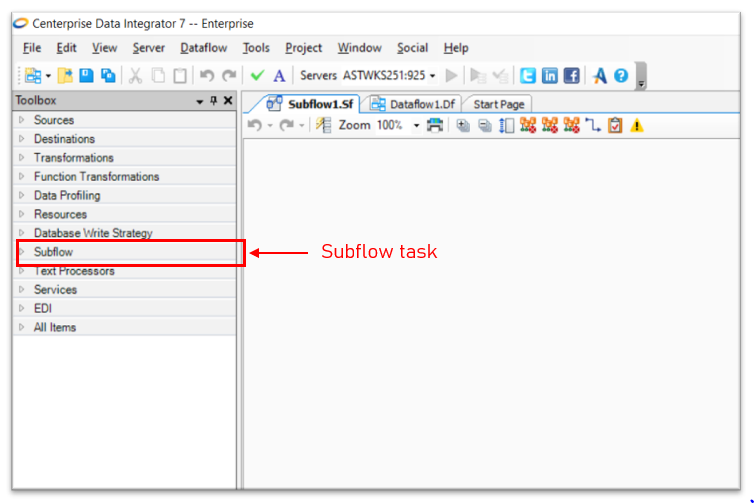
Subflows can be perceived as ‘black boxes’ inside a dataflow, simplifying and streamlining the dataflow design. Subflows can be called in a dataflow by dragging-and-dropping the subflow transformation object onto the dataflow designer.
Toolbox - Subflow
You can view the Subflow option in the toolbox when you open a subflow. To open a subflow, go to File > New > Subflow.
Toolbox for a subflow offers similar categories of actions and tasks as for a dataflow with an additional category of a subflow task which expands into two objects shown below.
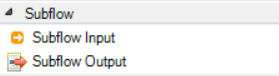
A short description of these objects is given below.

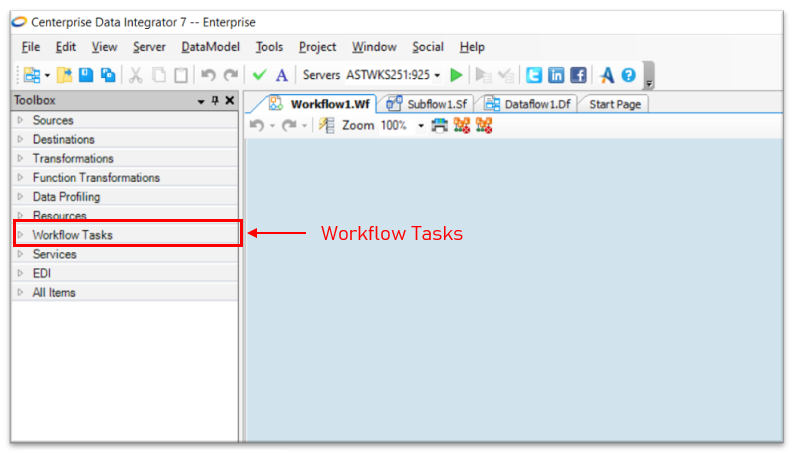
Workflow
Workflow is designed to orchestrate an automated and iterative execution of ordered tasks. Tasks are performed according to some predefined path and custom logic. For an in-depth understanding of workflows, refer to this article on working with workflows and the help video.
Toolbox - Workflow Tasks
To open a Workflow, go to File > New > Workflow.
Toolbox for a workflow offers similar categories of actions and tasks as for a dataflow with an additional category of a workflow task which expands into several objects as shown below.
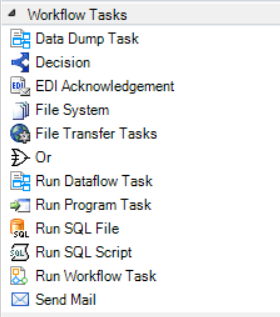
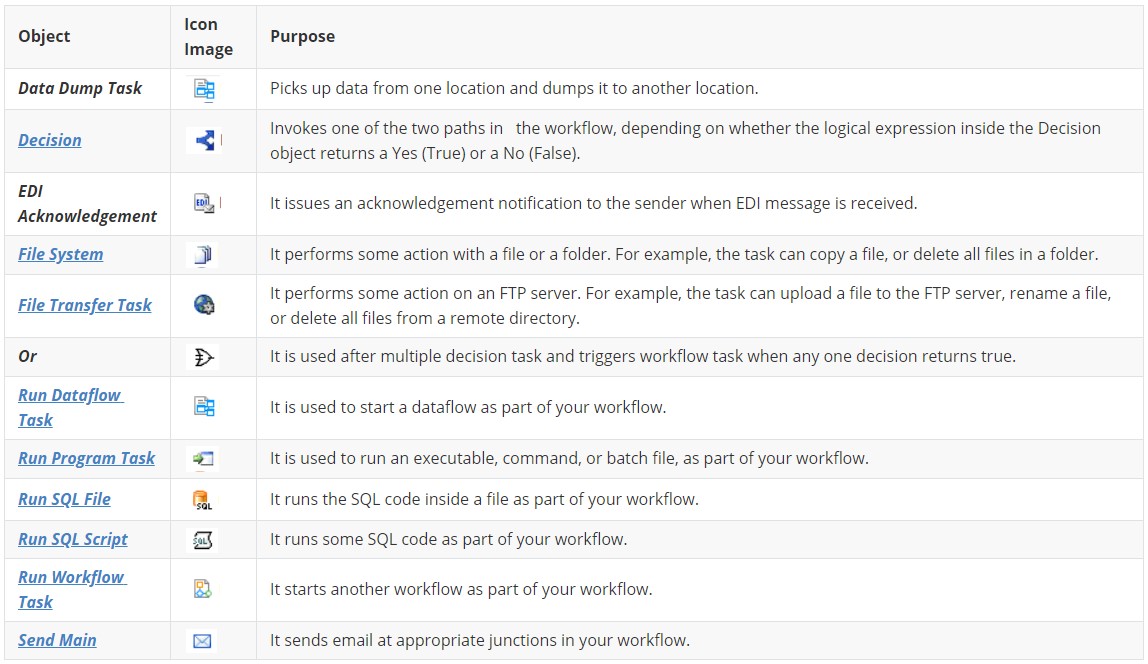
In the screenshot above, you can see a list of tasks that are included in the Workflow Tasks category. A brief note on their purpose is as follows.
Report Model
The objective of a Report Model is to convert unstructured data into a structured format. This unstructured data is normally a text file, a PDF file, an image file; it can even be an excel file or a word file as long as the data stored is unstructured.
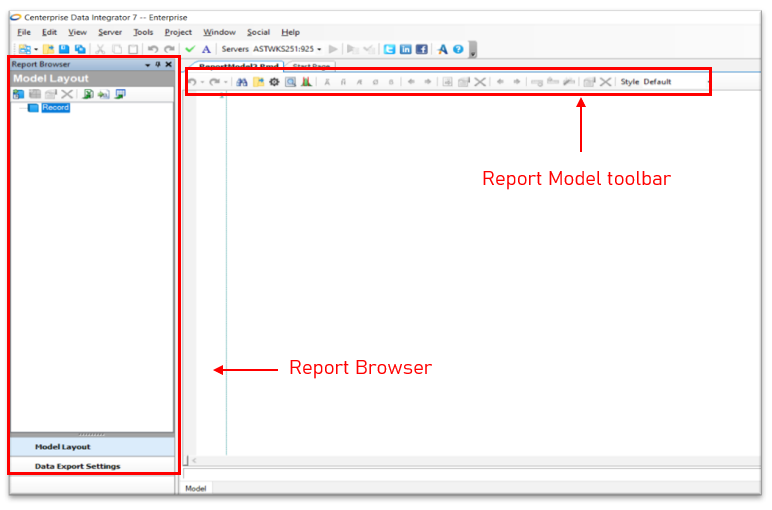
Above image represents the main screen of a Report Model in Centerprise. To open a Report Model, go to File > New >Report Model.
In addition, a vertical panel – Report Browser – that contains Model Layout and Data Export Settings can be seen on the left side of the screen. There is also a toolbar specific to Report Model interface. Each of these additional attributes are explained in the following sections.
Read more on how to create a Report Model here
Toolbar - Report Model
![]()
Report Browser
It contains features and layout panels for initiating and building an extraction template and exporting extracted data. There are two main panels in a Report Browser;
· Model Layout
· Data Export Settings
Model Layout
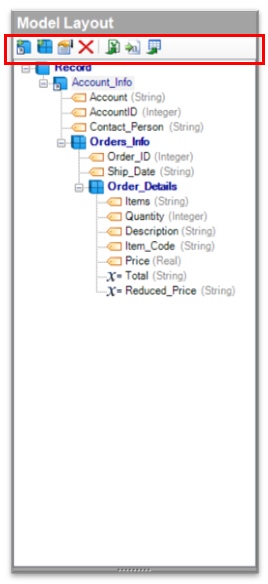
Model layout panel serves the purpose of building a layout of data extraction. It contains data regions and fields built according to a custom extraction logic from an unstructured file.
In the figure above, you can see a hierarchical layout of an extraction model with a single instance region as well as collection regions containing multiple fields.
Icons - Model Layout
![]()
Data Export Settings
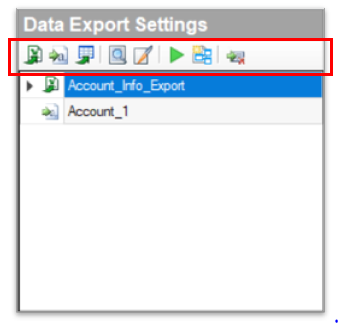
Data Export Settings deals with all the settings related to the export of data into an excel sheet, a csv file or a database table. Depending on the file format it is exported to, this exported data can later be called in a dataflow, subflow or a workflow through Excel Workbook Source, Delimited File Source or a Database Table Source.
Icons - Data Export Settings
![]()
Scheduler
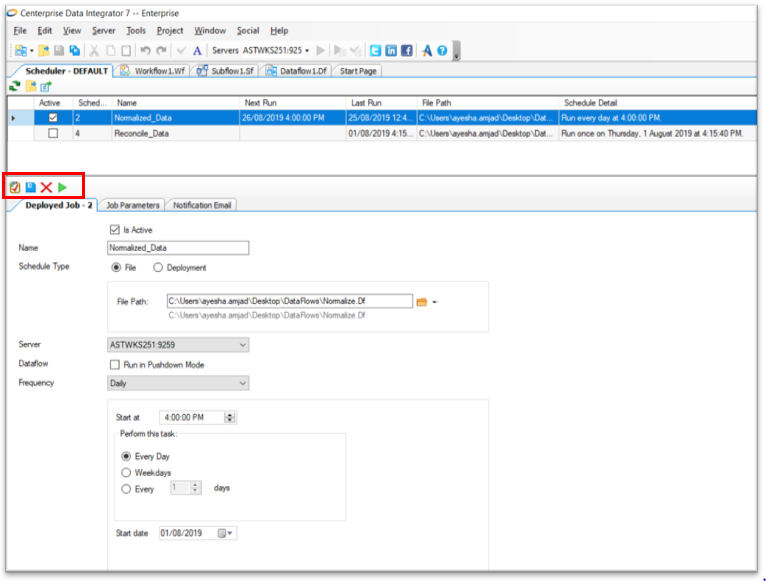
Centerprise offers a built-in Scheduler to perform quotidian tasks. The main screen of the Scheduler with options to customize a repetitive task can be seen in the above screenshot. To open Scheduler window, go to Server > Job Schedules.
Configure Scheduler by going to the Deployed Job tab; add the status, name and schedule type. Then, define a file path, server and the frequency of the scheduled task. It further provides an option to run the scheduled dataflow in a pushdown mode.
Users can also set up an email notification by going to Notification Email tab and fill in the necessary details.
Understand how to set up a scheduling task through an example here.
An icon tab is highlighted in the screenshot, details of each is as follows:
![]()
Deployment
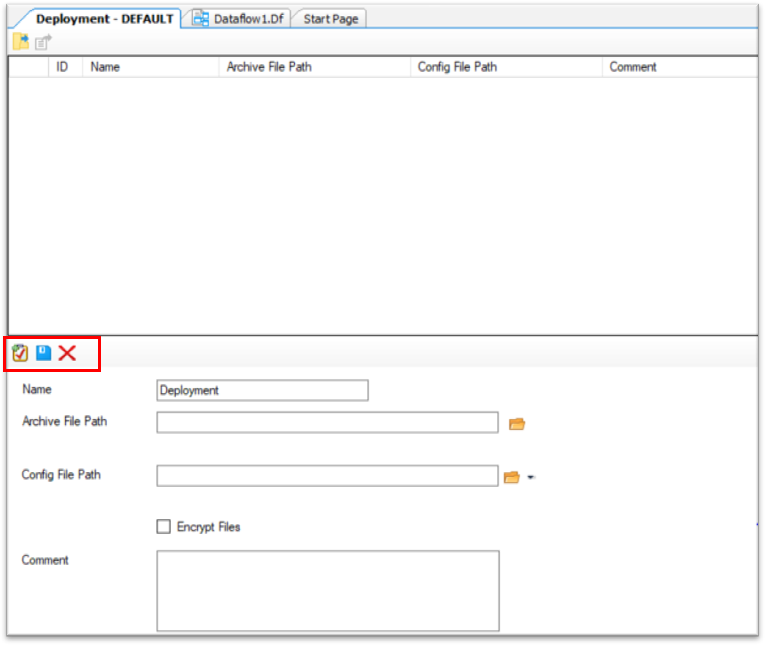
Deployment is a way for setting up Centerprise Projects to run on the Scheduler. Deployment enables the use of a Config File on a Project Archive (*.car) file, making the selected flow run independent of any local parameters.
To open Deployment window, go to Server > Deployment.
To configure Deployment; provide a name, an archived copy of the Project file (*.car), an optional file to specify project parameters and a comment.
Understand how to set up a project deployment through an example here.
An icon tab is highlighted in the screenshot, details of each is as follows:
![]()
Job Monitor
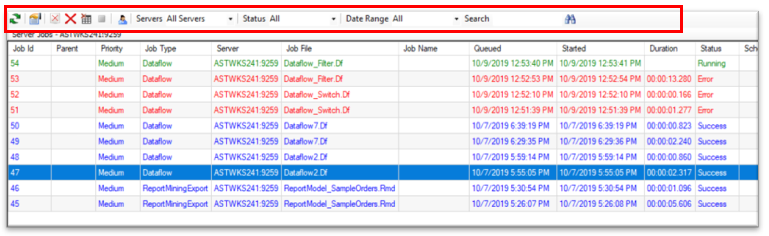
Job Monitor allows you to monitor the jobs that are executed on the server. To open a Job Monitor, go to Server > Monitor.
With a Job Monitor, you can observe the job type, job execution server, executed file, duration of the job, its status, error records etc.
In Job Monitor, a record in green shows a running job, a record in red signifies a job ending with error and a record in blue signifies a job ending with success.
An icon tab is highlighted in the screenshot, details of each is as follows:
![]()
Miscellaneous

View > Toolbox, Server Explorer, Data Source Browser, Job Progress, Verify, Data Preview and Quick Profile will generate a shortcut tab of each of these options on the bottom of the Main screen. Moreover, tabs on Level 1 will expand into a vertical panel on the left side of the Main screen whereas tabs on Level 2 will expand into a horizontal panel at the bottom of the screen.
Social
Social menu item lists down the options for