Introducing Dataflows
A dataflow contains a set of transformations that are executed in a user-defined sequence. Typically, data is read from one or more data sources, goes through a series of transformations, and then the transformed data is written to one or more destinations. In a Centerprise dataflow, you can mix and match any number of sources and destinations on a single, visual dataflow diagram and specify transformations, validations, and routing as the data moves down the pipeline.
Centerprise dataflows enable you to achieve seamless integration between data sources and destinations so you can integrate applications within the enterprise as well as integrate outside customers, vendors, and other business partners. With Centerprise dataflows, you can merge data from multiple disparate sources, split data from a single source into multiple destinations, and perform a series of relatively-simple to highly-complex transformations. Centerprise built-in transformations include field-level transformations such as expressions, lookups, and functions, as well as record-set-level transformations such as sort, join, union, merge, filter, route, normalize, denormalize, and many others. Centerprise also provides transformations that enable you to apply data quality rules to ensure that your data meets certain specified criteria. In addition, you can route the flow of data one way or another by using a custom decision logic that is suitable for your scenario.
For a set of complex transformations that are used repeatedly, you can automate your process by creating subflows. A subflow is a dataflow that can be used inside another dataflow, enabling you to build modular integration projects. You can call any number of subflows to run inside your dataflow. A subflow also makes it possible to hide the underlying logic inside the subflow and treat it as a black box in your main dataflow. This simplifies and streamlines the design of your integration jobs, increases reusability, and results in an easier-to-understand overall diagram. Over time, as the logic inside your subflow changes, you can update the subflow, and your update is automatically reflected in the main dataflow.
Thanks to the Centerprise advanced logging functionality, you have detailed visibility into the data at each step in the dataflow. A special ‘data quality mode’ is available to help you capture error messages and related status info as records move through the dataflow pipeline. The data quality statistics can be written into any destination, so that both the individual data records and aggregate data profile are available for review and analysis.
Centerprise dataflows can run on local or remote servers. To support smooth development-to-production deployment, Centerprise provides extensive parameterization capability, enabling you to change database connection information, file paths, authentication information, and other values at runtime without modifying the underlying documents.
Dataflow Designer
A new dataflow can be created from scratch with just a few clicks of your mouse thanks to the Centerprise graphical dataflow designer. The dataflow designer enables you to drag and drop objects onto the dataflow, copy or move them between dataflows, change properties, create maps, save objects for reuse in a different dataflow, and do many other things, all with unlimited undo-redo of previous actions.
Objects can be added to a dataflow in several ways, such as direct drag and drop of files from any Explorer window, drag and drop of tables or views from the built-in Data Source Browser, or by adding an object directly from the Flow toolbox.
Flow Toolbox
The objects on the toolbox are organized into expandable categories. The following main categories are available:
Sources
Below are the source types supported by Centerprise:
- Database table supporting a number of database providers: SQL Server, Oracle, DB2, ODBC, Sybase, Netezza, Access, MySQL, Microsoft Dynamics CRM, Salesforce, QuickBooks, and others
- Delimited file
- Fixed-length file
- ADO.NET metadata collections
- COBOL file
- EDI document
- XML file
- Excel file
- File system entries
- Multi-table query
- Report document
- REST web service
- SQL query
Data sources are starting points for your dataflow. Data is read from the data source, and may optionally go on to succeeding transformations before it is written to a destination. Data sources cannot succeed any object other than parameters, context, or singleton objects.
NOTE: You can assign any data source as singleton. Singleton sources are useful when reading values from configuration files or databases, which are then supplied as parameters to the other dataflow objects. When a data source is marked as singleton, Centerprise reads only the first record from the data source and makes it available for maps and parameters throughout the entire life of a dataflow. This makes singleton objects useful for providing configuration and environment information to the current dataflow.
Destinations
Below are the destination types supported by Centerprise.
- Database table supporting these database providers: SQL Server, Oracle, DB2, ODBC, Sybase, Netezza, Access, MySQL, Microsoft Dynamics CRM, Salesforce, QuickBooks, and others
- DelimitedfFile
- Fixed-length file
- Excel file
- Message queue
- SQL statement
- Web service
- XML file
You will normally use destination objects on your dataflow to write to a database, file, or web service. A destination object must follow a source object, either directly or indirectly, via a chain of transformations. A destination object does not necessarily have to be the ending object on your dataflow—it may be succeeded by another destination object, a subflow, or a log/profiler object.
Transformations
Below are the transformations supported by Centerprise.
- Aggregate
- Constant value
- Database lookup
- Delimited parser
- Denormalize
- Distinct
- Expression
- File lookup
- Filter
- Fixed-length parser
- Function
- Join
- List lookup
- Merge
- Normalize
- Route
- Sequence generator
- Sort
- SQL statement lookup
- Subflow
- Tree join
- Tree node query
- Union
- Web service lookup
- XML parser
- Detached
- FLOWR
- Scoped
- Dynamic lookup
- Persistent lookup
- ApplyToAll
- Expression list
- Text processors
- REST web service
A transformation object processes and changes your data traveling from an upstream object. You can use transformation objects to convert, combine, filter, route, join, split, merge, look up, or otherwise process incoming data. There are two types of Centerprise transformations—single-record transformations and set transformations.
Single Record Transformations
Single-record transformations are used to derive or look up new values by using element values in preceding transformations or sources. You can view results of single-record transformations as appending more values to the preceding layout. A name-parse function, for instance, takes a full name and breaks it into individual name components. These components can be mapped to succeeding transformations or written to a destination. Examples of single record transformations include expressions, functions, and lookups.
Set Transformations
Set transformations work on the record set and can combine, route, filter, and otherwise manipulate a record set. Set transformations can change the order and content of records in the input stream. Examples of set transformations include join, filter, route, sort, union, etc.
Blocking Transformations
Blocking transformations accumulate some or all records before processing these records. The sort transformation is one such example. It waits for end of input before sorting and releasing records. Other blocking transformations include join, aggregate, and denormalize.
Resources
The Resources category provides access to context and parameter objects, as well as shared database connections. These objects are useful for parameterizing your dataflow. They pass in values from outside the dataflow or use values from the job context, such as Server Name or Scheduled Job Id. The values coming from context and parameter objects, as well as the fields in singleton sources, can be accessed directly in many places throughout the dataflow using the parameter replacement notation $(<parameter_name>). Shared connection objects enable you to use a single connection and, optionally, a single transaction for multiple destinations. This enables you to write to multiple destinations in the same transaction and roll back the entire transaction if necessary.
Using Dataflow Designer
Creating a New Dataflow
To create a new dataflow, go to File -> New -> Dataflow on the main menu. Or you can expand the New Dataflow dropdown menu on the main toolbar and select Dataflow.
Adding Objects
A dataflow normally has one or more sources, and may have zero, one or more destinations. Sources, destinations, most types of maps, transformations and logs are represented as objects on the dataflow. Depending on the type of the object, an object can be added to the dataflow in one of the following ways:
For Flat File Sources or Destinations:
1. Using Toolbox. You can add a source object or a destination object by selecting it from the appropriate category in the Flow toolbox.
For example, to add a source comma-delimited file object, expand the Sourcesgroup in the Flow toolbox, and the drag-and-drop the Delimited File Source tool on the dataflow.
To add a destination object, press and hold Shift key while performing the drag and drop.
Note that an object added this way initially does not have any properties defined. To define its properties, double click on the object title, or right click and select Properties from the context menu.
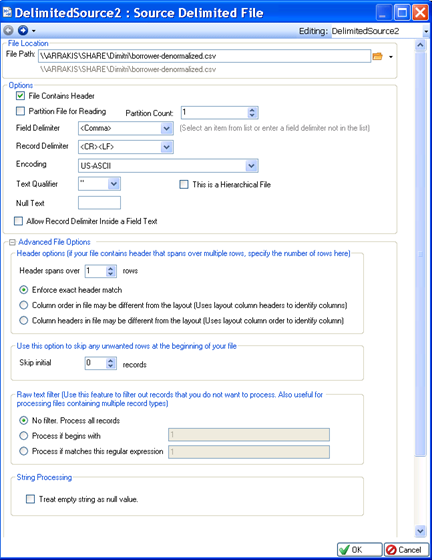
In the Properties screen that opens, select the File Path of the file that will be associated with the object. Field layout and other properties can then be populated based on the file’s content. An example of a source delimited file Properties screen is shown below.
2. Using Drag and Drop. You can drag an Excel, delimited, or fixed-length file from an Explorer window and drop it onto an open dataflow tab in Centerprise.
NOTE: XML files cannot be added to a dataflow using the drag-and-drop method, see instructions below for XML sources or destinations.
By default, the file dropped on a dataflow is added as a source object.
To add the file as a destination, press and hold Shift key while dropping the file.
The advantage of using drag and drop versus other methods is that many of the object’s properties are pre-populated for you based on the file’s content. For example, the field layout is automatically filled out so that there is no need to manually create it.
3. Copying and pasting an existing object from the same or different dataflow or workflow. If your source or destination is already defined in the same or different dataflow (or workflow), you can copy the existing object and paste it into your dataflow. The object being copied retains the properties of the original object, and is assigned a unique new name to distinguish it from the original object.
NOTE: Using this method, you cannot change the designation of Source vs. Destination object.
For XML Sources or Destinations:
1. Using Toolbox. To add an XML source or destination to the dataflow, use the XML File Source or XML File Destination tool in its appropriate group in the Flow toolbox.
Note that the XML file object initially will not have any properties defined. To define its properties, double click on the object’s title or right click and select Properties from the context menu.
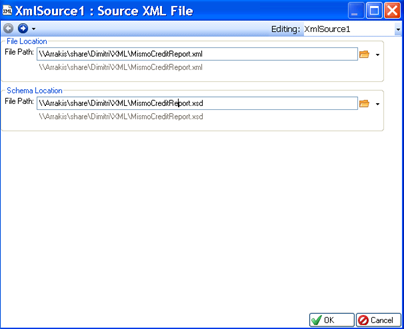
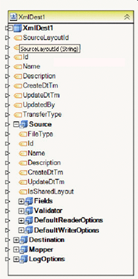
In the Properties screen that opens, select the File Path of the XML file that will be associated with the object. Additionally, provide the path to the XSD schema that controls the layout of your XML file. An example of a source XML file Propertiesscreen is shown below.
As with flat files, you can copy and paste an existing XML object from the same or different dataflow or workflow. The object being copied retains the properties of the original object and is assigned a unique new name to distinguish it from the original object.
For Databases:
1. Using drag and drop. You can drag a database table or view from the Data Source Browser and drop it on an open dataflow tab.
To open the Data Source Browser, go to View -> Data Source Browser. Connect to the appropriate server, then expand the Database tree and expand Tables (or Views) tree to select your table (or view). Drag-and-drop the selected table or view to the dataflow.
By default, the database table is added as a Database Table Source object.
- To add a database table (or view) as a destination, press and hold Shift key while dragging and dropping a table (or view) from the Data Source Browser.
- To add a data model source, press and hold Ctrl key while dragging and dropping a table (or view) from the Data Source Browser.
- To add a database lookup object, press and hold Alt key while dragging and dropping a table or view from the Data Source Browser.
As with files, you can copy and paste an existing database table object from the same or different dataflow or workflow. The object being copied retains the properties of the original object and is assigned a unique new name to distinguish it from the original object.
2. Using Toolbox. To add a database table source or destination to the dataflow, use the Database Table Source or Database Table Destination tool in its appropriate group in the Flow toolbox.
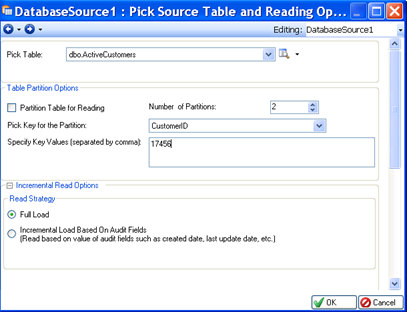
Note that the database table object initially will not have any properties defined. To define its properties, double click on the object’s title, or right click and select Properties from the context menu. An example of a source database table Properties screen is shown below.
As with files, you can copy and paste an existing database table object from the same or different dataflow or workflow. The object being copied retains the properties of the original object and is assigned a unique new name to distinguish it from the original object.
For Any Other Types of objects (for example, maps, transformations, or logging objects):
1. Using Toolbox. You can add an object by selecting it from the appropriate category in the Flow toolbox.
Note that an object added this way initially does not have any properties defined. To define its properties, double click on the object title or right click and select Properties from the context menu.
2. Copying and pasting an existing object from the same or different dataflow or workflow. If your object is already defined in the same or different dataflow (or workflow), you can copy the existing object and paste it into your dataflow. The object being copied retains the properties of the original object and is assigned a unique new name to distinguish it from the original object.
Unlimited Undo/Redo
Dataflow designer supports unlimited undo-redo capability. You can undo or redo the last action done or undo/redo several actions at once.
To undo the last action, open View menu and select Undo. You can also click the  icon on the Dataflow toolbar. Or you can also use the CTRL+Z shortcut.
To redo the last action, open View menu and select Redo. You can also click the icon on the Dataflow toolbar. Or you can also use the CTRL+Y shortcut.
To undo several actions at once, select the first action you wish to undo from the dropdown. The actions following the selected action will also be undone.
To redo several actions at once, select the first action you wish to redo from the dropdown. The actions following the selected action will also be redone.
Copying Objects
Using the copy and paste feature, you can replicate an object on your dataflow by copying it into a new object with a different name to distinguish it from the original object.
You can paste this object into the same dataflow or a different dataflow.
You can also copy several objects at once. To do so, click the objects you wish to copy while pressing Ctrl key, or you can draw a rectangle with your mouse while holding down the LEFT mouse button. The objects inside the rectangle will be selected. Right click on a selected object and select Copy from the context menu. Then right click on white space in the same or a different dataflow and select Pastefrom the context menu.
To move an object or a set of objects, use the Cut and Paste sequence as described above.
NOTE: When you move objects, they keep their original names.
NOTE: You can use the CTRL+C shortcut to copy the selected object into the clipboard. CTRL+V will paste it from the clipboard. CTRL+X will cut it into the clipboard.
Managing Dataflow Layout
Auto Layout
The Auto Layout feature enables you to arrange objects on the dataflow, improving its visual representation.
To invoke the Auto Layout feature, click the  icon on the Dataflow toolbar. Or you can open the Dataflow menu and select Auto Layout.
NOTE: You can manually move the object around the dataflow by holding the LEFTmouse button down over the object title and moving it to a new location.
Expand All/Collapse All
To only show object names in the dataflow hiding their field layout, click  icon on the Dataflow toolbar, or go to Dataflow menu and select Collapse All.
When an object is collapsed, the maps to and from the object are shown as a single line. To see how fields are mapped, expand the object.
To show object names as well as their field layout, click the  icon on the Dataflow toolbar, or go to the Dataflow menu and select Expand All.
To collapse a single object, click the icon in the top right corner of the object box.
To expand a single object, click the  icon in the top right corner of the object box.
Zoom In/Zoom Out/Fit to Screen
The following tools are available from the Dataflow menu to help you adjust the display size of the dataflow:
- Zoom In
- Zoom Out
- Fit To Screen
Additionally, you can select a custom zoom percentage using the Zoom % input on the Dataflow toolbar.
Auto Size All
Auto Size All adjusts the size of an object box to eliminate extra white space or increases its vertical footprint to eliminate the vertical scroll bar. To use this feature, click the icon on the Dataflow toolbar.
NOTE: To auto resize a single object, right click on it and select Resize to Fit from the context menu.
NOTE: You can resize any object by ‘grabbing’ any corner of the object with the mouse pointer.
Use Orthogonal Links reorganizes links between objects in a grid. To use this feature, click the  icon on the Dataflow toolbar.
Linking and Mapping Objects
Most objects on the dataflow have ports. Some have only input ports, others only have output ports, and still others have both input and output ports.
An input port on an object signifies that incoming data can be fed to the object. Because source objects cannot receive data, they do not have Input ports.
Example:
An output port on an object signifies that the object can send data to another object.
Example:
An object having both an input port and an output port can receive and send data. An example of such an object is a destination object that is also a source to another destination object. Most transformation objects have both types of ports.
There are two types of ports: field ports and node ports. A field port allows you to map to an individual field. A node port allows you to map to a node, including all fields and child nodes in the selected node. The main node located at the very top of the object box is essentially the root node that spans the entire tree (or all fields in the case of a flat layout).
To quickly create field maps between two objects, drag and drop the node output port of the upstream object to the node input port of a downstream object.
If the downstream object already has fields, the fields with the same name will be mapped between the two objects. If the downstream object has an empty field layout, it will inherit the same layout as the upstream object and all the fields will be mapped between the two objects.
NOTE: By default, maps copy the value of the source into the destination, and, if needed, convert the value to the data type of the destination element. If you want to copy metadata for the field, you can change the map type to copy the field name, field data type, or length to the destination.
To remove all fields from a node, right click the node and select Remove All Elements from the context menu. This action will also unmap any fields mapped to the fields being removed.
To remove a map between two fields, right click on the map and select Delete, or left-click on the map and press DEL key on the keyboard.
To remove incoming maps for a node, right click on the node, and select Remove All Inbound Maps.
Note: For objects with tree layouts in the collapsed state, a single map link will be shown for the entire node, which can make it difficult to see how fields are mapped. You can use the Find Map From To capability to automatically expand and position the two trees inside the object box, showing how the fields are mapped. To do so, right-click on a map and select Find Map From To.
A similar feature is available when you need to identify to or from which field or fields a given field is mapped. To find the destination field or fields for a given source field, right click on your field and select Find Elements Mapped To. To find the source field for a given field, right click on your field and select Find Element Mapped From.
Setting Object Properties
To open an object’s properties, double click on the object’s title or right click on the object and select Properties from the context menu. An example of a destination database table’s Properties screen is shown in the screenshot below.
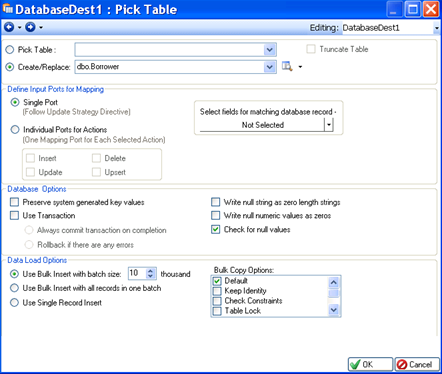
NOTE: While in the Properties screen, you can navigate the wizard pages by pressing icons. You can also switch to the properties of another object on the dataflow by selecting an object in the Editing dropdown menu.
Common Object Actions
The following actions are common for many types of objects on the dataflow. These actions are available via the context menu.
Resize to Fit – shrinks the object’s box to get rid of extra white space or increases its vertical footprint to eliminate the vertical scroll bar.
Collapse Tree Subnodes – is useful for objects whose field layout is a tree. This function will collapse all subnodes in the tree, leaving the root node as it is.
Sort Nodes – sorts fields in all nodes alphabetically. Click Sort Nodes again to restore the original sorting.
Rename – renames the object.
Preview Data – is similar to previewing source or destination data in transfer settings. A sample of data will display in the Data Preview window. To change the number of rows displayed in the sample, enter the number in the Record Countinput in the Data Preview window.
Quick Profile – is similar to source or destination data statistics in transfer settings. A data statistics report will display in the Data Statistics window.
Edit File – only applies to files. It opens the file for editing in a new tab.
Edit Schema – only applies to XML files. It opens the XSD file for editing in a new tab.
View Table Data – only applies to database tables. It opens the table for viewing in a new tab.
View Table Schema – only applies to database tables. It opens the database schema for viewing in a new tab.
Use As Singleton – turns on/off the singleton mode for the selected object. When a source is used in singleton mode, only the first record (excluding the header) is read from the source. This makes it possible to refer to the source’s fields via parameters that return a single value. For example, ObjectName.FieldName.
Generate XML Schema for Layout – exports the field layout of the selected object as an XSD schema.
Delete – deletes the object from the dataflow. This will also remove any links to and from the object.
Cut – removes the object from the dataflow and places it into the clipboard. The object can then be ‘pasted’.
Copy – copies the object into the clipboard leaving the original object as it is. A copy of the object can then be ‘pasted’.
Paste - pastes the object from the clipboard.
Creating Field Layouts
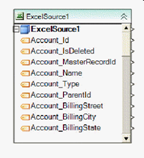
Most objects on the dataflow have field layouts. Field layouts can be either flat or hierarchical (tree layouts). Depending on the layout type, the field layout is displayed as a flat list or a hierarchy of fields inside the object box. The following is an example of a flat field layout.
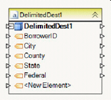
Below is an example of a tree field layout.
To navigate a tree-field layout, expand or collapse the tree nodes as needed using the + or - icons.
There are four ways to create a field layout for your object.
1. Auto populate the field layout based on a source’s content. For example, for a source delimited file, Centerprise will read the file to derive the field layout including the data type of each field.
2. Create the field layout based on the layout of another object on the dataflow (Note: This does not apply to source objects).
To create a field layout based on another object’s field layout, grab the node output port of the object whose layout you wish to replicate and drop it on the node input port of your object. This action will also map all fields inside the node (including child nodes) between the two objects.
Using this feature, you can create field layouts for the entire tree or a selected node only.
NOTE: This feature is available only for nodes with no fields added yet. To clear a node that already has fields, right click on the node and select Remote All Elements. This action will also unmap all fields inside the node (including child nodes) between the two objects.
3. Add a single field to the layout by dropping the field on the **
4. Manually create or edit a field layout by opening an object’s properties and going to the appropriate field layout screen (Source Fields screen for source objects, and Destination Fields screen for destination objects). Here you can also change field data types, the order of fields, and specify null/not-null properties, among other actions.
Copying Field Layouts
You can copy an entire layout from one object and paste it into another object on the same or different dataflow. This way you can quickly replicate a set of fields between two objects.
To copy a field layout, right click a node in the object whose layout you want to copy and select Copy Layout from the context menu. Then, right click a node in the target object and select one of the following options from the context menu:
Paste Layout (Add Member) – will add a new node to the existing layout keeping existing structure unchanged
Paste Layout (Replace) – will replace the existing layout with the layout being copied
Paste Layout (Add Elements) – will add fields to the existing layout keeping existing fields unchanged.
Deleting Fields
To delete a field from the layout:
Either right click on the field inside the object’s box and select Remove Element. (Note: This function is not available for source objects)
Or open the object’s properties, go to the appropriate field layout screen and remove the field from the grid by selecting the field and pressing the DEL key on the keyboard.
General Options
The General Options screen shares the options common to most objects on the dataflow. This screen is the right-most screen in an object’s properties dialog. The options it provides are described below.
Clear Incoming Record Messages
When this option is on, any messages coming in from objects preceding the current object will be cleared. This is useful when you need to capture record messages in the log generated by the current object and filter out any record messages generated earlier in the dataflow.
The Comments input allows you to enter comments associated with this object.
Tools for Previewing and Monitoring Dataflow
The dataflow user interface provides the following tools that are helpful in previewing, debugging and monitoring your dataflow.
Job Progress
The Job Progress window displays status of the dataflow as it is being executed. This window also provides links to any error log files and the data profiler files. You can view these files by clicking the appropriate links.
You can view the Job Progress window by clicking View>Job Progress or using the shortcut key Ctrl+Alt+T.
Data Preview
The Data Preview window displays a sample of records for the selected object. You can view the Data Preview window by clicking View> Data Preview or using the shortcut key Ctrl+Alt+P.
You can also right click on any object’s properties and select Preview Data from the context menu.
Quick Profile
The Data Statistics window displays statistical information for a sample of records from the selected object. You can view the Data Statistics window by clicking View>Quick Profile or using the shortcut key Ctrl+Alt+A. You can also right click on any object’s properties and select Quick Profile from the context menu.
Verifying Dataflow
Verifying a dataflow will list any errors or warnings present in the dataflow design. Correct any such errors or warnings and verify your dataflow again to ensure there are no errors.
To verify a dataflow, click the icon on the main toolbar. Verification results will be displayed in the Verify window.
To stop verification while it is still in process, click the  icon on the Verify Window toolbar.
Running Dataflow
To run your dataflow, click the  icon on the main toolbar. The dataflow will run on the server that is selected in the Server Input on the main toolbar.
To stop a dataflow that is currently running, click the  icon on the Job Progress Window toolbar.
Dataflow Examples
Example 1. Simple dataflow reading source tables using a multi-table query and inserting records to an Oracle database table. The data is transferred ‘as is’ with no additional transformations, using direct mapping between source and destination fields.
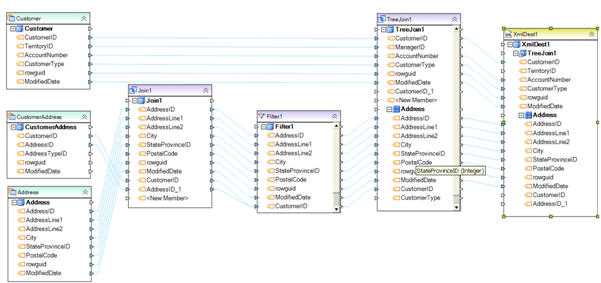
Example 2. Complex dataflow. This dataflow reads data from several related tables storing customer data. The CustomerAddress source table and Address source table are joined on AddressId field to derive the joined record, which is then sent to a filter object to discard records not meeting the filter criteria. The resulting record set is then joined with the Customer record to create a hierarchical structure, with Customer data stored at the parent node and the customer address entry stored at the child node level. The entire structure is written to an XML file.
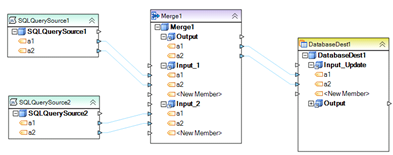
Example 3. A simple dataflow merging records from two SQL queries and writing the merged records to an SQL Server 2008 database table.
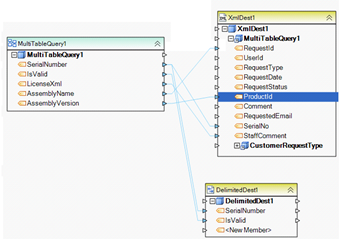
Example 4. This dataflow performs parallel writes to an XML file and a delimited file. Both destination files are fed by a single multi-table query, although different field maps are used between the source and the two destinations.
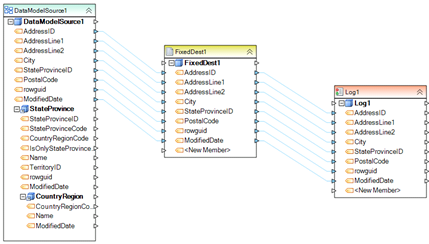
Example 5. This dataflow transfers data between a source data model and a fixed-length file destination. A record-level log capturing the status of each record is written to a separate log file.
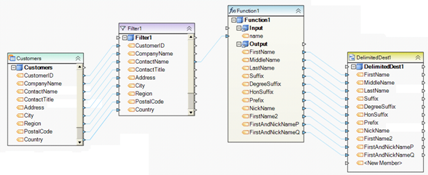
Example 6. This dataflow reads a Customer table, filters out records where PostalCode is greater than 79902, and sends the ContactName field to a name parse function (Function1), which parses the name and writes the parts of the name to a delimited file in a comma-delimited format.
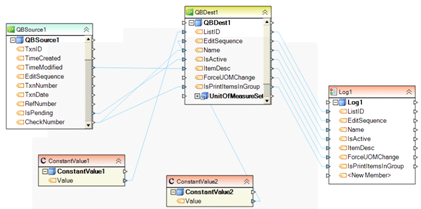
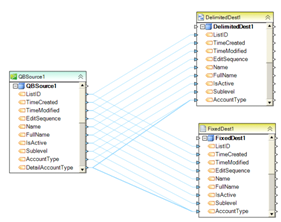
Example 7. This dataflow transfers records between two QuickBooks tables using custom mapping between source and destination fields. Two constant values are also written to ListID and EditSequence fields at the destination. The status of each record is captured by the log object.
Example 8. This dataflow performs parallel writes to a delimited file and fixed-length file from a single Quickbooks source table. Note that the two destinations receive exactly the same data as they share identical field maps.
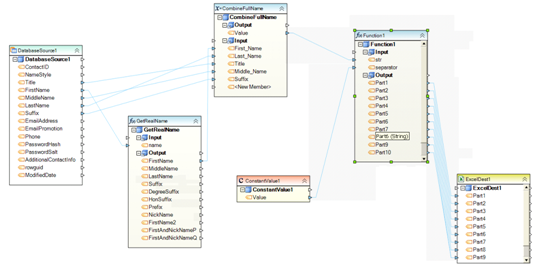
Example 9. Dataflow reads customer names from a database table, then applies a name parsing function and expression (GetRealName and CombineFullName) to create a full name using a naming standard. The full name is then split into fields using a string split function (Function1) and finally written to an Excel file.
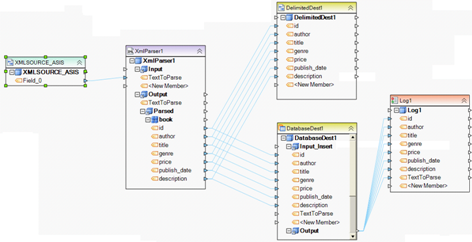
Example 10. This dataflow reads a single text stream containing an XML document. The XML parser processes the input stream and outputs the elements and attributes in the XML document, which are then written to a delimited file and a database table. A record-level log is also created to capture the status of each record as it is written to the destination database table.
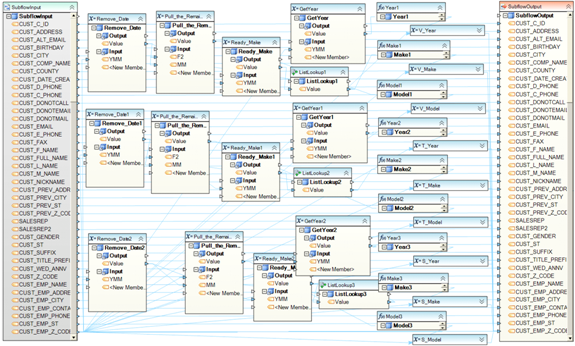
Example 11. This subflow contains some complex logic to process Dates. Most of the input fields are passed through with no additional processing from Subflow Input to Subflow Output. The Date fields, on the other hand, are processed using a set of expressions, Date functions, and lookup lists to create a custom Date representation as required by the application.
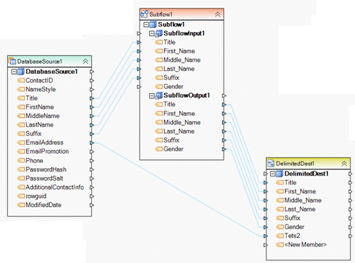
Example 12. This dataflow calls a subflow (Subflow1) to process customer names. The customer names are fed from a database table and passed to the subflow containing the name parsing logic. The parsed names coming out of the subflow are written to a delimited file. The subflow acts as a black box, hiding the inner logic from the calling dataflow. This design simplifies the overall visual diagram, allowing the architect to focus on what the subflow does instead of how it does it.
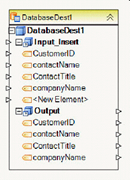
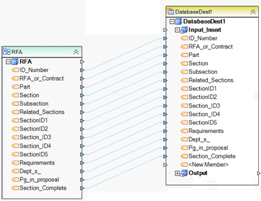
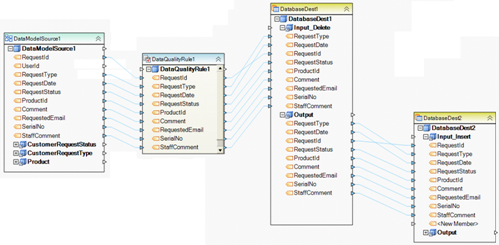
Example 13. This dataflow reads a set of related database tables using a multi-table query (aka data model). It then applies a data quality rule to filter out unwanted records from the parent source table. The remaining records are deleted from a destination table (this is achieved by mapping to the Input_Delete node on the destination database object). Finally, the records are also inserted into a second database table (DatabaseDest2 object).
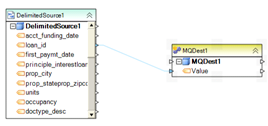
Example 14. A simple dataflow reading two delimited files. A single field loan_id is read from the first source and written to a private message queue (MQDest1). The field is fed to the message queue ‘as is,’ since there are no additional transformations as it travels from source to destination.
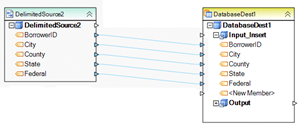
In contrast, all fields are read from the second source and then inserted into a database table. As with the other source, the fields are written ‘as is,’ since they are connected from source to destination using direct maps.
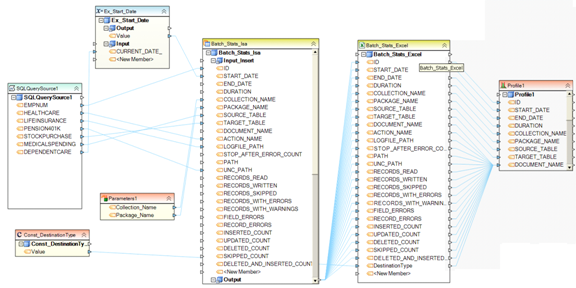
Example 15. This dataflow reads database data using a custom SQL query (SQLQuerySource1). The fields are then written to a DB2 table. Additional processing is applied to the DEPENDENTCARE field using a custom expression (Ex_Start_Date) object. A constant value is written to SKIPPED_COUNT field and dynamic parameter values for Collection_Name and Package_Name are written to their corresponding destination fields. The same record is also written to an Excel file. A data profile is created by the Profile1 object to capture the status of each record, including any successes, errors, warnings, or other conditions.
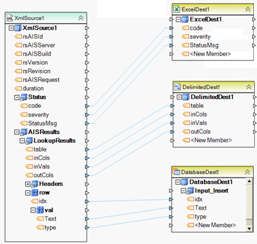
Example 16. This dataflow transforms a hierarchical XML source into three flat destinations: an Excel file, a delimited file, and a database table. No additional processing or transformations are applied to the fields, as they are written to a destination (the fields are mapped using direct mapping). Notice that each destination receives data from a different node inside the hierarchical source structure. As a result, there will likely be a different number of records written to each destination. Also notice that the database destination table receives fields from two nodes: row and val, in fact creating a join of sorts on the incoming data.
Example 17. This simple dataflow reads the contents of each file from the selected folder and writes it to a database table. The entire stream containing a file’s content is written to the Value field in the destination table. An additional field FullPath is used to store the network path of the file whose content is being written to the Value field in the table. The reading of the file’s content is done by the built-in ReadFileBytes function. This function accepts the file path as the input parameter and returns the file’s content in its output Value.

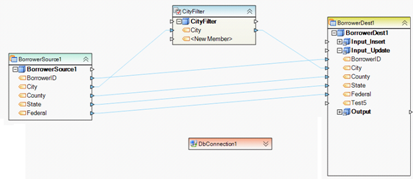
Example 18. This dataflow reads a database table, filters records with City = ‘Los Angeles,’ and updates those records in a destination database table. The source database connection is managed by a shared connection object DbConnection1. This setup lets the user quickly update the connection as needed when deploying the dataflow in a new environment.
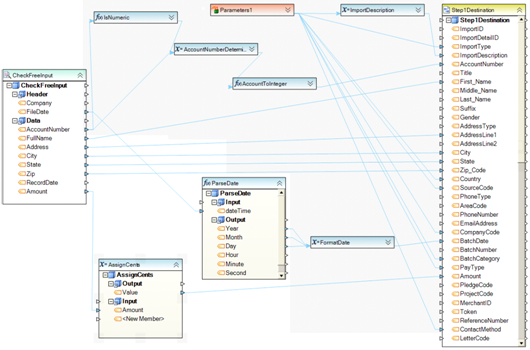
Example 19. This dataflow reads a report file and applies a set of expressions and built-in functions to process the AccountNumber, FileDate, and Amount fields. A set of parameters with default values is configured to feed into the ImportDescription expression, as well as write directly to several destination fields. The AccountNumber field is processed by the IsNumeric function to determine whether it is a number and then converted to the Integer data type before being written to the AccountNumber destination. The FileDate field is processed by the ParseDate function, which extracts the Year, Month, and Date from the date value. The output of the ParseDate function is fed into the FormatDate function to convert the date to a desired format. Finally, the transformed values are written to a delimited file using a custom field-to-field mapping.
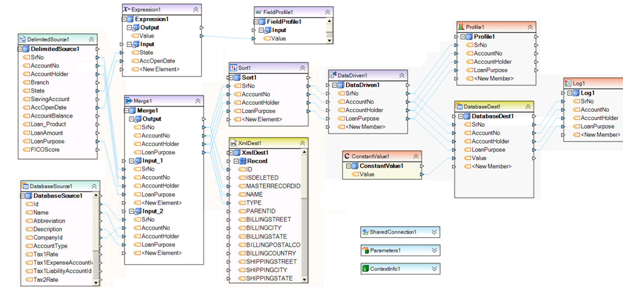
Example 20. In this dataflow, data comes from two sources: a flat file and a database table. The incoming data from the two sources is merged into a single record set, which is then sorted and processed by a database write strategy that controls what action, such as insert, update, delete, or something else, should take place for each record going into the destination database table. A designated field in the destination database table also receives some constant value for all records coming from the database write strategy.
The data from the two sources is also fed into a second destination, which is an XML file. The XML file receives a snapshot of all records merged from the dataflow sources. The records are written to the XML file unsorted, just as they are output by the Merge object.
Two types of logs are present in the dataflow to ensure logging and profiling of the data. A record level log collects the status of records created by the database write strategy. A data profile object also captures the summary and statistical data for the values going into the destination database table. Finally, an expression is applied for some of the source values and the expression result is collected by a field profile object, which makes it easy to preview statistics at dataflow design time for quality control or debugging purposes.
Also present on the dataflow is a shared connection, which makes it possible for the database connection to be reused by other objects, if needed. Finally, parameters and ContextInfo objects provide additional context information, such as server name or user account running the dataflow.