Building a Data Warehousing Architecture for an HR Department
Astera Data Warehouse Builder provides an open-ended platform that allows users create a data warehousing architecture based on their requirements. Users can either build a data warehouse from scratch to enable historical analysis for future transactions or take existing historical data and build an architecture around it.
In this article, we will be observing a use case where an HR department wishes to move its data from Excel sheets to an automated data warehousing environment.
Use Case
In this use case, the HR department of a fictitious company has a vast dataset that comprises numerous Excel sheets. These sheets are maintained manually and include the following datasets, to name a few: Employees, Departments, Expenses, Currency, etc.
These Excel sheets are logically related to each other but there are no formal relationship links between them. Therefore, it is impossible to perform any analysis for reporting. Moreover, some of these sheets already contain historical data, which is updated and maintained manually. For further clarity, here is a look at a portion of the Excel sheet containing employee data:
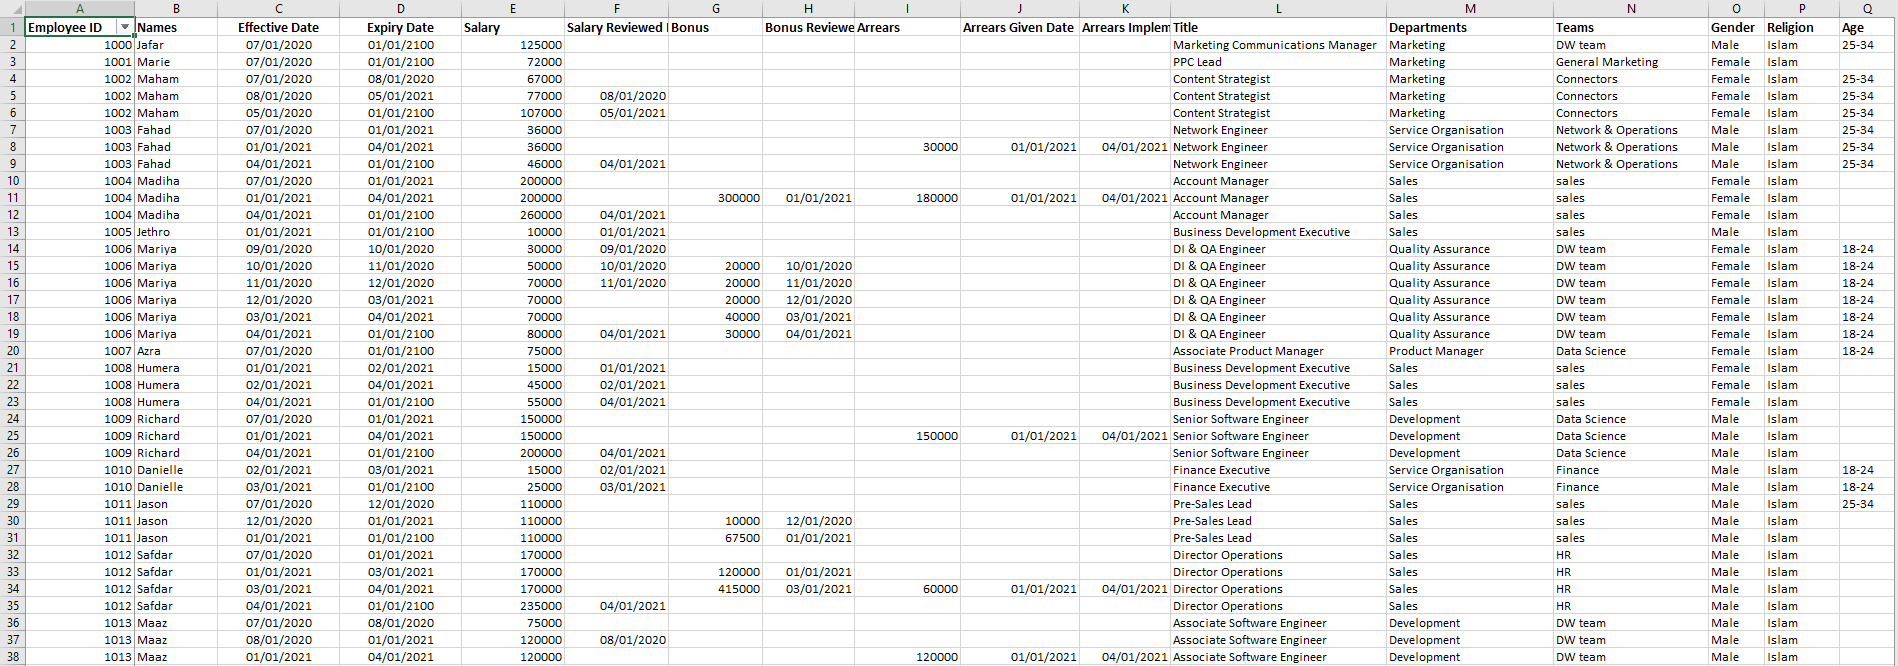
You’ll notice that there are multiple records for a single employee, which shows that each employee’s history has been maintained within the sheet. Our goal is to move all of this data to a data warehousing environment, and then automate the process of keeping track of historical data.
In this unique situation, let’s take a look at the process we’ve followed to design, develop, and maintain a data warehouse for this HR department, using Astera Data Warehouse Builder.
Step 1: Design a Dimensional Model
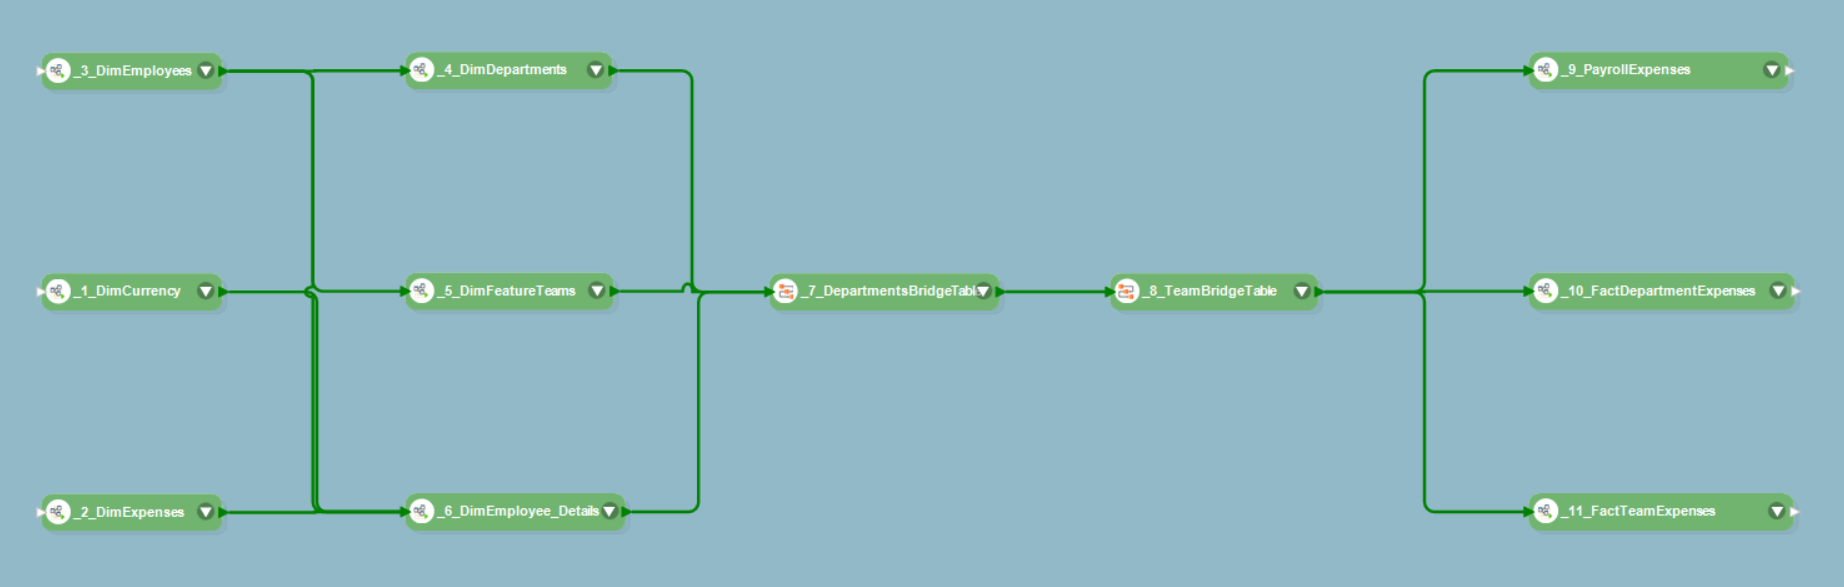
Since all of the source data is contained in Excel sheets and comprises of historical data, there is no need for a source model in this particular situation. Hence, our first step would be to design a dimensional model from scratch. Here is the model that we’ve designed:
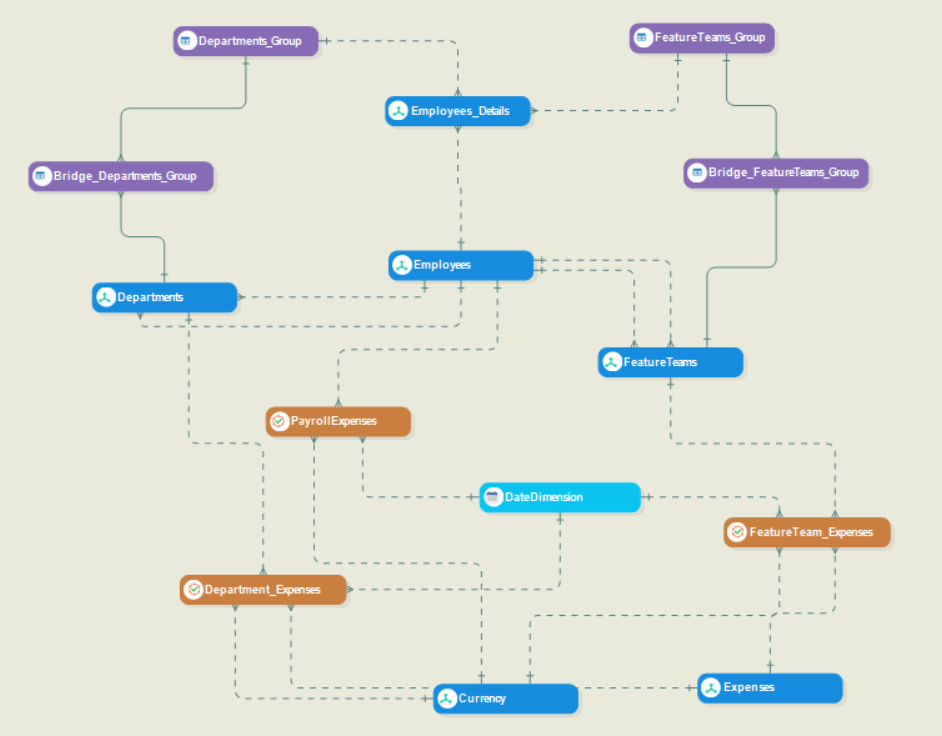
As you can see, this model represents a snowflake schema that contains the following:
- Three Fact Entities
- Six Dimension Entities
- One Date Dimension Entity
- Four General Entities
We’ve created this model from scratch by:
- Adding and configuring new entities via the Entities object in the data model toolbox.
- Creating relationships between these entities via the Link Entities to Create Non-Identifying Relationships and Link Entities to Create Identifying Relationships options in the data model toolbar.
To learn about how you can create a data model from scratch, click here.
After configuring the entities in this model and establishing the relations between them, we’d successfully created the structure for our dimensional model. The next step was to assign dimensions and fact entity types and pick appropriate dimension and fact roles for the fields in each of these entities. To learn about how you can convert a data model into a dimensional model, click here.
Dimension Entities
Let’s take a look at the layout of two dimension entities in this model: Employees and Employees_Details. As you can see, these two entities are related to each other in the model.
Employees
Here is the layout of the Employees entity:
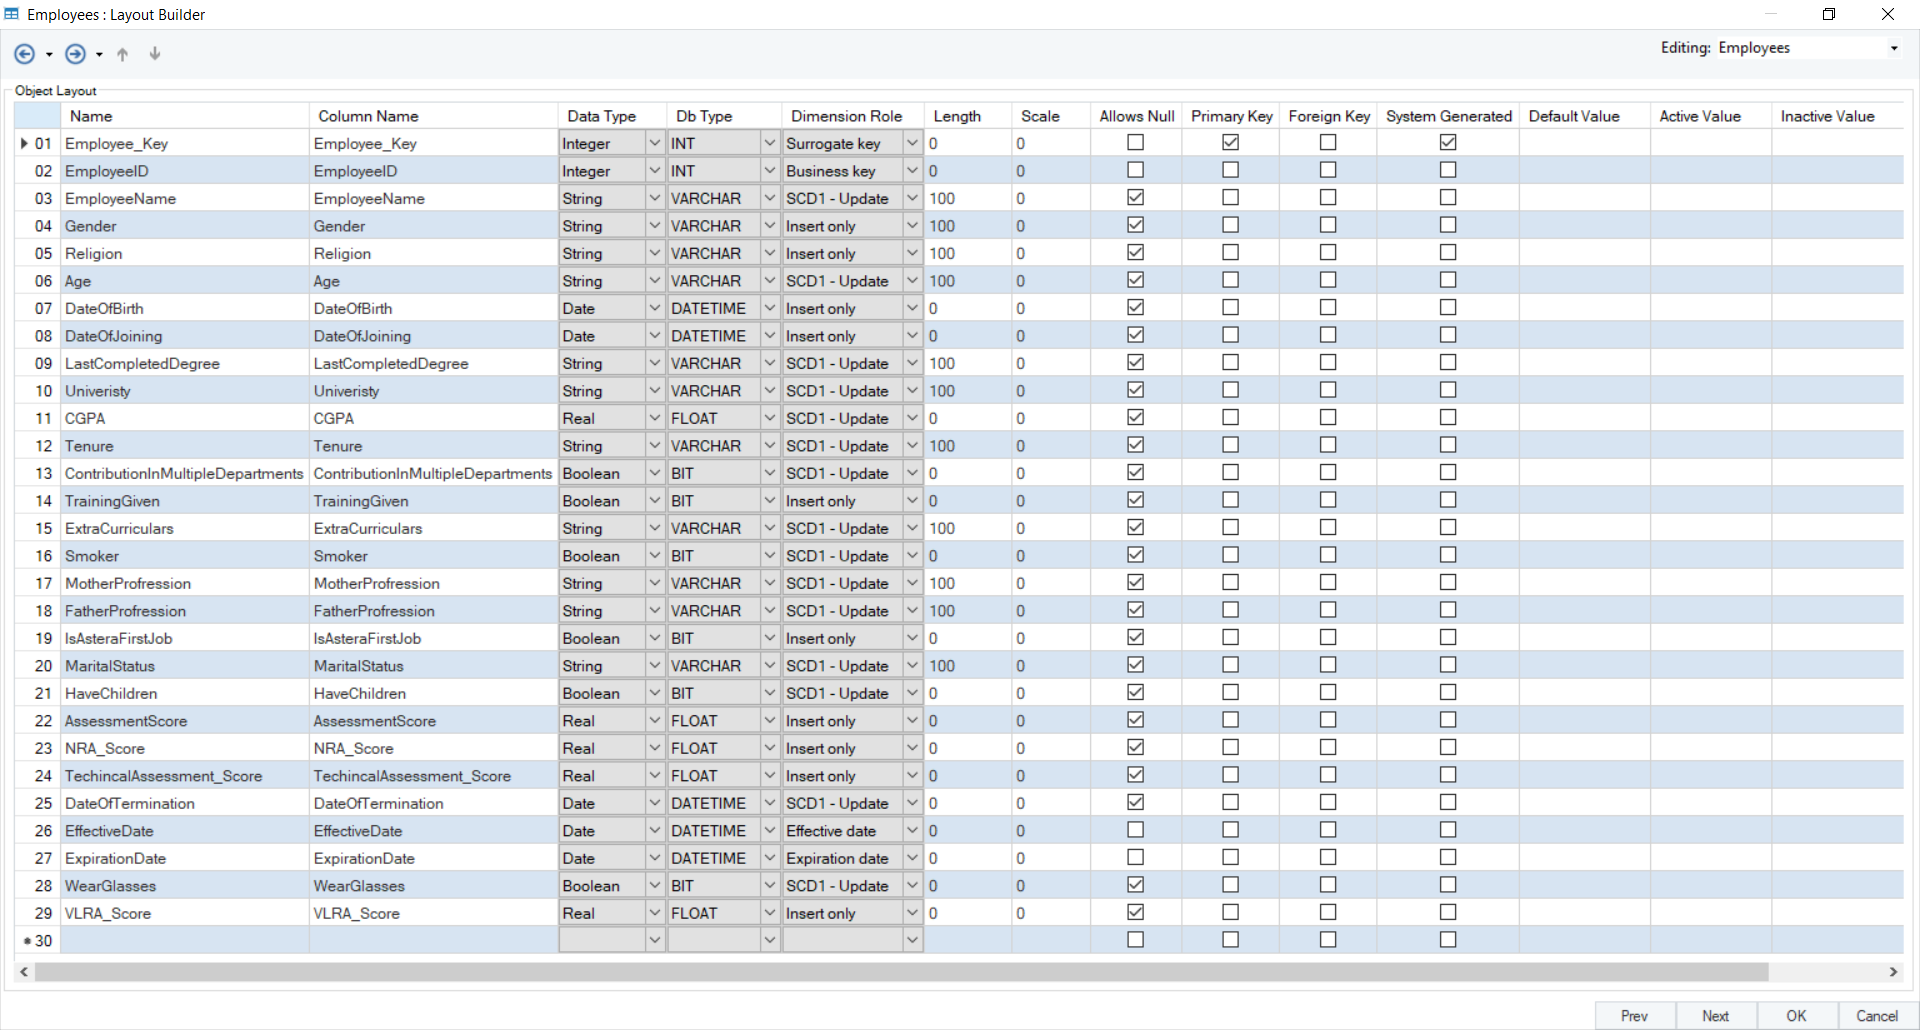
Here, you’ll notice that all the only SCD type that has been used for the fields in this entity is SCD1. This is because there is no need to keep track of historical data for these fields. From a logical standpoint, there is no need to keep track of any changes in the Gender, Age, Religion, and CGPA fields. The same reasoning applies to all of the other fields that have been assigned the SCD1 role.
Employees_Details
Here is the layout of the Employees_Details entity:
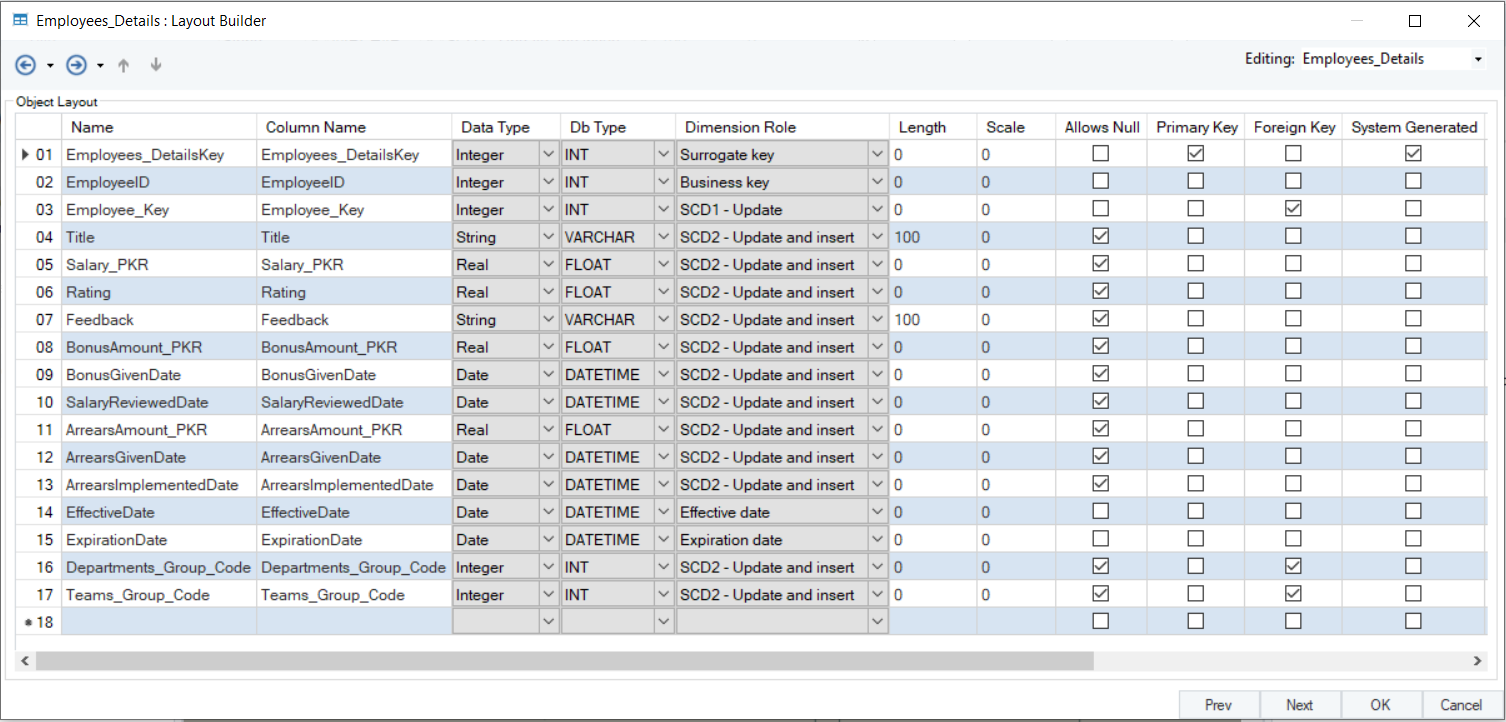
In this entity, most of the fields have been assigned the SCD2 role because there is a need to record historical data. Let’s take the Title field as an example. An employee’s title can change unpredictably and should therefore be kept track of.
Fact Entities and Date Dimension Entity
Let’s take a look at the layout of the Payroll_Expenses fact entity.
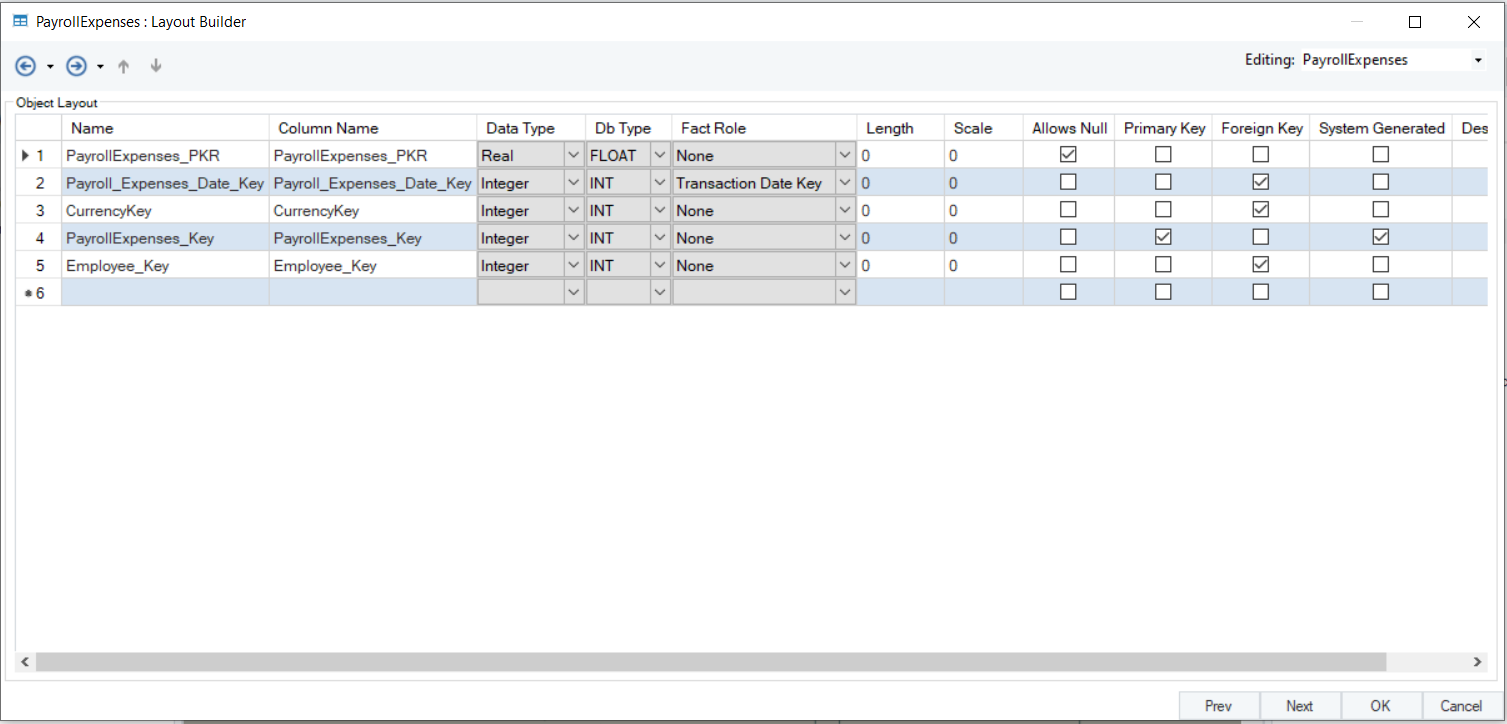
Here, the Payroll_Expenses_Date_Key field has been assigned the Transaction Date Key role. This field acts as a foreign key in the relation between this fact entity and the date dimension entity in the model.
General Entities
The general entities in this model represent bridge tables that have been used to link two dimension entities to each other.
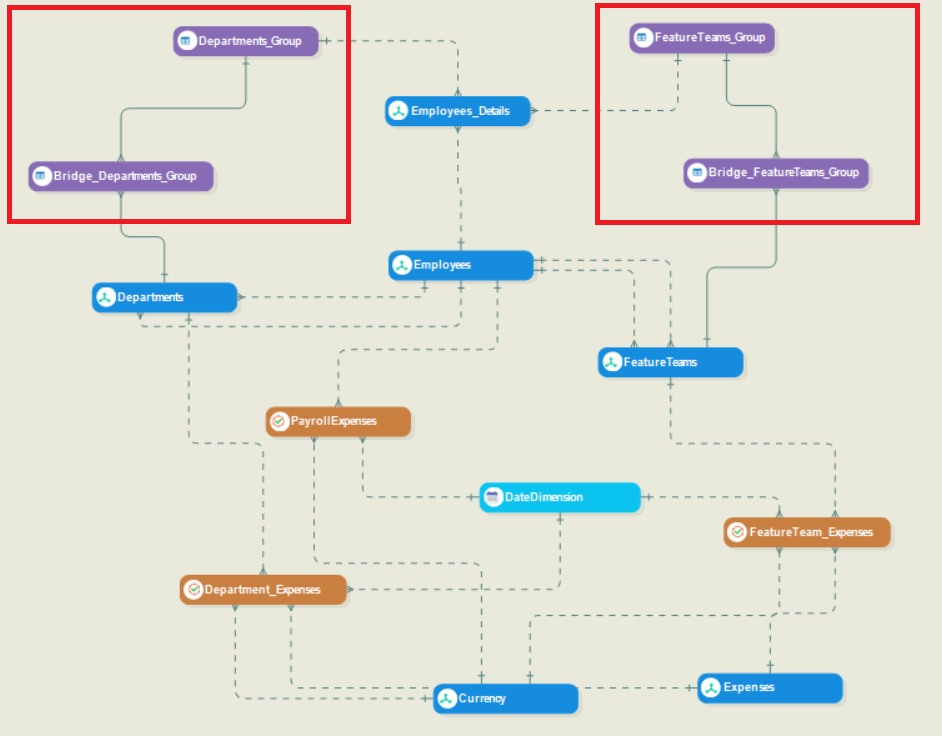
Bridge tables are needed here to establish a many-to-many relationship between the two dimension entities in question. As an example, let’s take a look at the relationship between the Departments and Employees_Details entities. One employee can be part of multiple departments and one department can have multiple employees in it. Hence, there is a many-to-many relationship between them.
Once the dimensional model is ready, we’ll verify it to check for any errors and warnings. After that, we’ll deploy it to the server for usage.
Step 2: Populate and Maintain the Data Warehouse
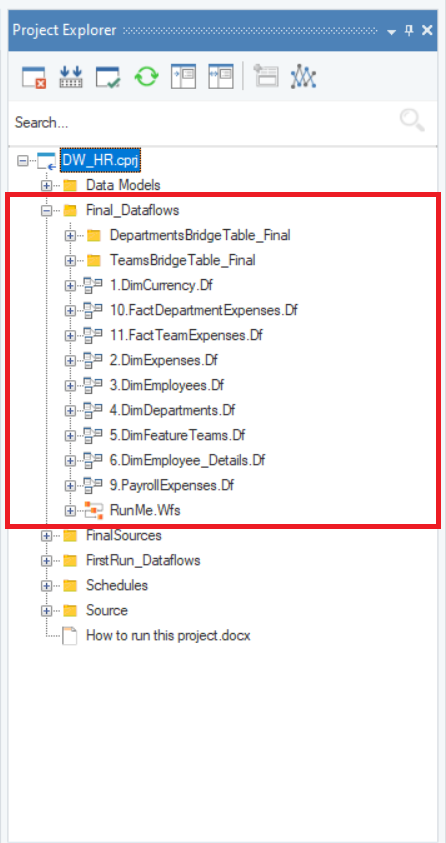
Since the source data, in this case, already contains historical records, there are two separate sets of flows that we’ve created to populate and maintain/update the data warehouse, respectively. But before we move towards the actual dataflows, here is a look at the project that contains all of the items needed to execute this data warehousing process:
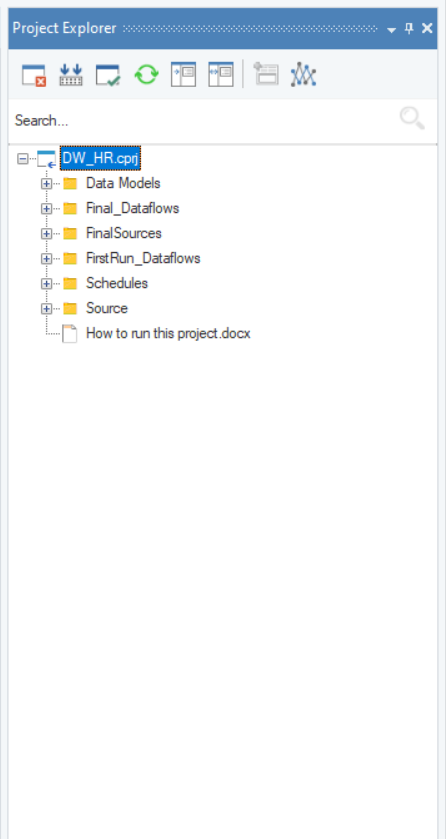
Here, there are two folders that contain dataflows: FirstRun_Dataflows and Final_Dataflows.
The dataflows present in the FirstRun_Dataflows folder are used to dump all of the source data into the data warehouse right after it is created.
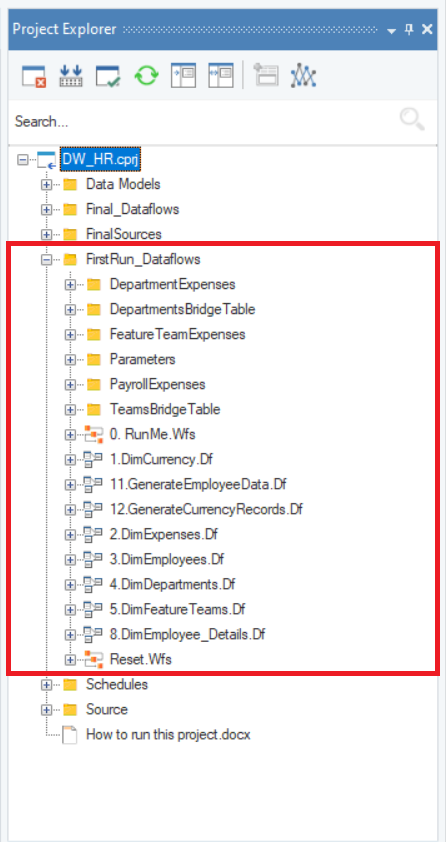
On the other hand, the dataflows present in the Final_Dataflows folder are used to update the data warehouse at regular intervals.
First Run Dataflows
Let’s take a look at the DimEmployee_Details dataflow in the FirstRun_Dataflows folder. As the name suggests, this dataflow is designed to populate the Employee_Details table in the data warehouse.
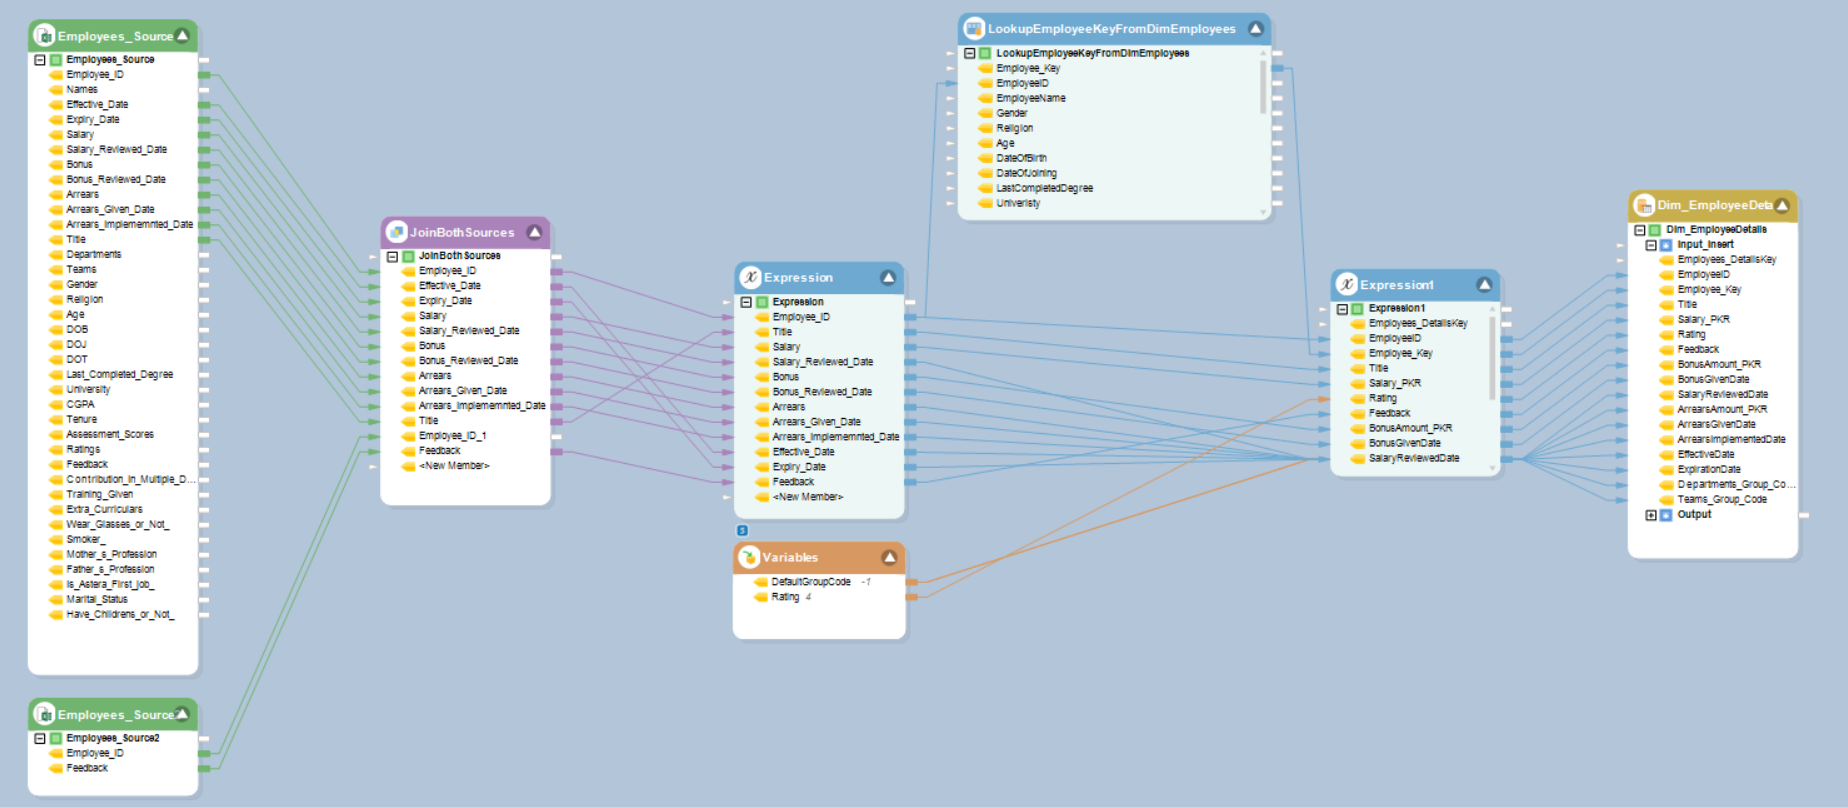
Here, we’ve extracted data from two source Excel sheets via Excel Workbook Source objects and joined them together using the Join transformation object. After that, we’ve used a couple of Expression objects to add some new fields to the table. Between the two Expression objects, we’ve used a Database Lookup object to find each employee’s key from the original Employee table and add it to the Employee_Details table.
Finally, we’ve used a Database Table Destination object to load data into the dimension table. Notice that even though the destination is a dimension table, we have not used the Dimension Loader object in this dataflow. The purpose of this dataflow is only to dump data into the destination once. Since there is no need to keep track of historical data, dimension roles do not need to be taken into account. Therefore, a simple Database Table Destination object is enough to complete the job successfully.
Upon running this dataflow, the source data from employee dataset will be written to the dimension table. Since this is a one-time job, we will not be needing this dataflow for any further processing.
Final Dataflows
Now, let’s have a look at the DimEmployees dataflow in the Final_Dataflows folder of the project. The purpose of this dataflow is to maintain and update data in the Employees dimension table.
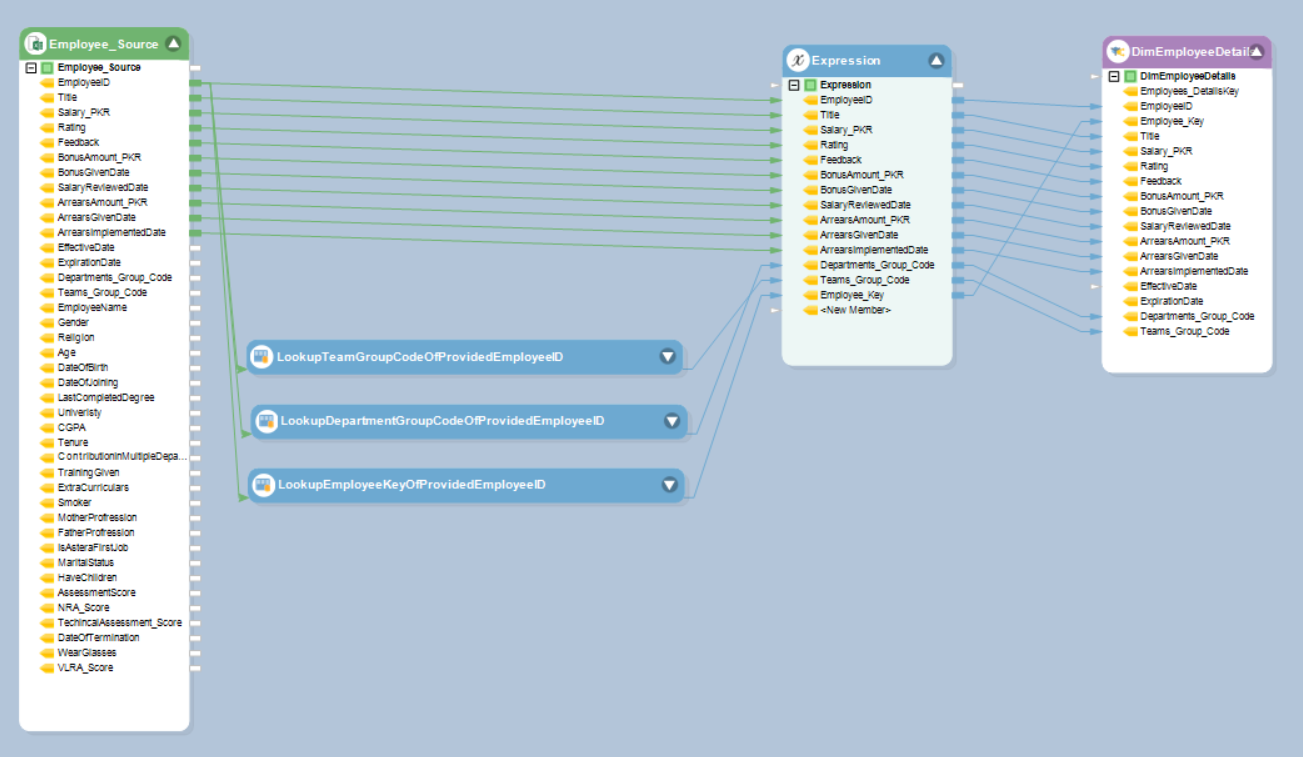
Here, we’ve simply extracted data from the source Excel sheet and then used an Expression object to add some new fields to the dataset. Moreover, we’ve used three Database Lookup objects to search for and add values to these new fields. Our main focus, however, is on the Dimension Loader object that has been used as a destination in this dataflow.
The Dimension Loader object is connected to the deployed dimensional model and takes all of the assigned dimension roles into account when updating and maintaining data in the destination table. Here is a look at the Layout Builder screen in the properties of the Dimension Loader object:

You can see that the Dimension Role for each field, as assigned in the dimensional model, has been identified by the Dimension Loader object. Since this dataflow will be used for all further processing of data in the Employees table, the proper identification and implementation of these roles is pivotal in keeping track of historical data.
Orchestration
We’ve designed a workflow to orchestrate the entire process of updating and maintaining data in the final data warehouse. Here’s what it looks like:
Not only does this workflow save a user from the hassle of executing each dataflow individually, but it also dictates the sequence in which the dataflows will be executed. For instance, dimension tables always need to be populated and updated before fact tables. Here, the dataflows that we created for dimension tables have been placed first in the sequence, followed by the bridge table dataflows, and then finally, the fact table dataflows.
To learn more about how you can use a workflow to orchestrate a data warehousing process, click here.
Automation
Finally, we’ve created a new schedule via the job scheduler, to automate the process of updating data in the data warehouse.
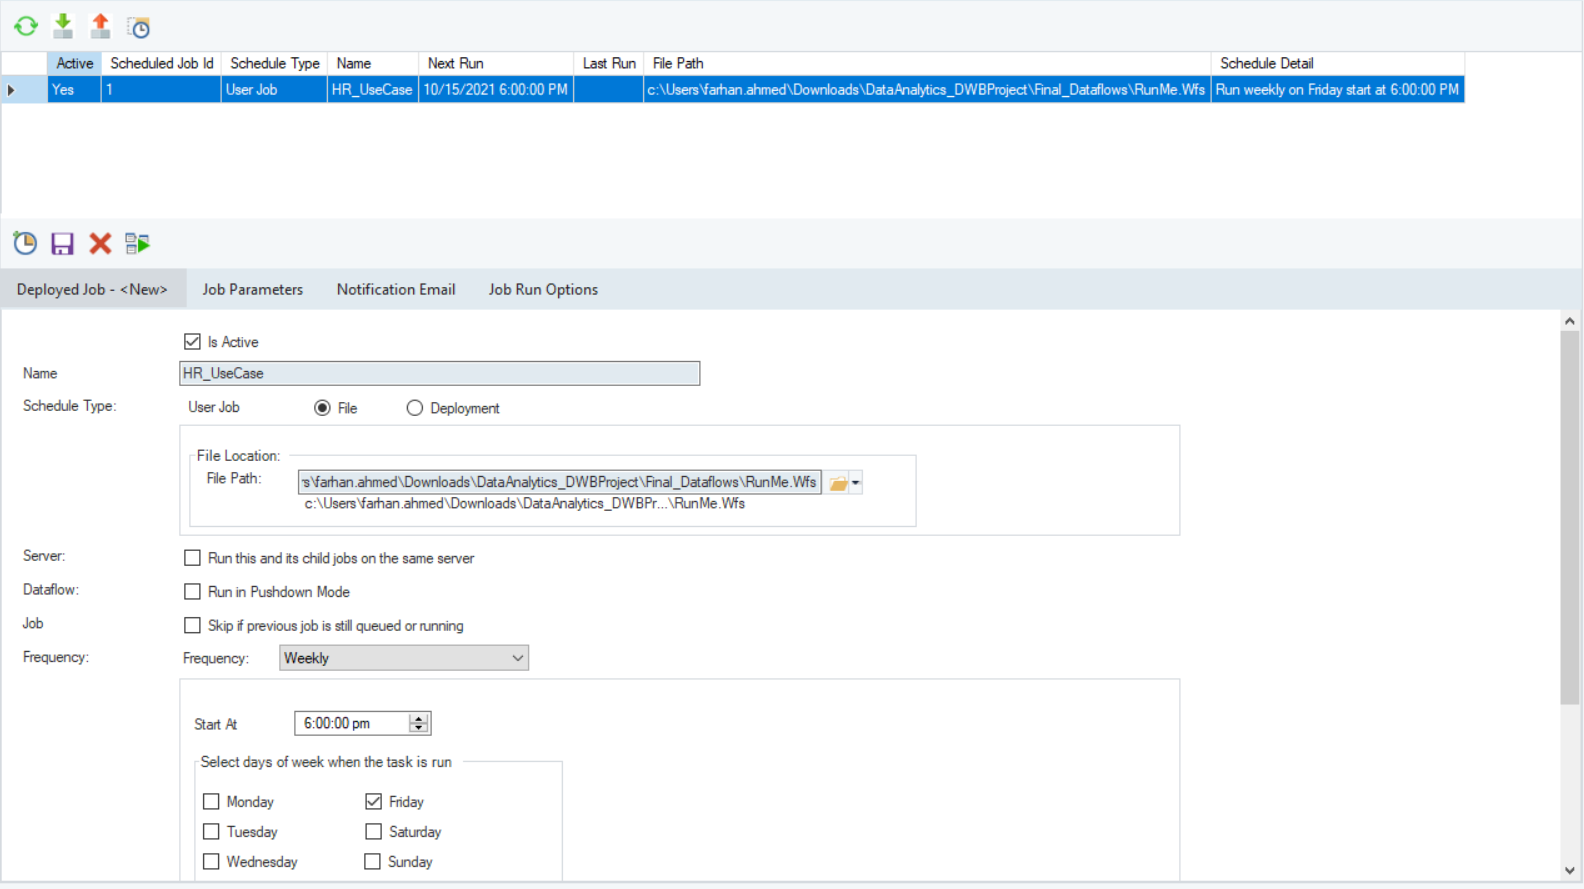
Here, you can see that we’ve scheduled our workflow to be executed on a weekly basis, every Friday at 6 pm. Now that this job has been scheduled on the server, it will be executed automatically at the assigned frequency. Therefore, the data warehouse will be updated automatically.
To learn more about how you can use the job scheduler to automate a data warehousing process, click here.
Step 3: Visualize and Analyze
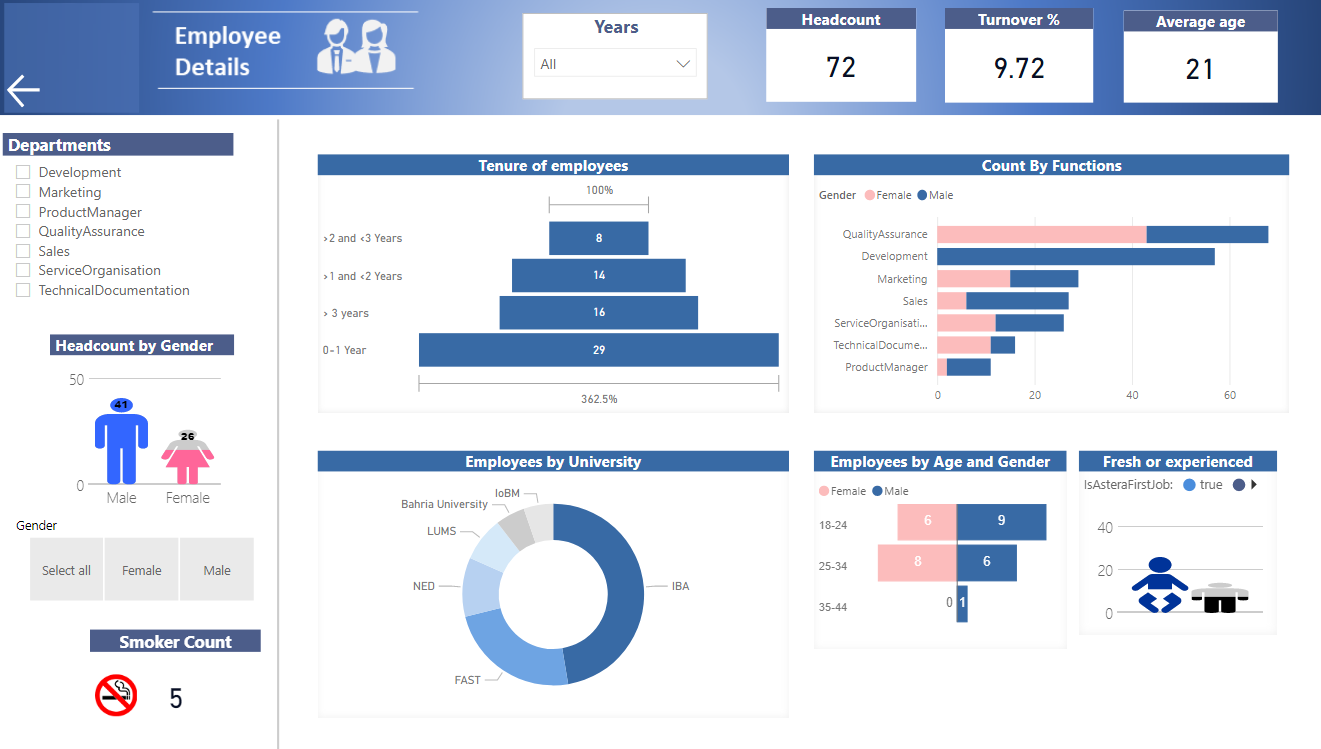
Now that the final data warehouse is ready, the HR department can integrate their data with industry-leading visualization and analytics tools like Power BI, Domo, etc. through Astera Data Warehouse Builder’s OData module. Here is a look at a sample dashboard that we’ve prepared for this use case:
This concludes our discussion on building a data warehouse architecture for an HR department using Astera Data Warehouse Builder.