Creating Workflows
Workflow Overview
A workflow enables automated and repeated execution of a sequence of tasks, such as running a program, sending email, uploading a file, running a transfer setting or batch, executing some SQL code, and many others. The tasks run according to some predefined path and following the custom logic that controls in what circumstances specific paths should be activated. You can add any number of tasks on a single visual workflow diagram, as well as specify what should happen at each step depending on whether the task completed successfully, or returned an error. You can also route the workflow one way or another by using Boolean conditions that are suitable for your scenario. You can even start another workflow, or a dataflow, to run within your main workflow.
A workflow can be created in a short time and with little effort by using a graphical user interface with a drag-and-drop capability. Centerprise workflow editor allows you to copy or move workflow tasks, source objects, or workflow parameters; change their properties, and do a number of other things, all of this with the capability of an unlimited undo-redo of any previous action.
A workflow makes it easy to visualize and implement complex sequences of tasks because pieces of a workflow can be used like ‘building blocks’. These building blocks can be pasted into a different workflow, or even into the same workflow, which allows you to quickly replicate tasks, or even sequences of tasks, with similar properties.
Objects can be added to a workflow in several ways, such as direct drag-and-drop of files from any Explorer window, drag-and-drop of tables or views from the built-in Data Source Browser, or by adding an object from the Flow toolbox.
A workflow that you create in Centerprise can run on local or remote servers. The workflow can also be ported to run in any number of target environments. This is achieved by using run-time Parameters, which change their values depending on the current context in which the workflow runs. Finally, to make sure that your workflow is continuously up to date with your changing environment, you can easily update data connections, such as server names, login credentials etc, throughout the entire workflow, using a single easy-to-use interface. This means that your workflow will stay in sync with the current requirements, even if the data connections have changed since the workflow was created.
Creating a New Workflow
To create a new workflow, go to File -> New -> Workflow on the main menu. Or you can expand the  dropdown on the main toolbar and select Workflow as shown below.

Using Workflow Designer
Adding Objects
A workflow always has at least one workflow task, and may have zero or more sources. Sources, workflow tasks, and resources are represented as objects on the workflow.
Depending on the type of object, an object can be added to the workflow in one of the following ways:
For Flat File Sources:
1. Using Drag-and-Drop. You can drag a file of the type listed below from an Explorer window and drop it onto an open workflow tab in Centerprise.
- Excel
- Delimited
- Fixed-Length File
The advantage of using drag-and-drop compared to other methods is that many of the object’s properties are pre-populated for you based on the file’s content. For example, the field layout is automatically filled out so that there is no need to manually create it.
Note: XML files cannot be added to a dataflow using the drag-and-drop method.
2. Using Toolbox. You can add a source object by selecting it from the appropriate category in the Flow toolbox.
For example, to add a source comma-delimited file object, expand the Sourcesgroup in the Flow toolbox, and the drag-and-drop the Delimited File Source tool on the workflow.
Note that an object added this way initially does not have any properties defined. To define its properties, double click on the object title, or right-click and select Properties from the context menu.
In the Properties screen that opens, select the File Path of the file that will be associated with the object. Field layout and other properties can then be populated based on the file’s content.
3. Copying and pasting an existing object from the same or different workflow or dataflow. If your source is already defined in the same or different workflow (or dataflow), you can copy the existing object and paste it into your workflow. The object being copied retains the properties of the original object, and is assigned a unique new name to distinguish it from the original object.
For XML Sources:
1. Using Toolbox. To add an XML source to the workflow, use the XML File Sourcetool in the Sources group in the Flow toolbox.
Note that the XML File object initially will not have any properties defined. To define its properties, double click on the object’s title, or right-click and select Properties from the context menu.
In the Properties screen that opens, select the File Path of the XML file that will be associated with the object. Additionally, please provide the path to the XSD schema that controls the layout of your XML file.
As with flat files, you can copy and paste an existing XML object from the same or different workflow or dataflow. The object being copied retains the properties of the original object, and is assigned a unique new name to distinguish it from the original object.
For Database Sources:
1. Using drag-and-drop. You can drag a database table or view from the Data Source Browser and drop it on an open workflow tab.
To open the Data Source Browser, go to View -> Data Source Browser. Connect to the appropriate server, then expand the Database tree and expand Tables (or Views) tree to select your table (or view). Drag-and-drop the selected table or view to the workflow.
By default, the database table is added as a Database Table Source object.
To add a data model source, press and hold ‘Ctrl’ key while dragging and dropping a table (or view) from the Data Source Browser.
As with files, you can copy and paste an existing database table object from the same or different workflow or dataflow. The object being copied retains the properties of the original object, and is assigned a unique new name to distinguish it from the original object.
For Any Other Types of Objects (for example, workflow tasks or resources objects):
1. Using Toolbox. You can add an object by selecting it from the appropriate category in the Flow toolbox.
Note that an object added this way initially does not have any properties defined. To define its properties, double click on the object title, or right-click and select Properties from the context menu.
2. Copying and pasting an existing object from the same or different workflow or dataflow. If your object is already defined in the same or different workflow (or dataflow), you can copy the existing object and paste it into your workflow. The object being copied retains the properties of the original object, and is assigned a unique new name to distinguish it from the original object.
Unlimited Undo/Redo
Workflow editor supports unlimited undo-redo capability. You can quickly undo or redo the last action done, or undo/redo several actions at once.
To undo the last action, open View menu and select Undo. You can also click the  icon on the Workflow toolbar. Or you can also use CTRL+Z shortcut.
To redo the last action, open View menu and select Redo. You can also click the  icon on the Workflow toolbar. Or you can also use CTRL+Y shortcut.
To undo several actions at once, select the first action you wish to undo from the  dropdown. The actions following the selected action will also be undone.
To redo several actions at once, select the first action you wish to redo from the  dropdown. The actions following the selected action will also be redone.
Copying Objects
Using the copy and paste feature, you can replicate an object on your workflow by copying it into a new object with a different name to distinguish it from the original object.
You can paste this object into the same workflow, or a different workflow.
You can also copy several objects at once. To do so, click the objects you wish to copy while pressing ‘Ctrl’ key. Or, you can draw a rectangle with your mouse while holding down the LEFT mouse button. The objects inside the rectangle will be selected. Right-click on a selected object and select Copy from the context menu. Then right-click on white space in the same or different workflow, and select Pastefrom the context menu.
To move an object, or a set of objects, use the Cut and Paste sequence similar to the one described above.
Note: When you move objects, they keep their original names.
Note: You can use CTRL+”C” shortcut to copy the selected object into the clipboard. CTRL+”V” will paste it from the clipboard. CTRL+”X” will cut it into the clipboard.
Managing Workflow Layout
Auto Layout
The Auto Layout feature allows you to arrange objects on the workflow improving its visual representation.
To invoke the Auto Layout feature, click the  icon on the Workflow toolbar. Or you can open Workflow menu and select Auto Layout.
Note: You can manually move the object around the workflow by holding the LEFTmouse button down over the object title, and moving it to a new location.
Zoom In/Zoom Out/Fit to Screen
The following tools are available from the Workflow menu to help you adjust the display size of the dataflow:
- Zoom In
- Zoom Out
- Fit To Screen
Additionally, you can select a custom zoom percentage using the Zoom % input on the Workflow toolbar.
Linking Objects
Ports
Any Workflow Tasks objects you add to the workflow will show Input and Output ports. Ports make it possible to connect an object to another object via links, creating the required workflow path.
The Input port on an object allows you to connect it to an upstream object on the workflow. Conversely, the Output port allows you to connect your object to a downstream object on the workflow. The downstream object representing a task will be processed after the upstream object it is connected to has finished running (with some exceptions, such as the Run Program task, which may not require waiting for the program to exit).
Source objects and Resources objects have no ports and cannot be linked to other objects on the workflow. These types of objects cannot be linked to any specific object as they provide values that can be used by any task throughout the workflow.
All source objects added to the workflow are used in Singleton mode only. A Singleton mode object only returns the first record of data (excluding the header) from the object. This makes it possible for you to get the values from the first record anywhere on the workflow, using the following notation: ObjectName.FieldName.
Similar to Source objects, Resources Objects such as Parameters or Context Info, provide parameters used throughout the workflow. Parameters have a similar notation of ObjectName.ParameterName.
Links
To create links between two objects, drag the Output port of the upstream object and drop it on the Input port of the downstream object.
To remove a link between two objects, right-click on the link and select Delete, or left-click on the link and press DEL key on the keyboard.
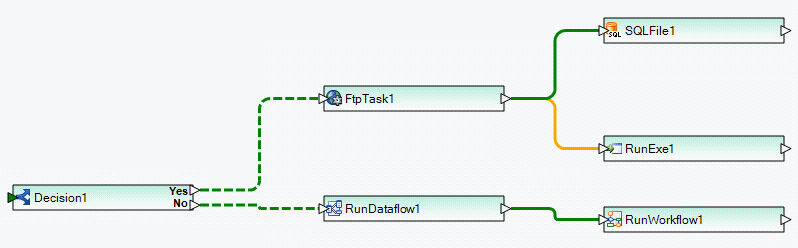
Note: By default, the link of Normal type is created between two objects. Normal link means that the downstream object will be processed in the event of a successful completion of the upstream object to which it is connected. Normal links are displayed in green.
In contrast, an Error link can be created between two objects, meaning that the downstream object will be processed only in the event of a failed (error) status of the upstream object to which it is connected. Error links are displayed in orange.
To change the link type, right click on the link and select Change Link Type.
An example of linked workflow tasks is shown below.
Setting Object Properties
To open an object’s properties, double click on the object’s title. Or right-click on the object and select Properties from the context menu.
Note: While in the Properties screen, you can switch to the Properties of another object on the workflow. To do so, select an object in the Editing dropdown.
The following functions are common for many types of objects on the workflow. These functions are available via the context menu.
Rename – renames the object.
Edit File – only applies to files. It opens the file for editing in a new tab.
Edit Schema – only applies to XML files. It opens the XSD file for editing in a new tab.
View Table Data – only applies to database tables. It opens the table for viewing in a new tab.
View Table Schema – only applies to database tables. It opens the database schema for viewing in a new tab.
Delete – deletes the object from the workflow. This will also remove any links to and from the object.
Cut – removes the object from the workflow and places it into the clipboard. The object can then be ‘pasted’.
Copy – copies the object into the clipboard leaving the original object as it is. A copy of the object can then be ‘pasted’.
Paste - pastes the object from the clipboard.
Verifying Workflow
Verifying a workflow will list any errors or warnings present in the workflow design. Correct any such errors or warnings, and verify your workflow again to ensure there are no errors.
To verify a workflow, click the window.
To stop verification while it is still in process, click the  icon on the Verify window Toolbar.
Running Workflow
To run your workflow, click the  icon on the main Toolbar. The workflow will run on the server that is selected in the Server input on the main Toolbar.
To stop a workflow that is currently running, click the  icon on the Job Progress window Toolbar.