
Upgrading Centerprise 6 to Version 7
Applies To:
- Centerprise 6
Upgrading The Database
Centerprise 7.6 is shipped with new features and functionalities that require an update to the Cluster Database used by the Integration Server. This article provides information on how to upgrade the Cluster Database for use with Centerprise 7.6.
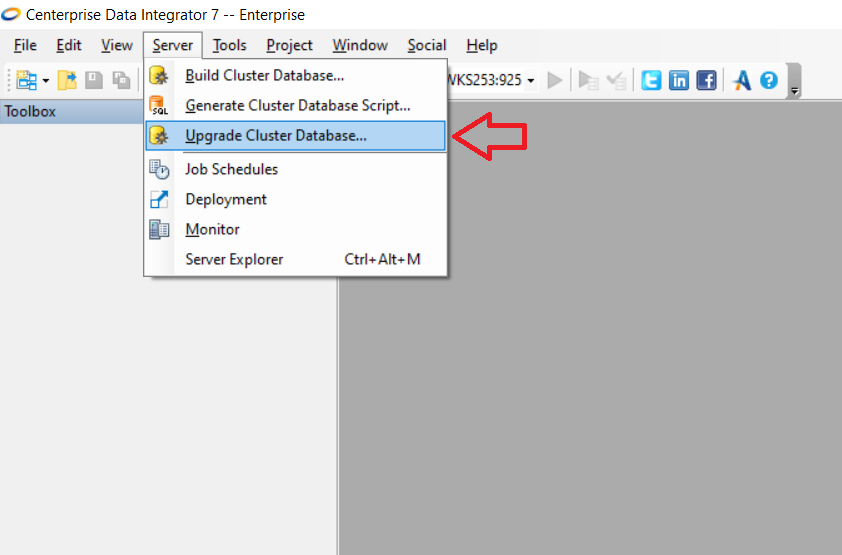
Automatic Cluster Upgrade Instructions
Centerprise can automatically perform an upgrade of an existing Cluster Database to version 7.6 with the Upgrade Cluster Database command.
Steps to Upgrade:
Install the most recent Centerprise Client (7.6).
Using the Centerprise Client, navigate to the main menu and select Server > Upgrade Cluster Database.
Connect to the Cluster Database with an older version.
Manual Cluster Upgrade Instructions
Prior to any upgrade, we strongly recommend that you take a full backup of your repository database. Also, upgrading a lower level environment first (such as QA, UAT, etc.) is recommended prior to upgrading the Production environment. This will make it possible to sort out/resolve any issues before upgrading Production.
Steps to Upgrade:
Steps to Upgrade:
- Using Centerprise 6 client, run the following dataflow to export existing schedules into a comma delimited file.
Note: Prior to running the dataflow, you will need to update the database source object to point to the database where Centerprise repository resides.
Download attached dataflow: Dataflow_ScheduleExport71
Take a note of any existing Cluster Settings. These are available by right clicking the cluster in Server Explorer. These settings will need to be re-configured manually after the upgrade. It may be helpful to take screenshots of those settings for later reference. The settings include: Staging Directory, Purge Job Frequency Options, Email Notification Setup, and optionally, Server Profiles if a non-default profile was used prior to the upgrade.

Run the Client installer and then the Server Installer to upgrade to Centerprise to 7.
Using Centerprise client, go to Server menu > Build Cluster Database. Point it to the database hosting Centerprise repository.
Important Note: This will reset the repository.
- Use the dataflow below to import the schedules you have exported in Step 1.
Note: Prior to running the dataflow, you will need to change the database destination object to point to the database where Centerprise repository resides.
Download attached example dataflow: Dataflow_ScheduleImport74
- Open Server Explorer, right-click your cluster and select ‘Cluster Settings’. Manually re-configure the relevant settings from Step 2. Optionally, manually reconfigure the Server Profiles setting if a non-default profile was used prior to the upgrade.
- Restart Centerprise server.
This completes the upgrade.
- Dataflow_ScheduleImport74.df (60 KB)
- Dataflow_ScheduleExport71.df (70 KB)